- PractiTest End-To-End Process
- PractiTest Entities and Modules
- Custom Fields
- Manage Time-Based Iterations with Milestones
- Dynamically Organize Your Data Based On Data Attributions/Fields
- Visualize Your Data Using Dashboards And Reports
PractiTest is an end-to-end test management platform. This means that it covers your entire QA process – Requirements, Tests, Test-runs, and Issues. Although you can work separately with each module, there is a significant added value to the interaction between the different entities of PractiTest. This interaction provides you with better visibility and control over your end-to-end QA & Testing process.
PractiTest End-To-End Process
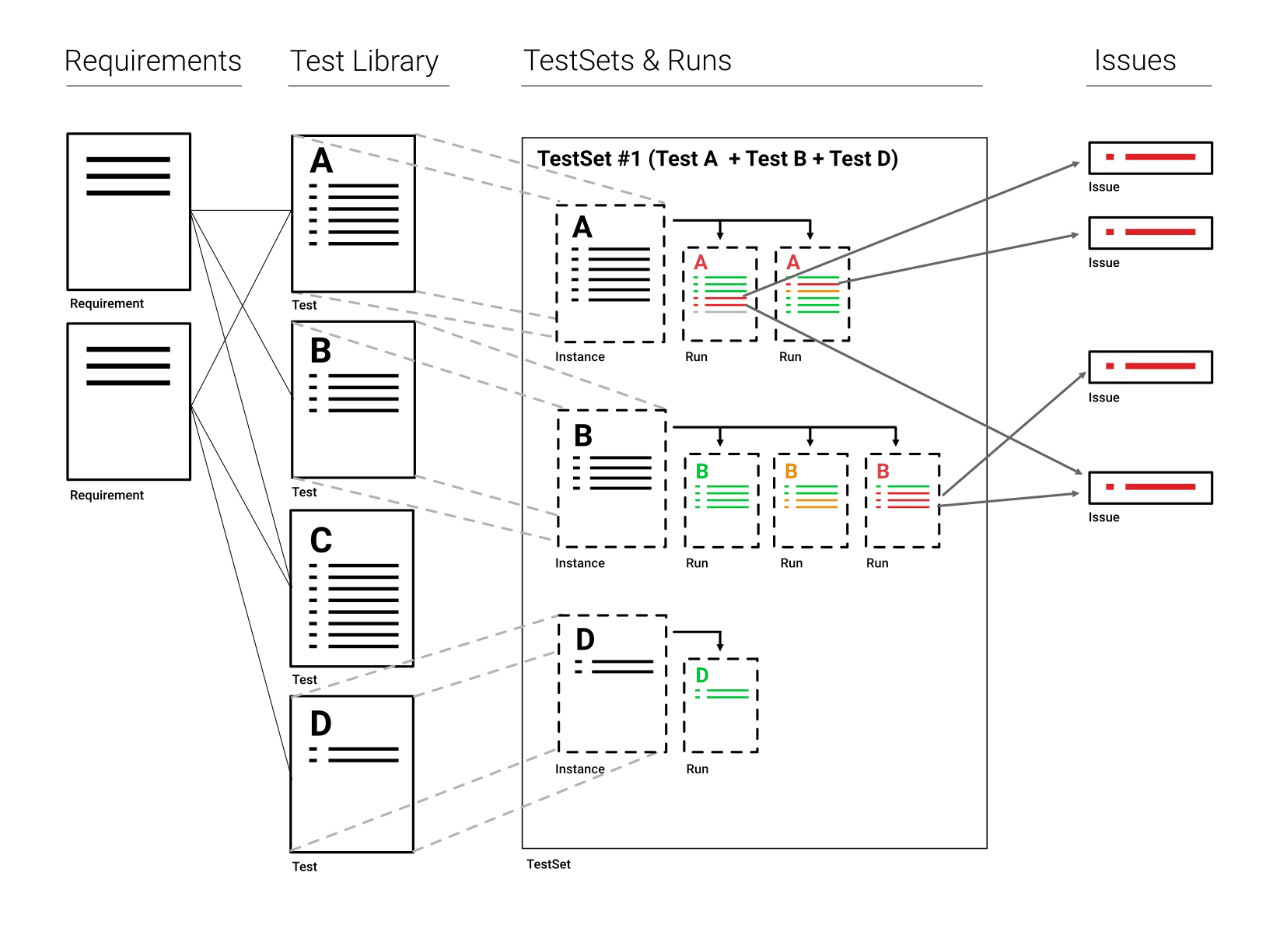
An effective Test-Management process works in the following way:
Before you start testing or even developing an application or service, you first need to know what the Requirements are. Requirements provide you with information about the application or system you will later test. For example, one of your system’s requirements can be “enable multiple logins”.
Next, based on the requirements you can design your Tests. In PractiTest, tests are stored in the test library which serves as a repository for all tests. Tests can be linked to the appropriate requirements to create traceability. If your requirement is “enable multiple logins”, the linked test might be “to check if you can log in with different users from the same machine or browser”.
This small test can be run as a part of a larger set of tests, for example – a regression test. In the “Test Sets & Runs” module, you can manage all testing execution-related artifacts and create Test Sets, groups of test instances. Instances are dynamic copies of tests that allow you to reuse the same test from the test library, multiple times. Each test can be reused in different test sets (you might want to test the multiple login feature in a regression test, a sanity test, and a smoke test). You can even use the same test instance several times in a single test set.
Once you have your test set ready, you can run all the relevant test instances, and report Issues from them. An issue can be a bug or an enhancement request. The issues you report during these runs will be automatically linked to the test instances they originated from. You can work with each module separately – for example, report an issue without linking it to a test. However, the traceability between the different modules helps you to keep track of your application and project’s status. All this information can be viewed later in multiple ways, such as reports and interactive graphs.
PractiTest Entities and Modules
-
Requirements – Where you store the definition of what your product should be or do. Requirements will serve as the base (or Test Oracle) to define what you should check as part of your verification process; this is why it is recommended you link the requirements and their respective tests (in the Test Library) to denote the traceability between the definition of the feature or attribute and the tests that verify it. In Agile-like methodologies, Requirements are defined as User Stories and even Epics.
-
Tests (in the Test Library) – These are your verification scenarios, that define what you want to check as part of your process. The Test Library serves as the repository, where you store and maintain your tests and the place from where you will choose the test instances to be executed in the Test Sets & Runs module.
-
Test Sets – A group of test instances that you want to run with a shared objective or characteristic (e.g they test the same area of the system, they will be run at the same time and maybe by the same person, etc).
-
Test Instances – An instance is a dynamic copy of the original test from the Test Library, in a Test Set. Each test in the Test Library can have multiple instances in different test sets, or even in the same one.
-
Runs – In PractiTest you can execute each test instance multiple times. Each execution will have a separate run, where all your steps and actual results are stored. Runs can be linked to issues in order to denote the traceability between the issue and the test where it was detected.
-
Issues – An issue can be a bug, a task, or an enhancement request. Issues can be linked to other issues, to requirements to denote that the requirement originated from an issue reported in the system, and to runs to show the scenario where the issue was detected.
-
Milestones - The project management module in PractiTest enables you to define high-level testing objectives with defined timeframes. It provides a quick and simple way to understand the overall status of your project and track its execution progress. Good examples of a Milestone can be a new Sprint or Version release. As a Milestone intended to facilitate testing cycle planning, you can link to its relevant Requirements, Test Sets, and Issues.
-
Project Info – An intrinsic part of your process is the way you display information to your stakeholders (product managers, testing peers, developers, etc). PractiTest provides you with multiple channels in order to display your testing information – Custom Reports that may be elaborate or very specific, a Dashboard allowing graphic representation of your system’s current state, and Hierarchical Filter trees turning entities grids to dynamic and interactive. You can also have a cross-entity view and manage the entities in your project in a Kanban-like board called the Task Board.
Custom Fields
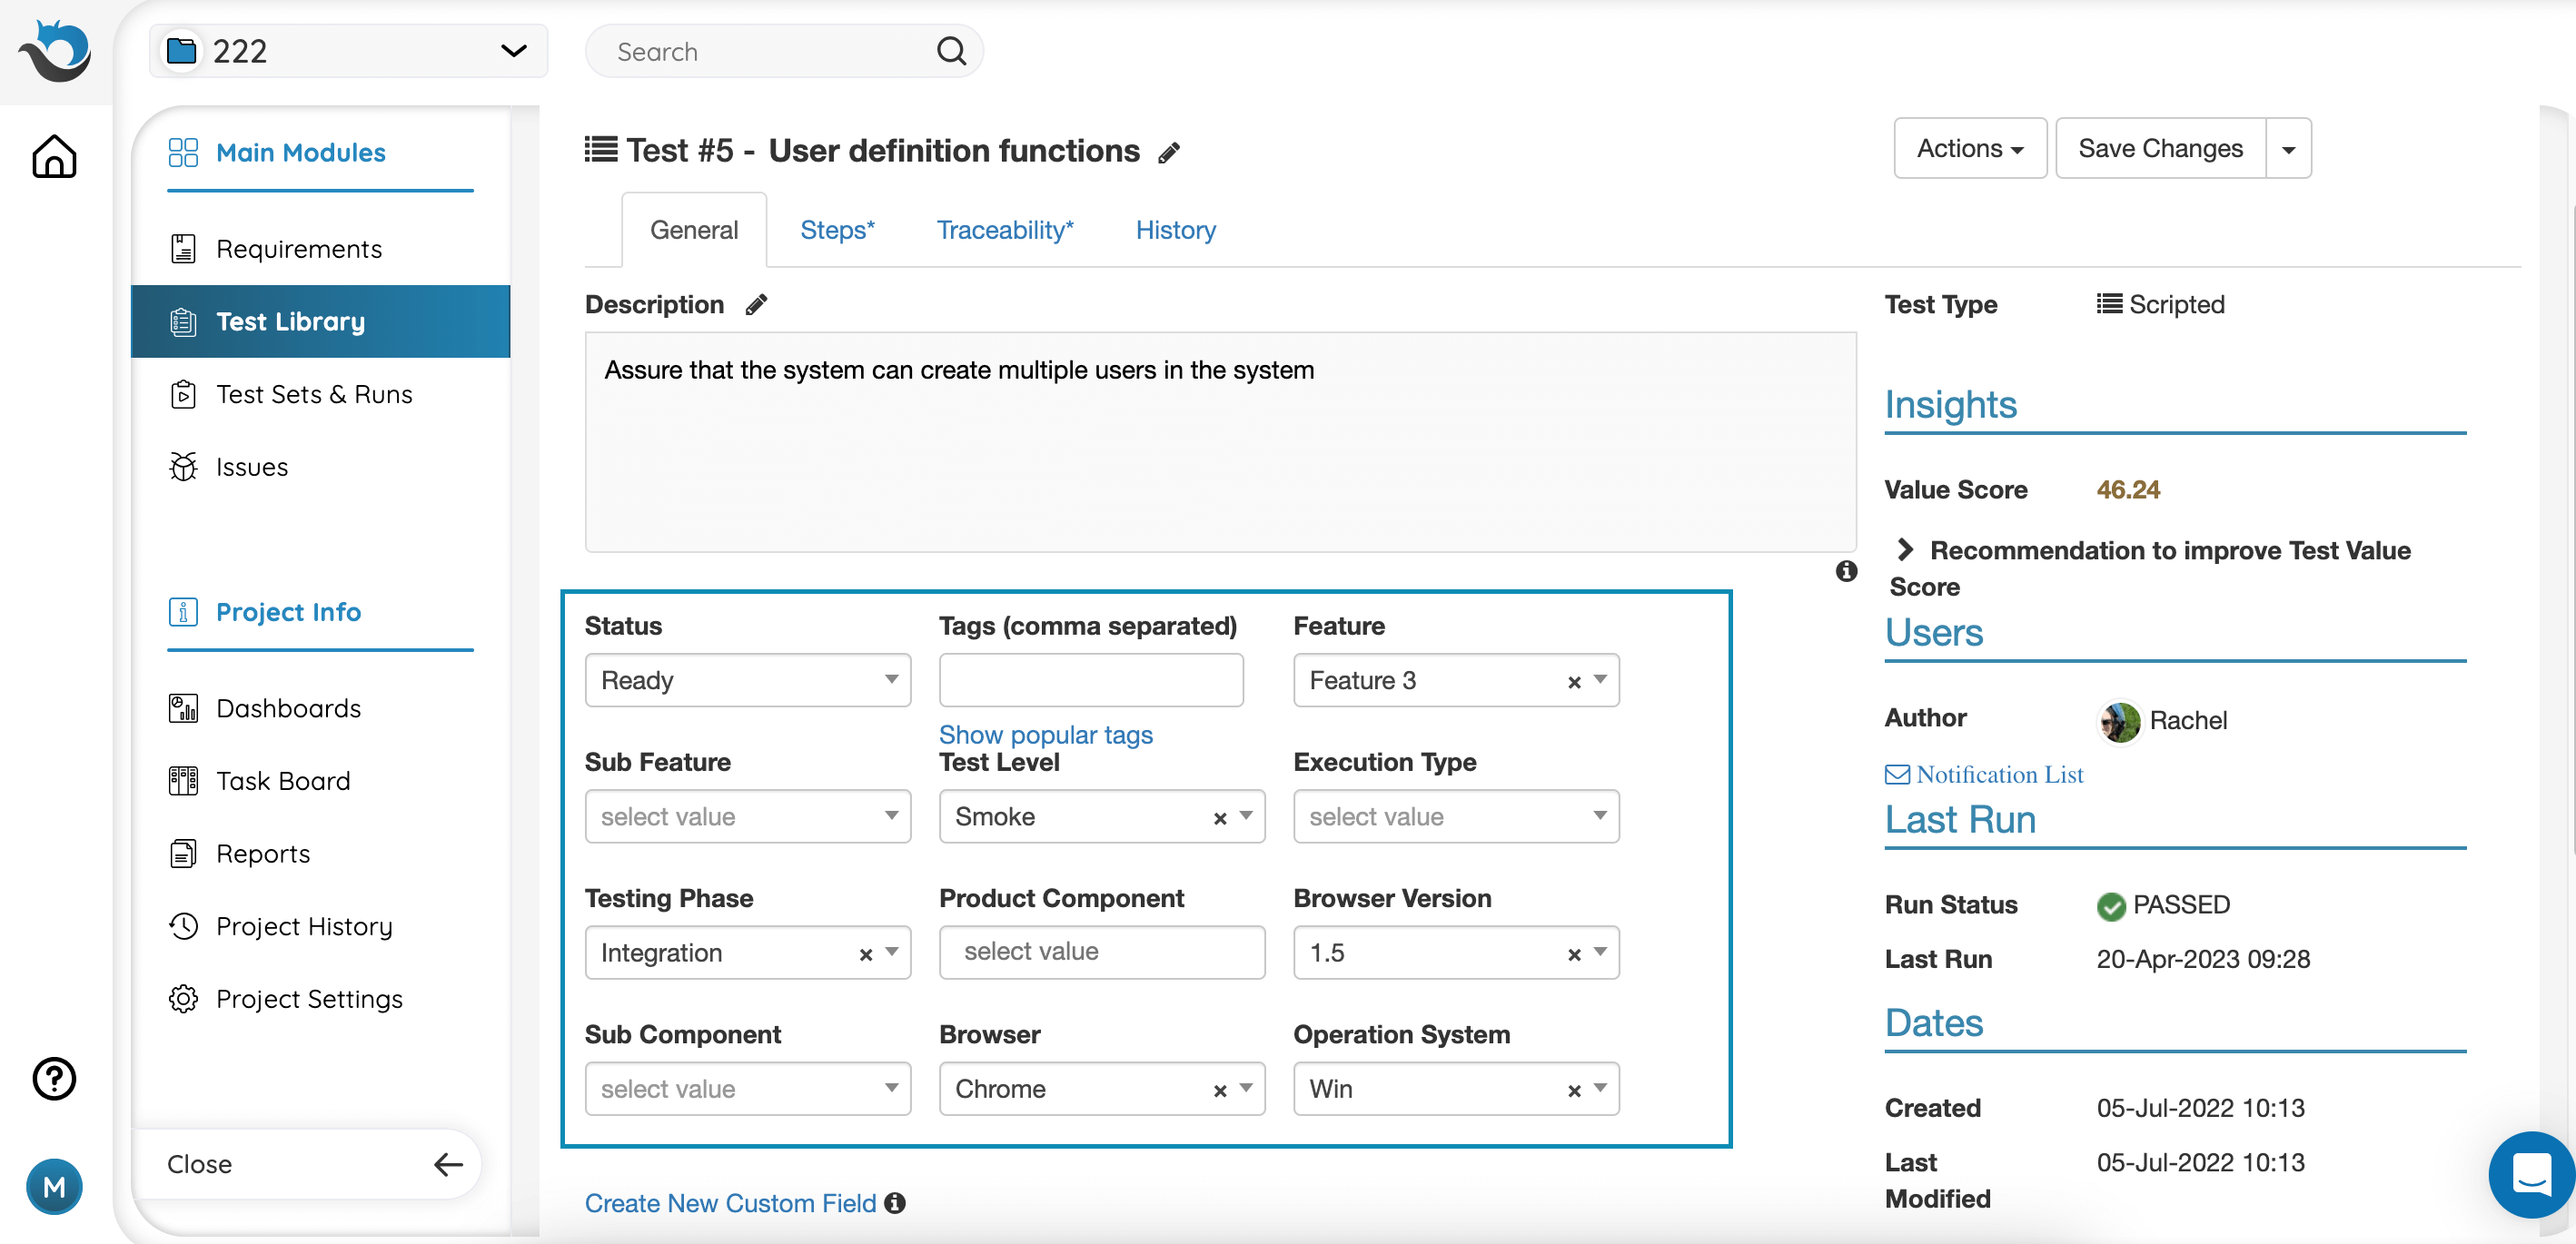
Custom fields are entity attributions that help you define each entity and later also filter your data according to this attribution. We recommend adding custom fields for any product attribution you have such as component, area, priority and more. To learn more about custom fields please read here.
Manage Time-Based Iterations with Milestones
If you’re working in an Agile or DevOps environment and managing testing in cycles, then the Milestones Module is where you manage your iterations in PractiTest. Designed as the project management backbone, Milestones empower users to define high-level testing objectives with defined timeframes, whether it’s for a sprint, a new version release, or any other project milestone.
When creating a new Milestone, you are required to name it, set its status (Upcoming, Active, or Completed), and define its time frame. As each Milestone represents a single testing iteration, you can link to it all relevant testing entities, including requirements, test sets, and issues. This allows us to define the scope of each testing iteration comprehensively and ensure that all necessary tasks and artifacts are accounted for.
After you link the entities, you can run your tests. Issues that were created during a test run which is part of a Test Set that is associated with a Milestone, will be automatically linked to the same Milestone by default. To keep track of your testing progression within the Milestone, go to the Dashboard tab for dedicated charts regarding Requirements coverage, Test Instances status, and Issues Status.
Please refer to this help page to learn more about how to work with Milestones
Dynamically Organize Your Data Based On Data Attributions/Fields
After the Iteration field is set, assign the relevant entities (Requirements and Test Sets in the first stage) to the current iteration value. Do the same for other fields you have. Now you can create a custom filter in the Test Sets module in order to present the Test Sets assigned for the current iteration. If you create an auto filter based on the iteration fields, every new iteration value you add to the field will automatically add a subfilter for this iteration filter and will display the Test Set with that iteration value. When a new iteration is coming up, you can also use the test set permutations feature or the batch clone feature in order to duplicate the relevant Test Sets and assign them with the relevant iteration value. You can create a new filter for every new iteration directly from the action of cloning the Test Sets or creating the permutations.
You can do the same in the Requirements and Issues modules to view Requirements and Issues per their iteration.
You can create different kinds of filters based on any field. Read more about Hierarchical filter trees here.
Visualize Your Data Using Dashboards And Reports
Dashboards can be a way to keep your team up to date with the Sprint status in general, and of each User Story in particular.
After organizing your data by sprint filters, you can easily create reports and dashboard graphs based on the different sprints by basing the report/graph on the relevant sprint filter. You can create additional dashboard tabs with information for each Sprint or User Story independently.
You can also create a wider graph/report, to show a specific aspect of the testing and the change it went through in each sprint. For example - create a tabular aggregate report and base the Y axis on sprint and the x axis on area/status/component/type etc.
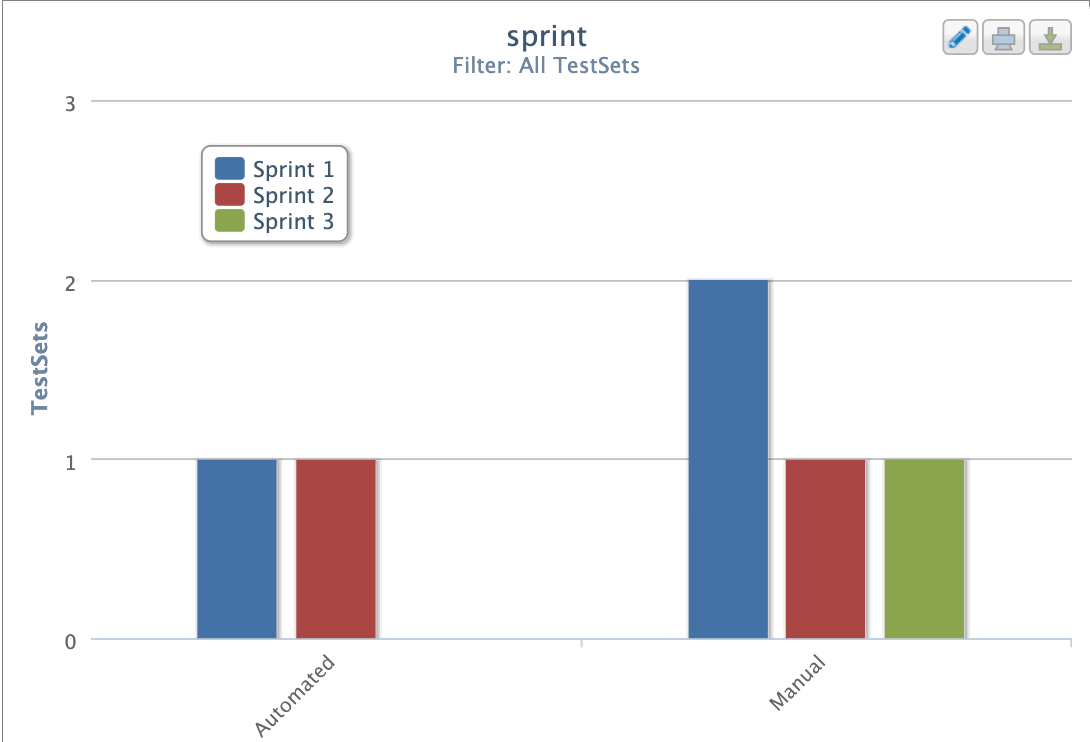
Or, create a bar chart graph based on the sprint field and anything else that interests you (status, assignee, area, etc) to view the change in entities between the different sprints.


