Users can be managed both at the account level and at the project level. In this article, we will show how to add and manage users in both your account and project.
- Users in Groups, Projects and Accounts
Users in Groups, Projects and Accounts
When purchasing a PractiTest account, you pay per year and per user and receive extra “Read-Only With Comments” users according to the plan you chose. User licenses can therefore include two types:
- Paid ‘Tester’ licenses
- Free “Read Only With Comments” licenses
When adding a user to PractiTest, they must be added to three different levels of the software: Account, Project, and Group. An account can have many Projects, and each project can have many groups as defined below:
- Account is the overall PractiTest area of your company where you can find your projects.
- Projects are where you manage your projects such as Products, Operations, and so on.
- Groups inside projects: these are the way you define users permissions. For example, you can define a group that has the permission to create issues and a group that doesn’t, and then assign your users to groups accordingly. Some of the groups are predefined system groups (as explained below) and their permissions cannot be edited.
Each user can be added to as many projects as you like, and to any group with any permission. Free licenses (Read-Only With Comments) may be added to any project, but only as part of the “Commenters” group inside of those projects.
Managing Groups Inside Projects
System Groups
There are four predefined system groups in any PractiTest project:
- Administrators: have unrestricted permissions. If you can customize project settings and permissions (and see this screen), you are in the Administrator group.
- Testers: do almost everything within the system. They behave like Administrators for issues, requirements, and tests, but their members do not have access to most project customizations such as permissions, custom fields, and workflows.
- Developers: have full access to issues (creating, editing, and viewing issues and reports), but they may only view tests, runs, and requirements. They cannot edit, comment on, or delete them. Developers may not access most Project customizations.
- Commenters: can view and comment on all entities. They can view dashboards and add filters, but they are unable to access most project customizations and reports.
Notes:
- You can add or delete as many members as needed to any group according to the number of users that have been purchased.
- The permissions of the predefined groups cannot be changed.
- ‘Read-Only With Comments’ users should be added to the ‘Commenters’ predefined group only. Paid users can be added to any group. To view your licenses, please visit your account settings in the General tab. The number of ‘Read-Only With Comments’ users is according to your plan and the number of licenses purchased as described on the pricing page and pricing help page.
- If a user belongs to more than one group, then permissions include all group permissions that he/she belongs to.
- If a user is removed from a project or account, the data created by them (issues, tests, etc) is not removed.
- Users added to any group other than the system predefined Commenting group will be considered as paying users, regardless of the group permissions.
Adding a Group With Custom Permissions
To create a new group, enter the group’s name and click the ‘Create Group’ button. After the group is added, you can edit its permissions and add members.
Customizing Group Members and Permissions
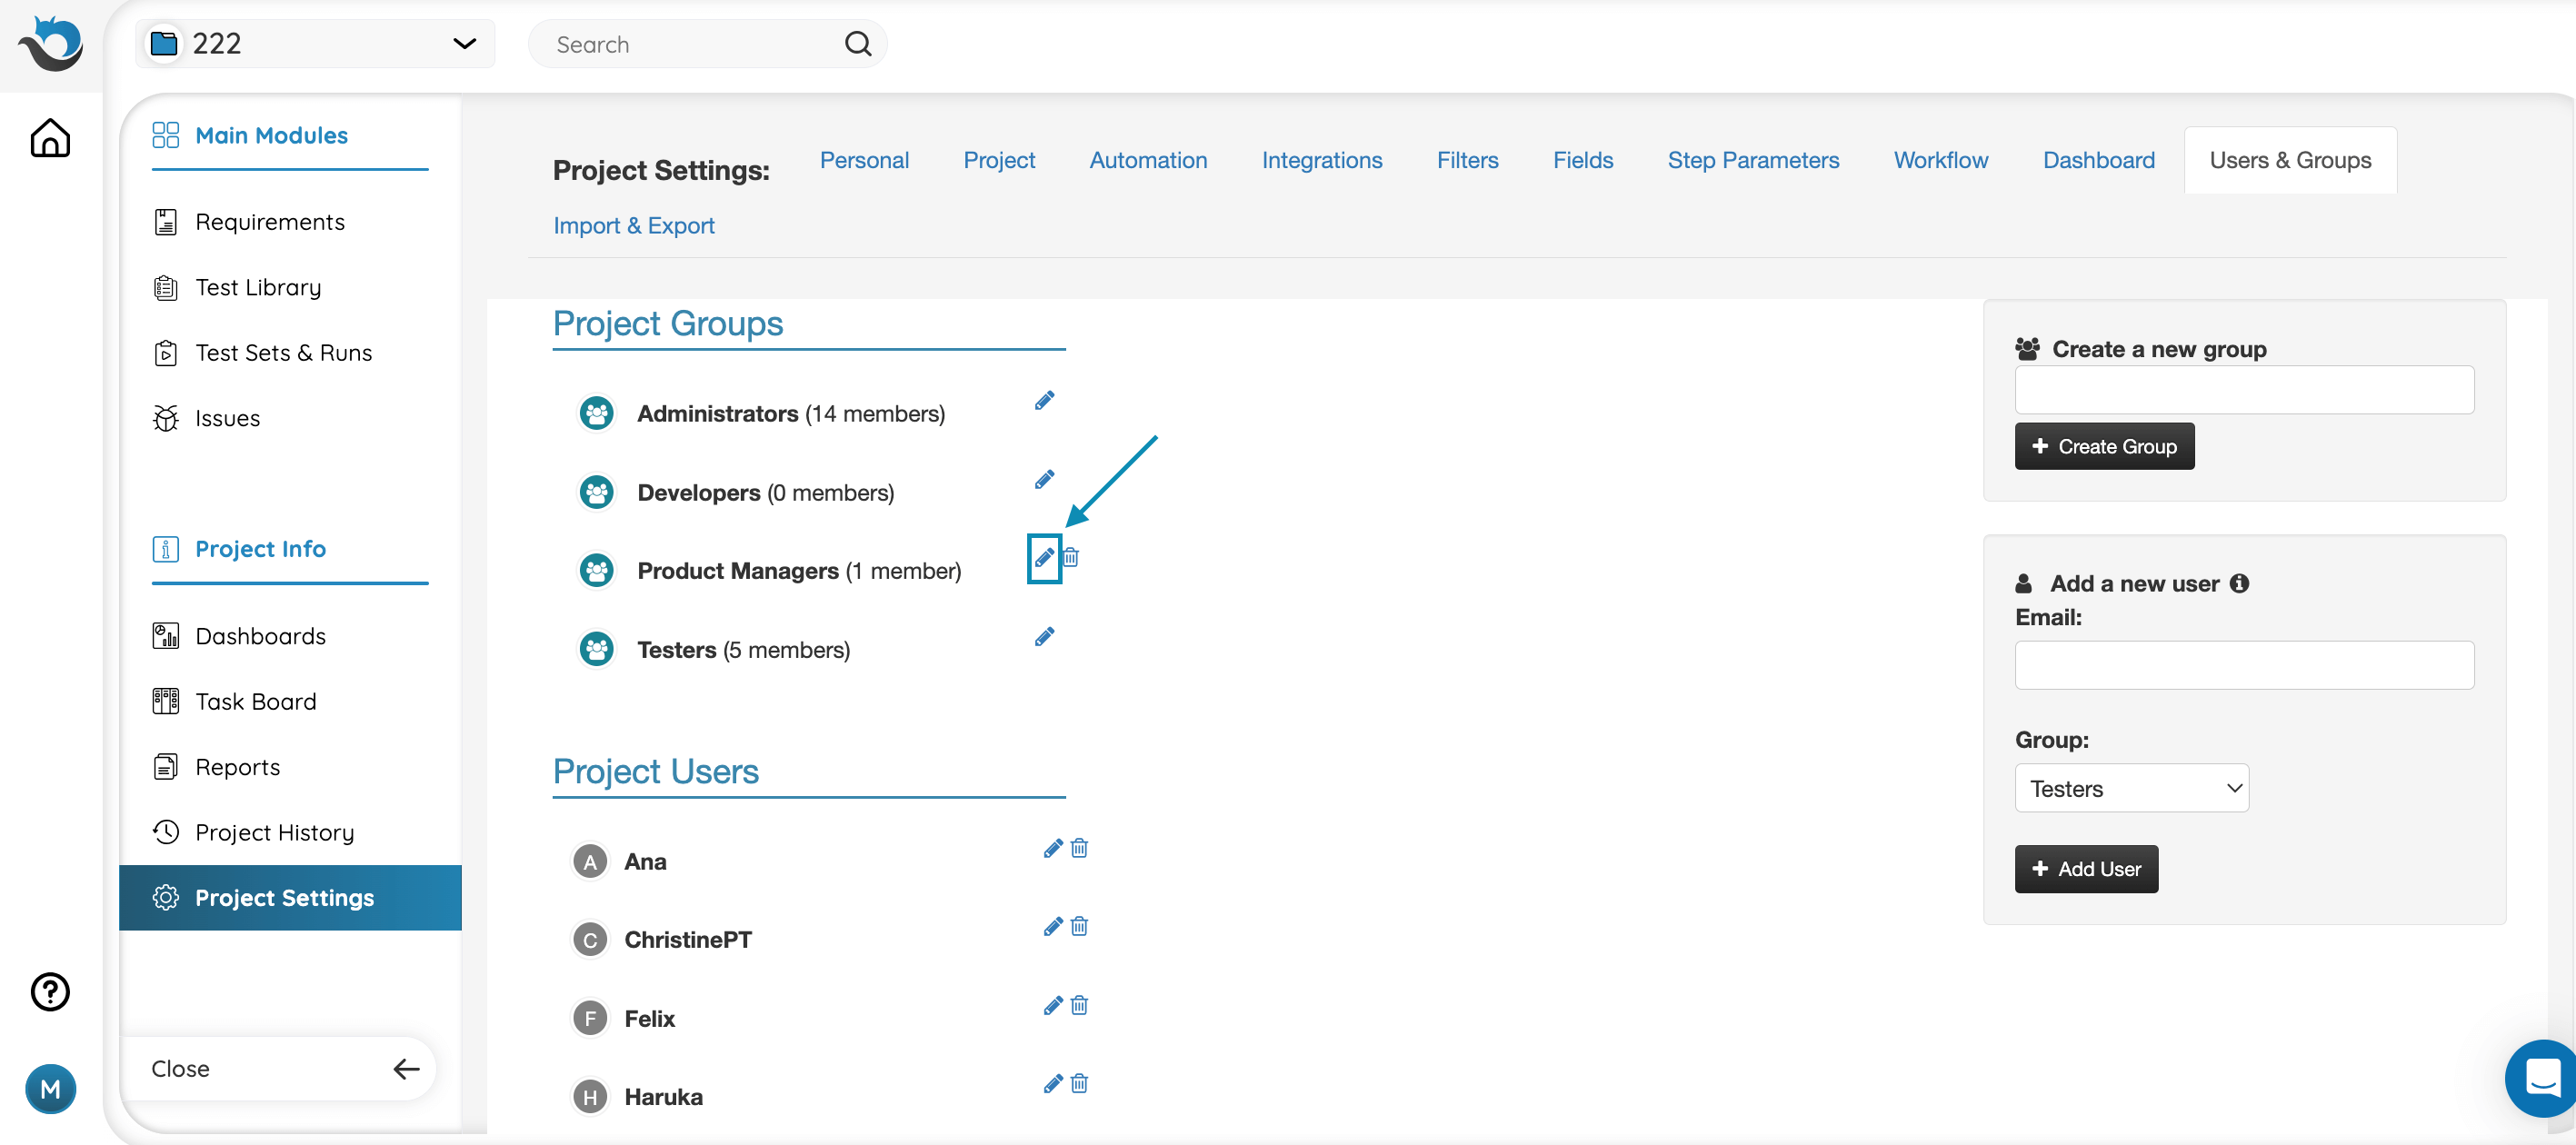
To edit a group, click the Edit link (pencil icon) next to the group name.
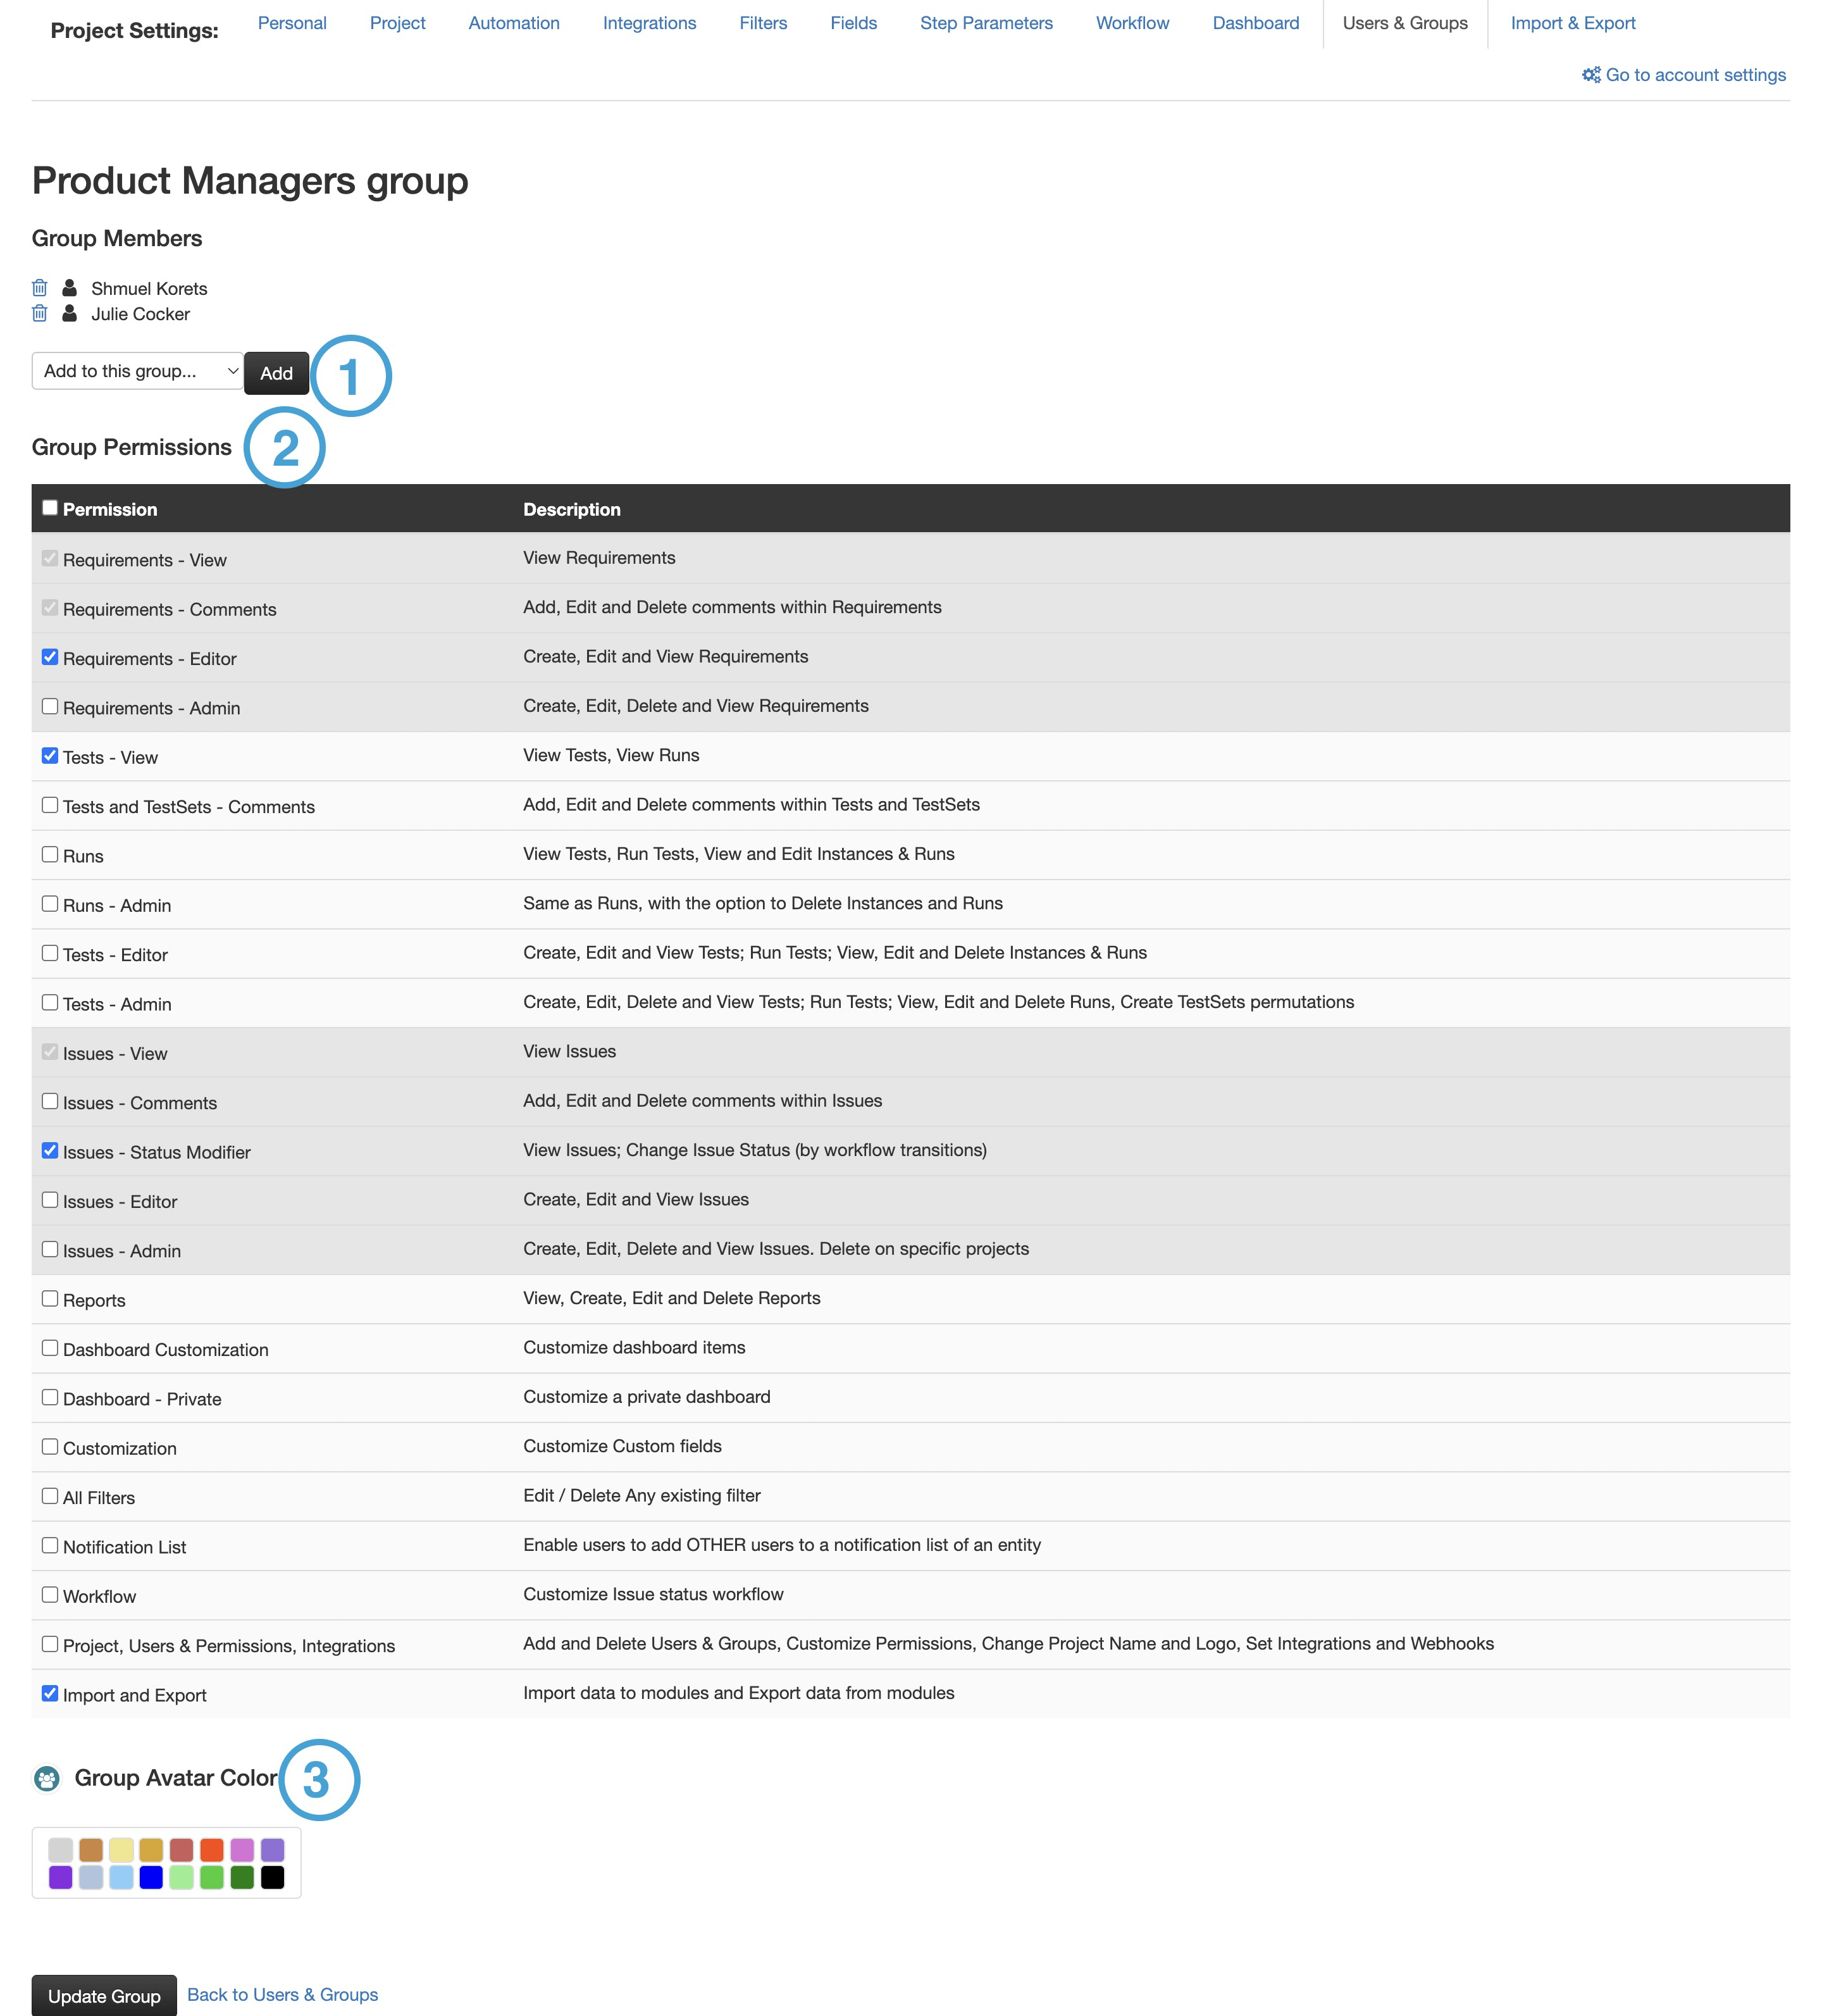
- Adding a Member to a Group: You can choose to add a single member or a group of members to another group. Choose the name of the user or the group and click the ‘Add’ button.
- Setting Group Permissions: Each group has its own permissions. To set a group’s permissions, select or unselect the relevant permissions (see image above). When you finish, click the ‘Save Changes’ button.
- Changing Group Icon Color: You can change the color of your group icons to help you easily recognize them in the system when entities are assigned to them.
Managing Users in Project Settings
Adding a User
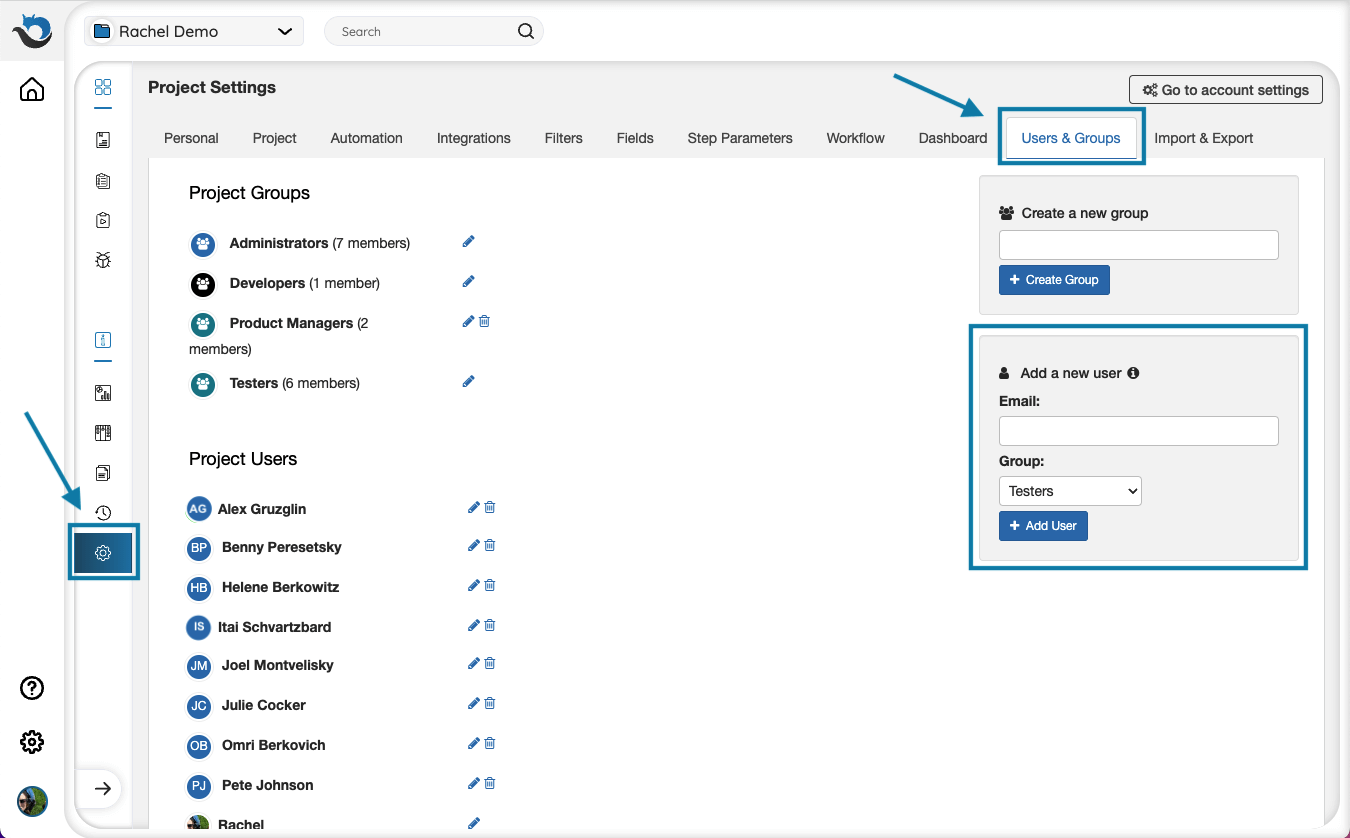
To add a user, simply go to Project settings, enter the user’s email address and click the ‘Add’ button.
By default, the new user will be added to the Testers group.
Managing Users with SCIM
This is only available for account owners with Ultimate or Corporate accounts
This capability allows you to add/remove PractiTest users directly from the System for Cross-domain Identity Management such as Okta, preventing from other project admins adding unauthorized users to your PractiTest Account.
To enable this capability, please contact the PractiTest Support team to set up the configuration.
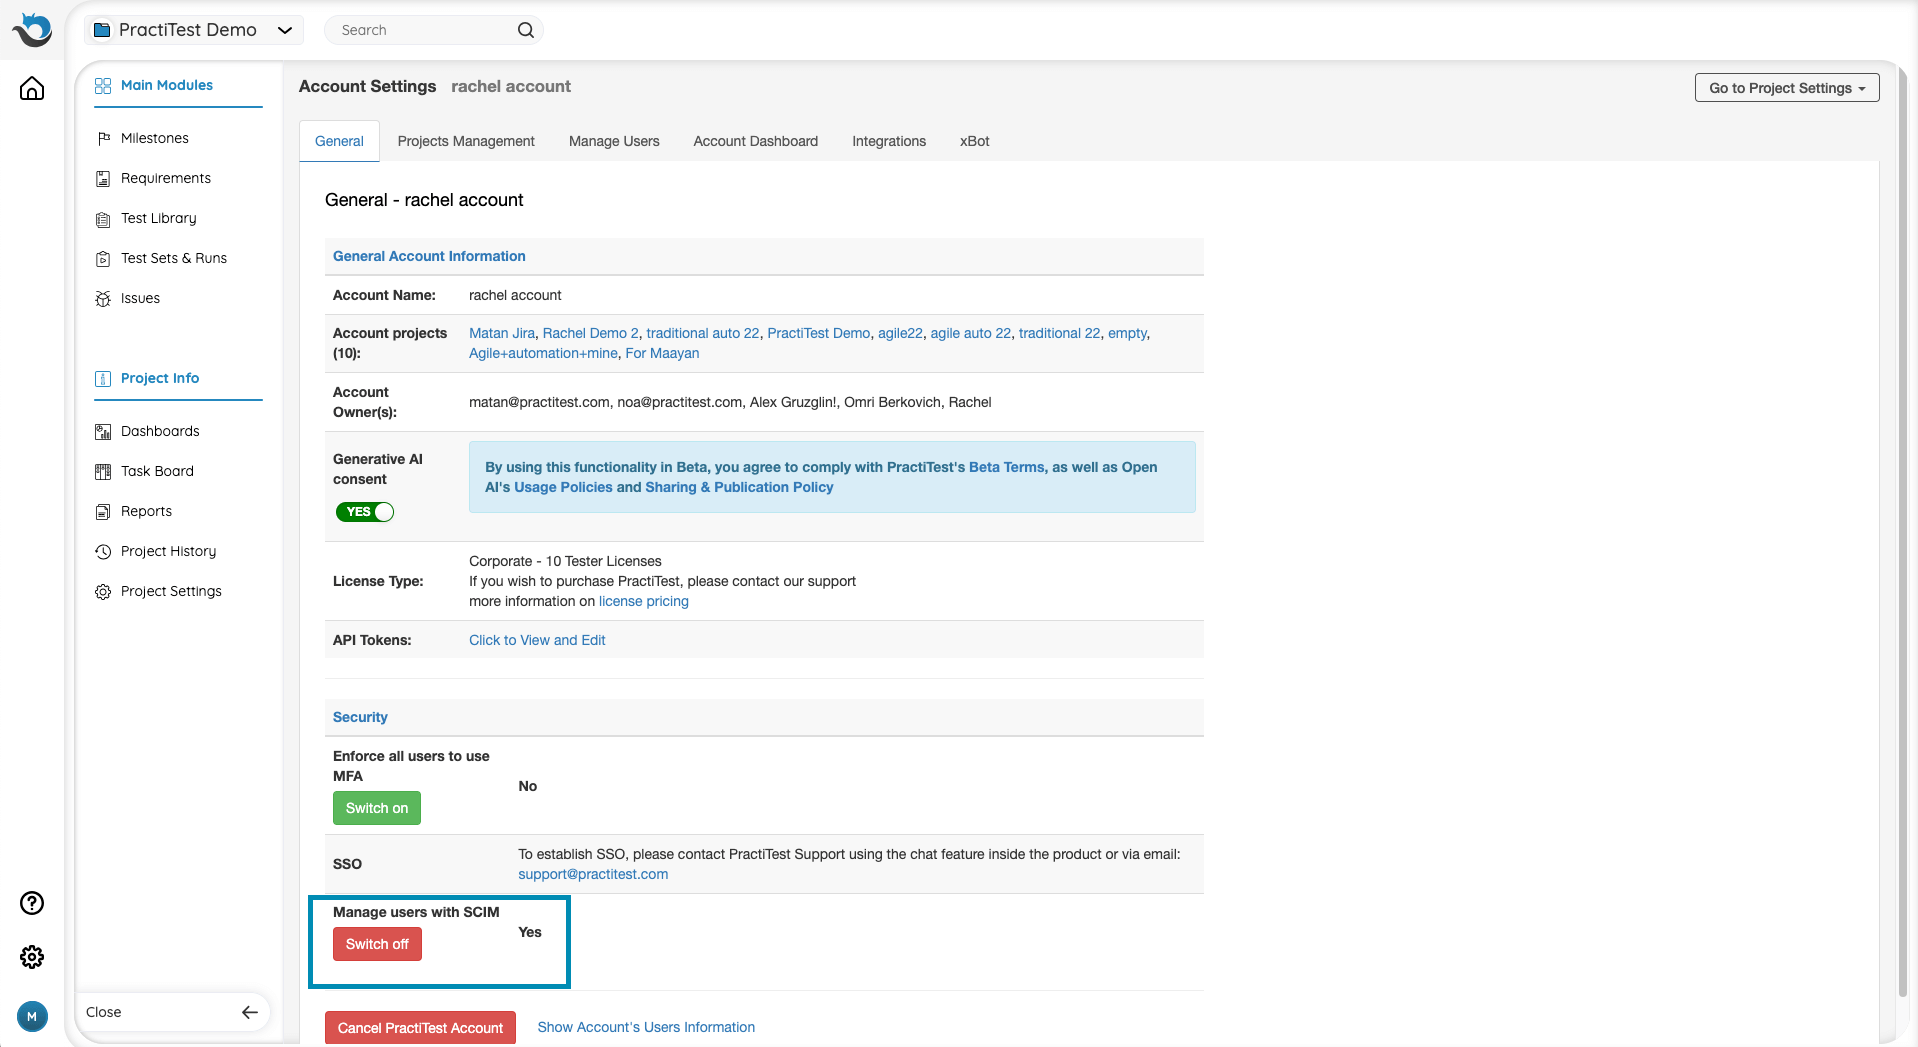
Once enabled, you won’t be able to add or remove users manually from PractiTest. After users are added, you need to manually assign users to relevant projects from the user management tab.
Note:
- PractiTest does not support the ability to suspend users from Okta.
- The provisioning process duration is dependent on the Identity Management System provider.
Managing Users in Your Account (available to account owners only)
Adding Users to Projects and Groups
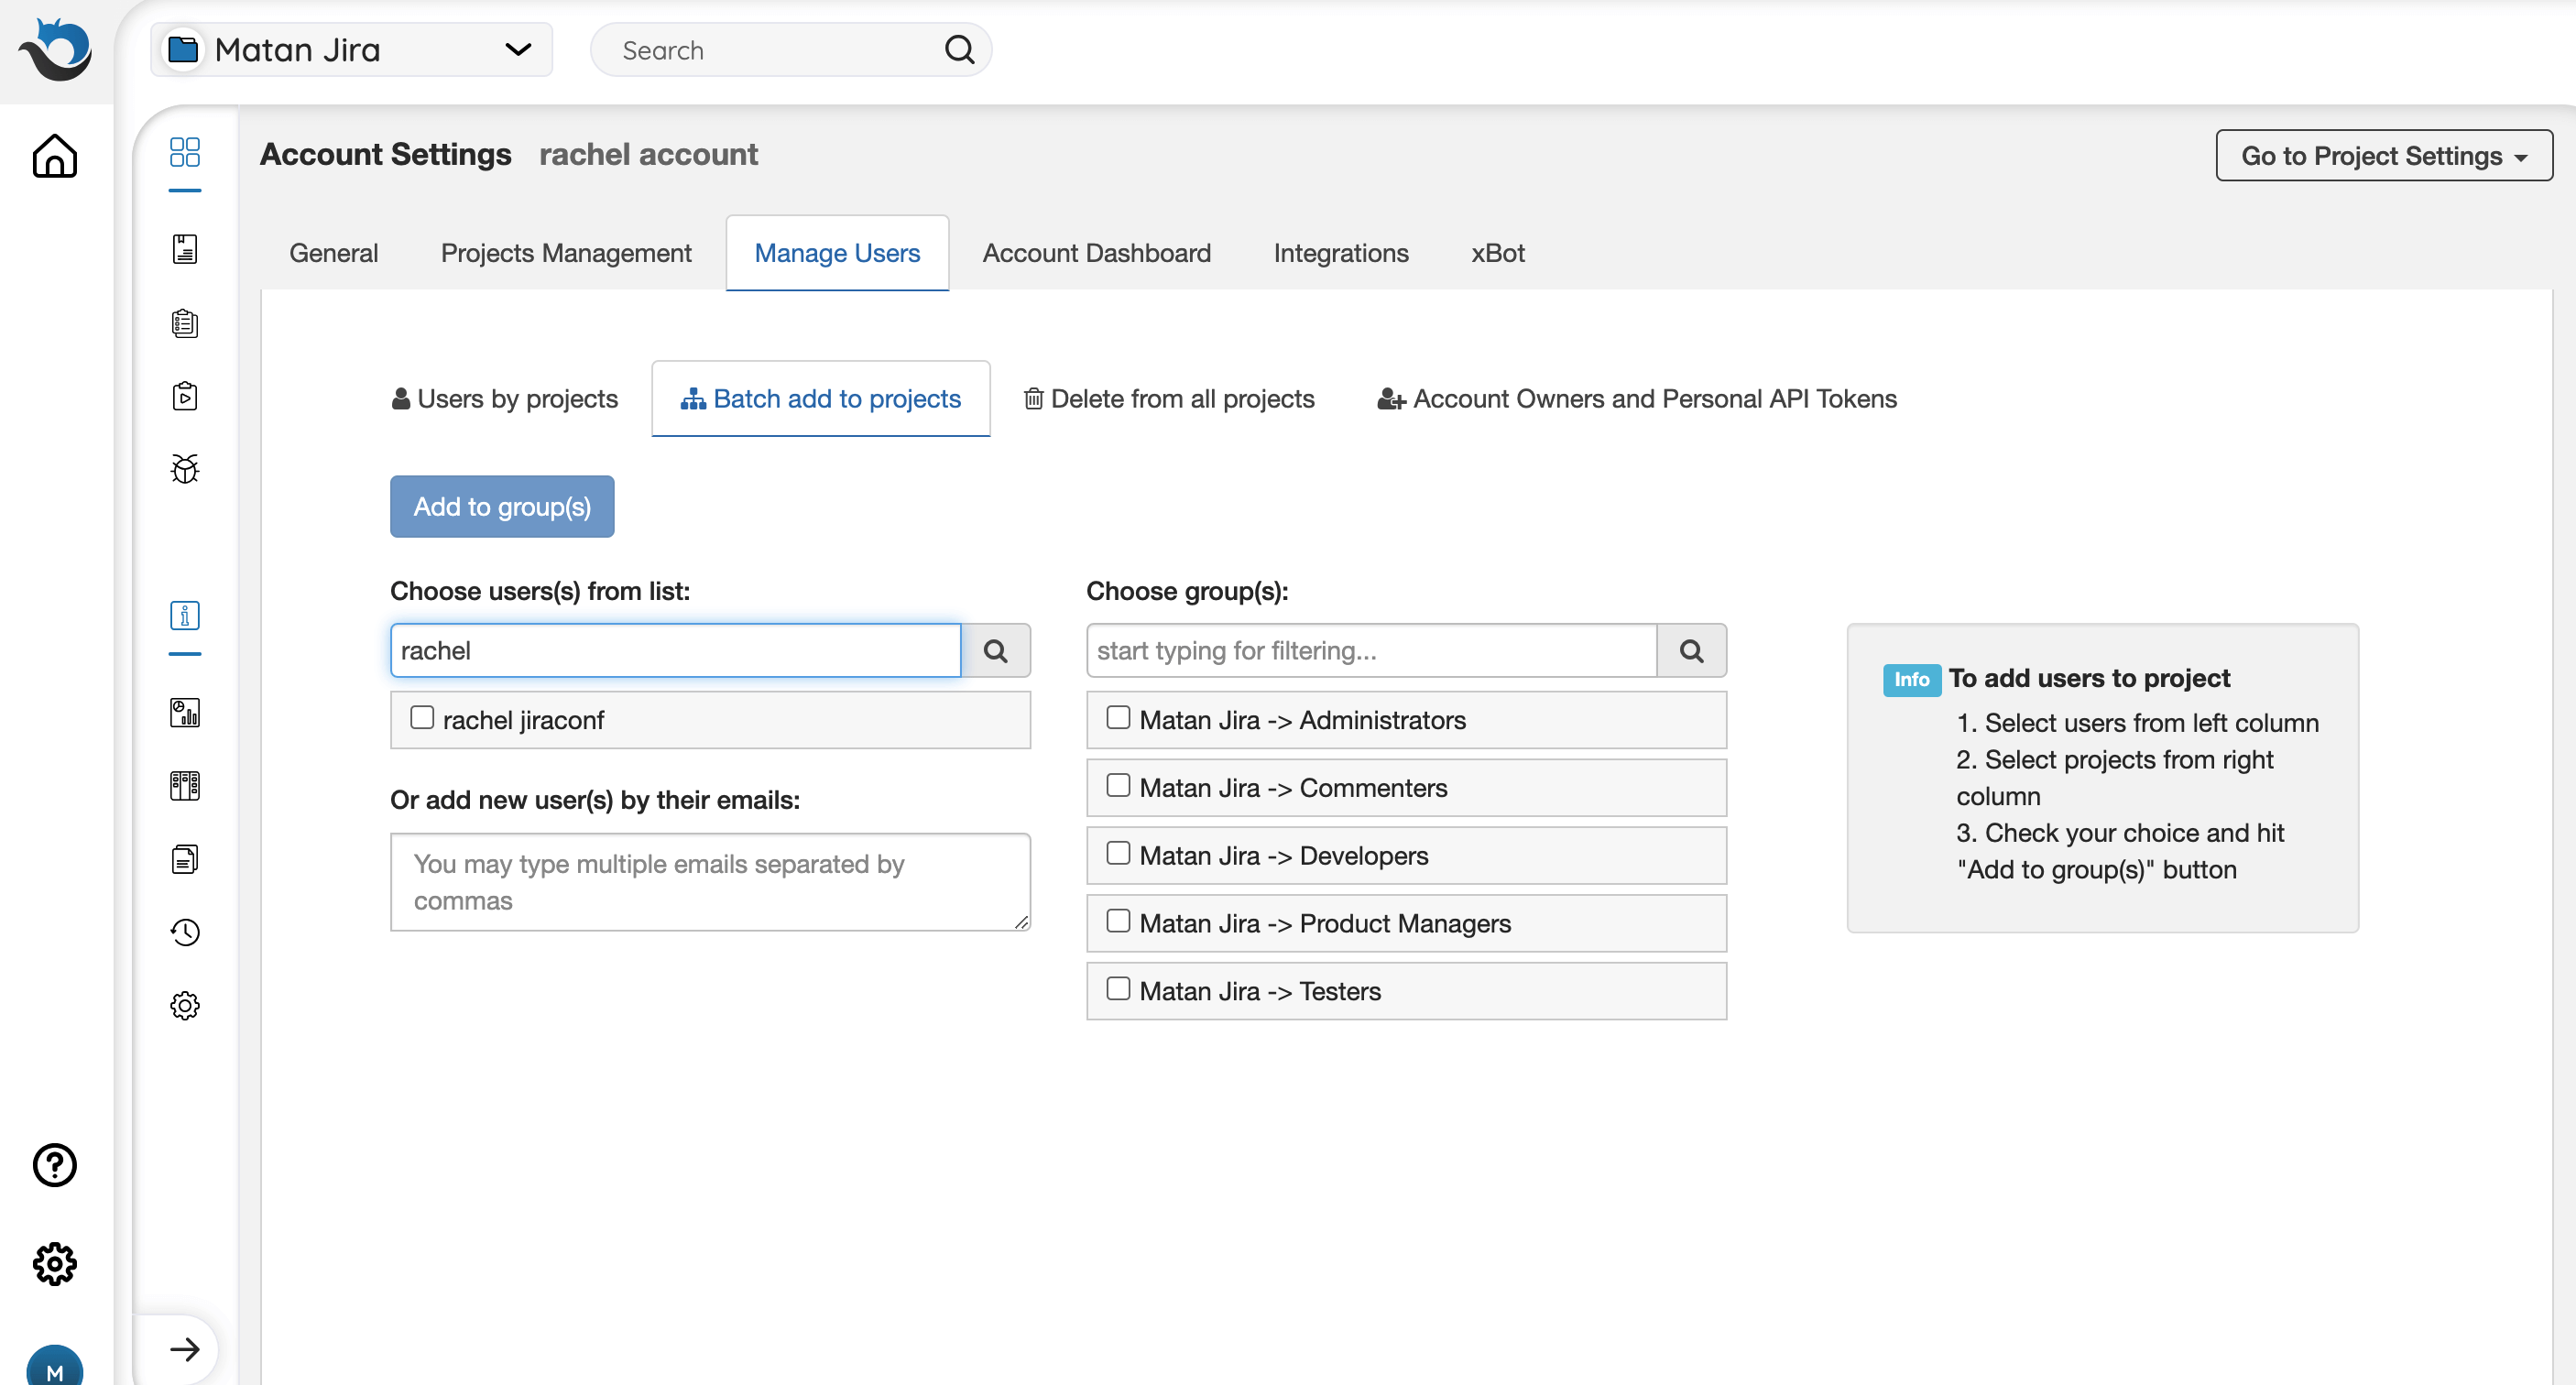
Go to Account Settings → Manage Users → Batch add to Projects.
Here you can:
- Choose users from the list and add them to all relevant projects groups
- Search for specific users and add them to all projects at the same time
- Add new users to projects by email
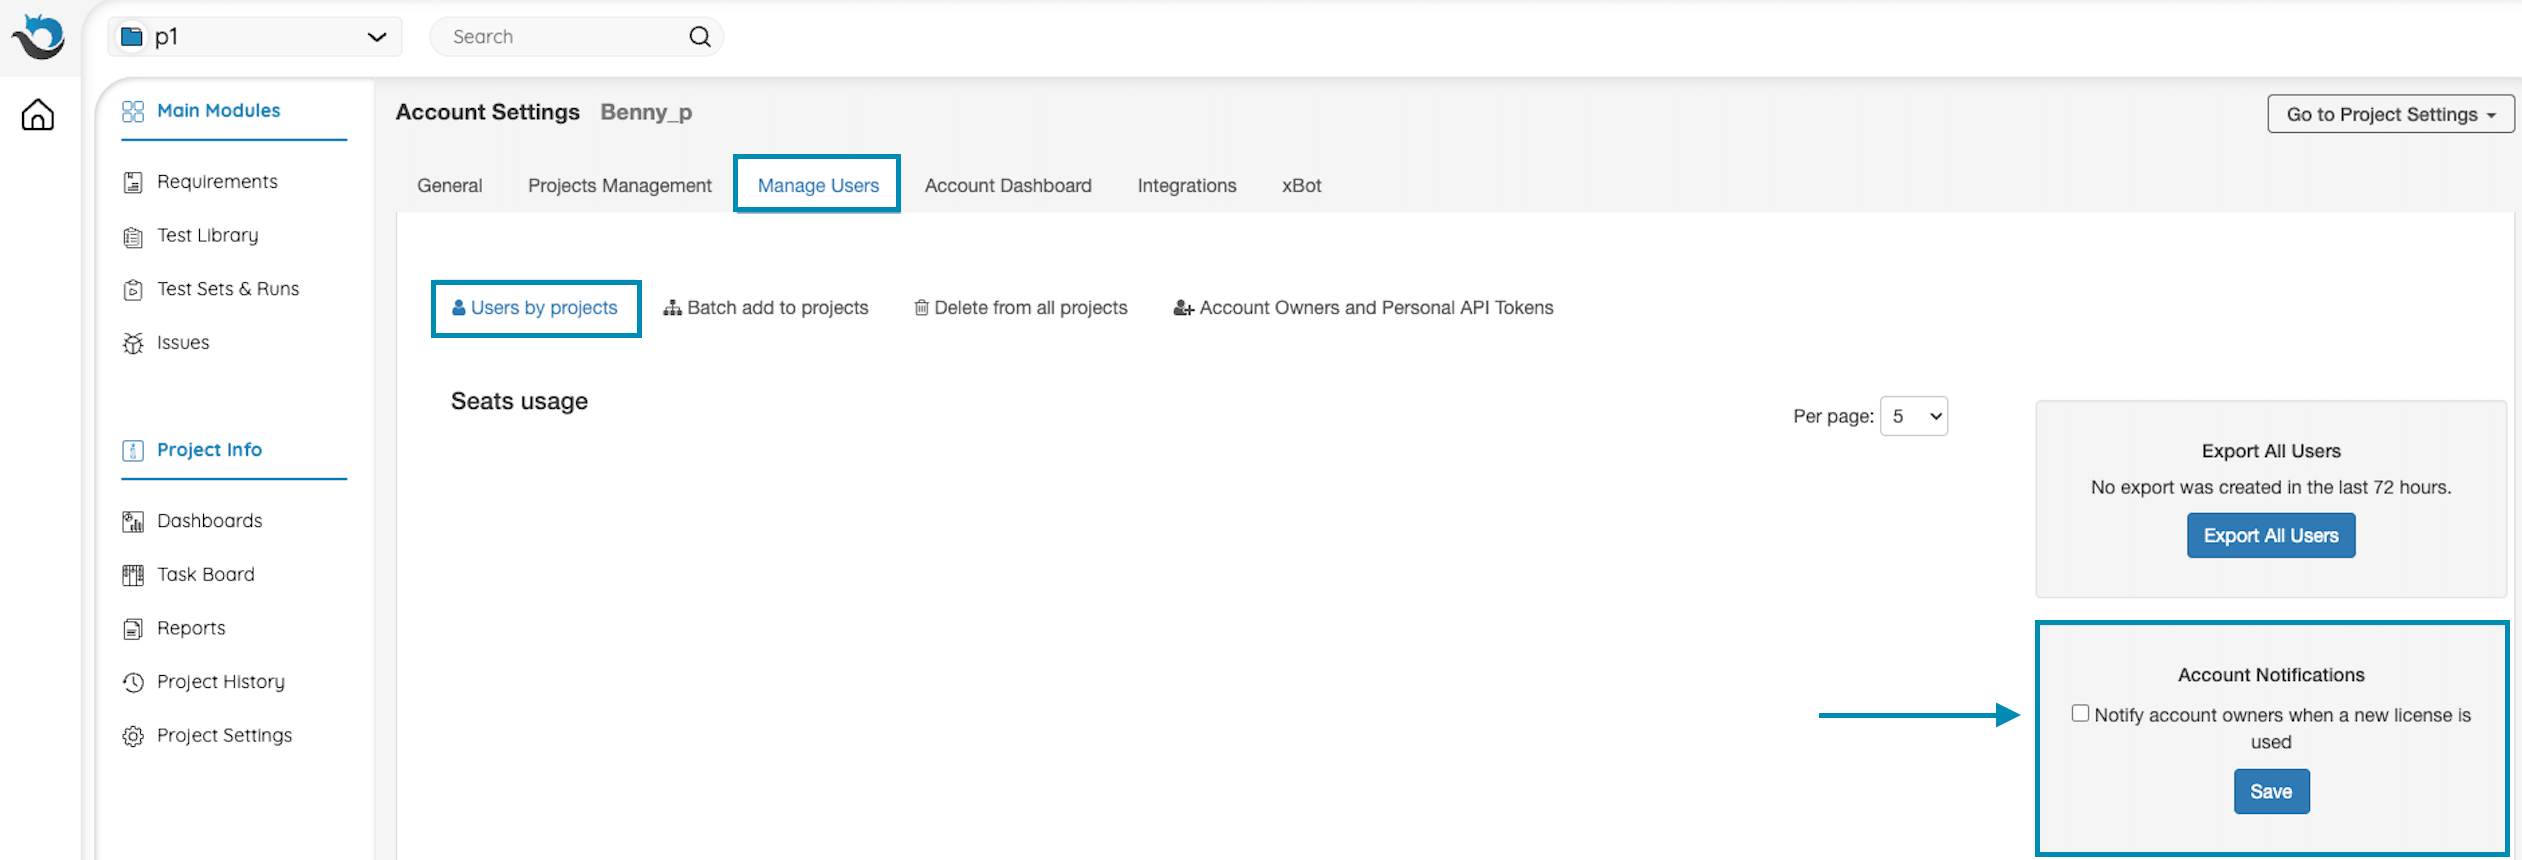
Enabling Notifications When Adding New Users
This capability is only available for account owners with Ultimate or Corporate accounts
When enabled, allow account owners to receive an email notification when a project admin is adding a new user to the account in the following cases:
- Adding a new Tester license user
- Adding a new Developer/Commenter license user
- Upgrading an existing user from a Commneter license to a Seat license (Corporate account only)
To enable this feature, access the Account Settings → Manage Users tab → Users by project → Account Notification → tick the “Notify account owners when a new license is used” checkbox.
Viewing and Editing User Features
To view each user by their license type, projects, and groups, go to Account Settings → Users by Projects tab
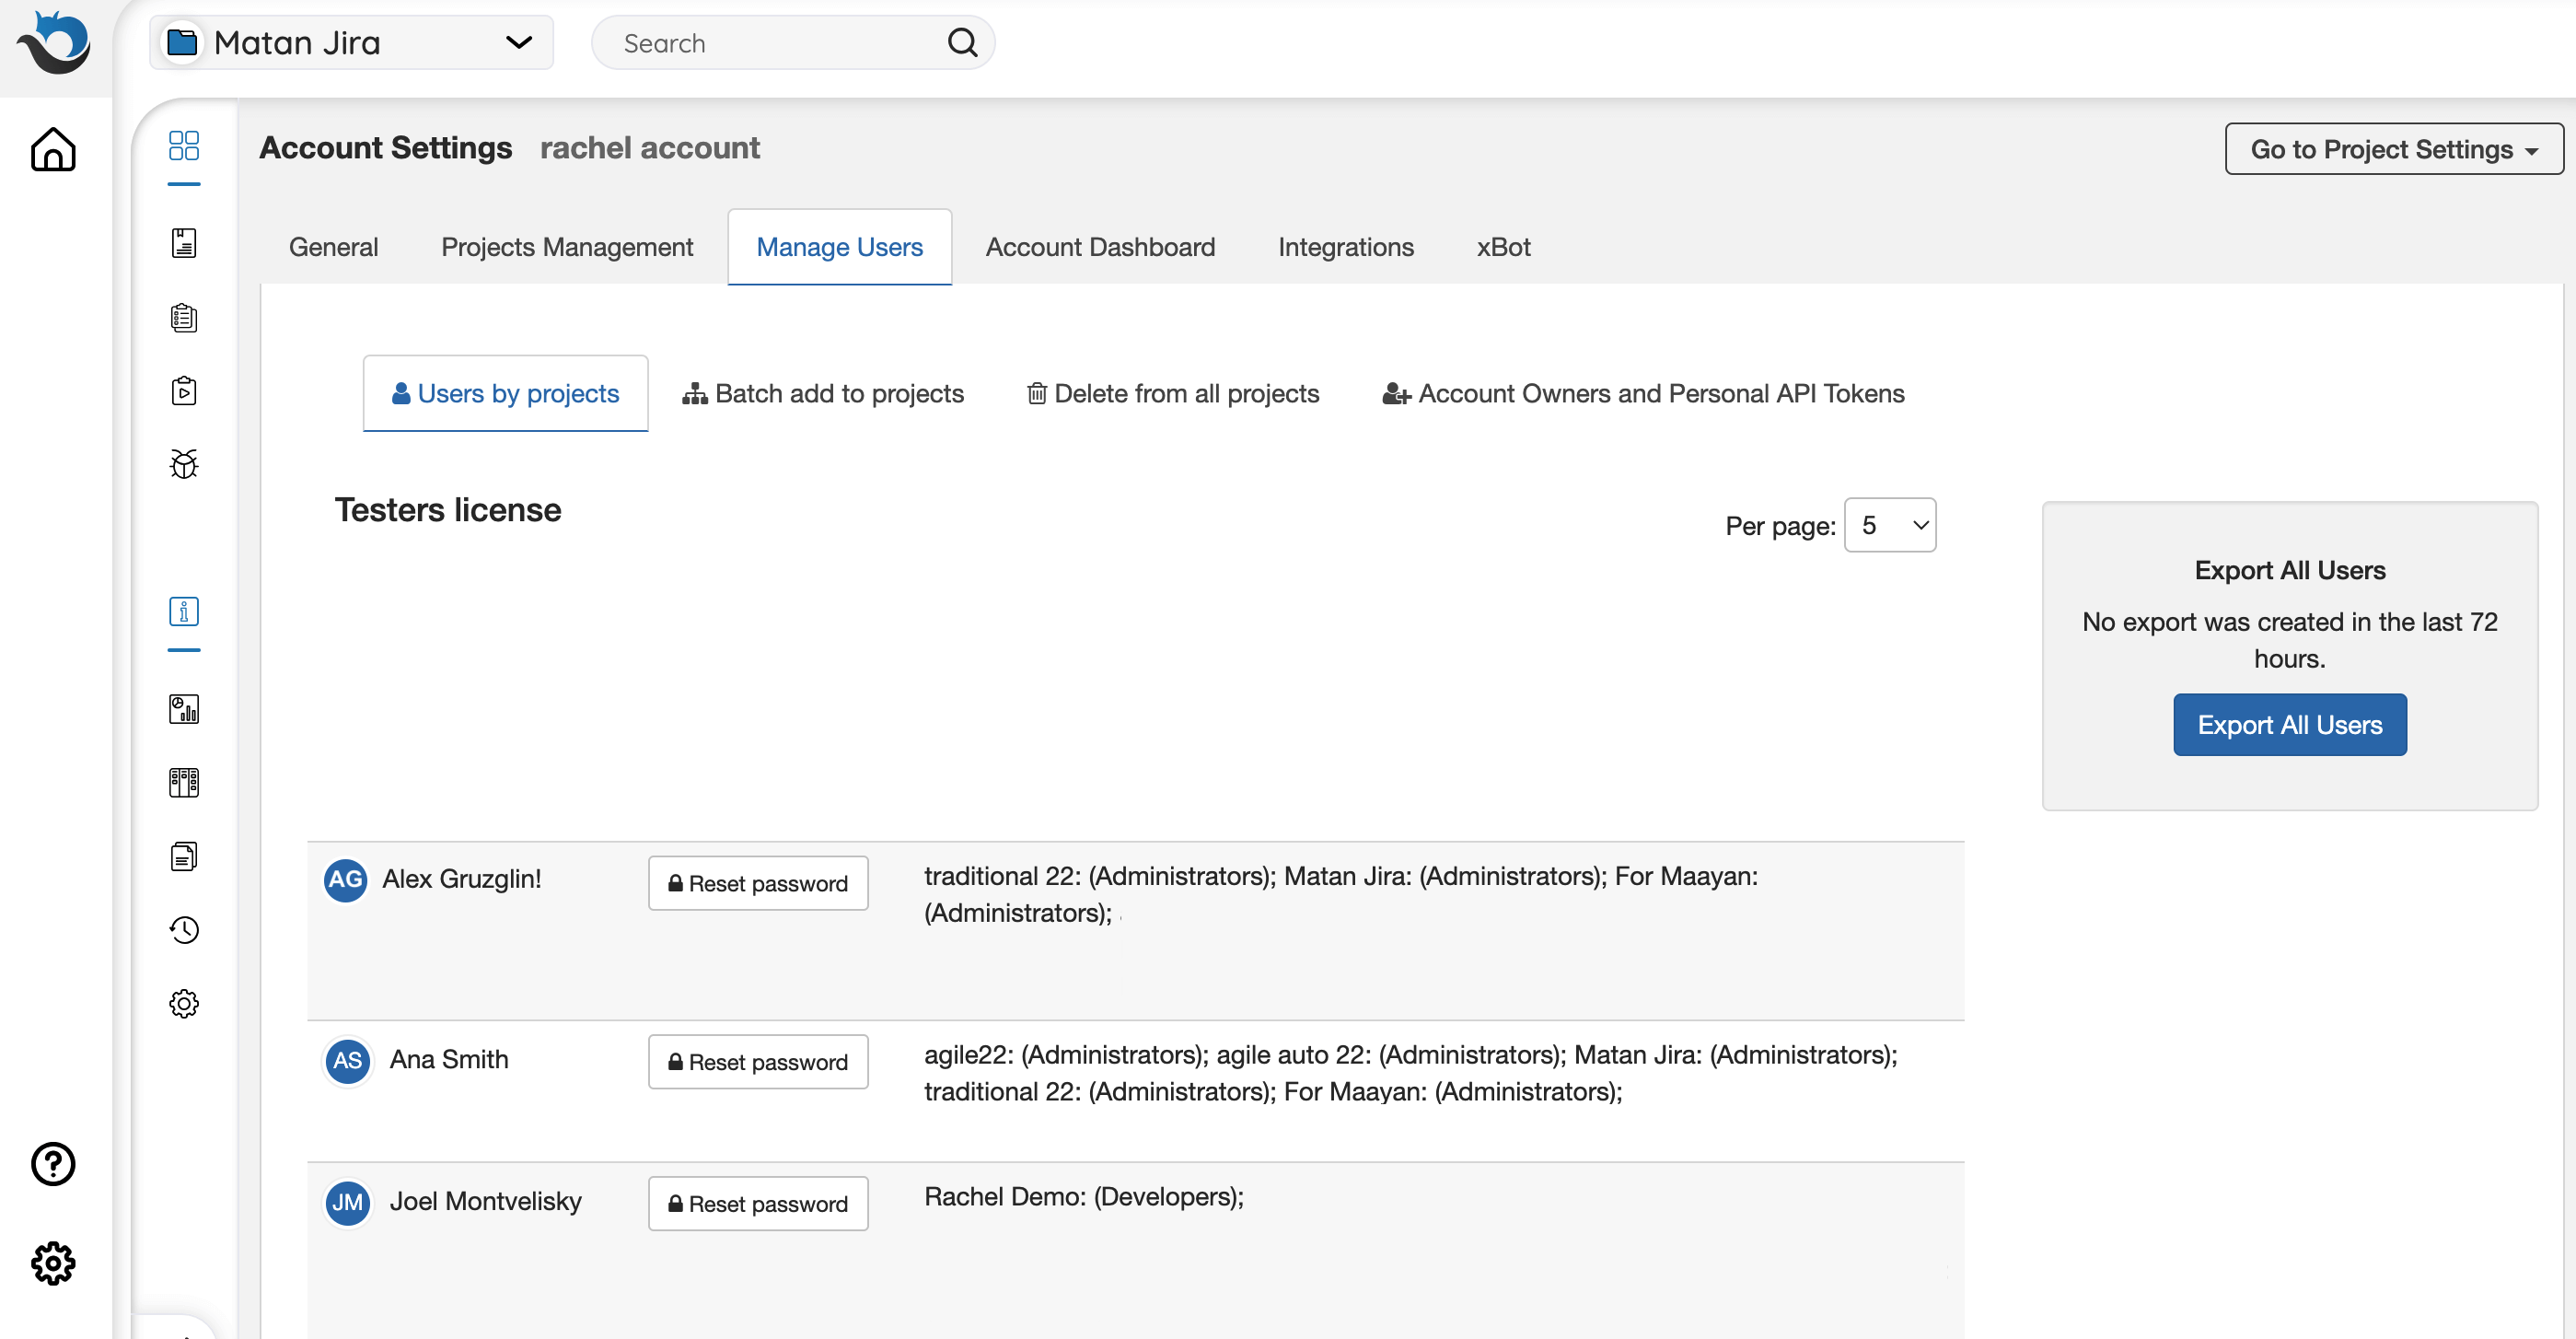
Resetting User Passwords
To reset a user’s password, go to Account Settings → Users by Projects tab and click the ‘Reset password’ button next to the relevant user.
Enabling/Disabling Personal API Tokens
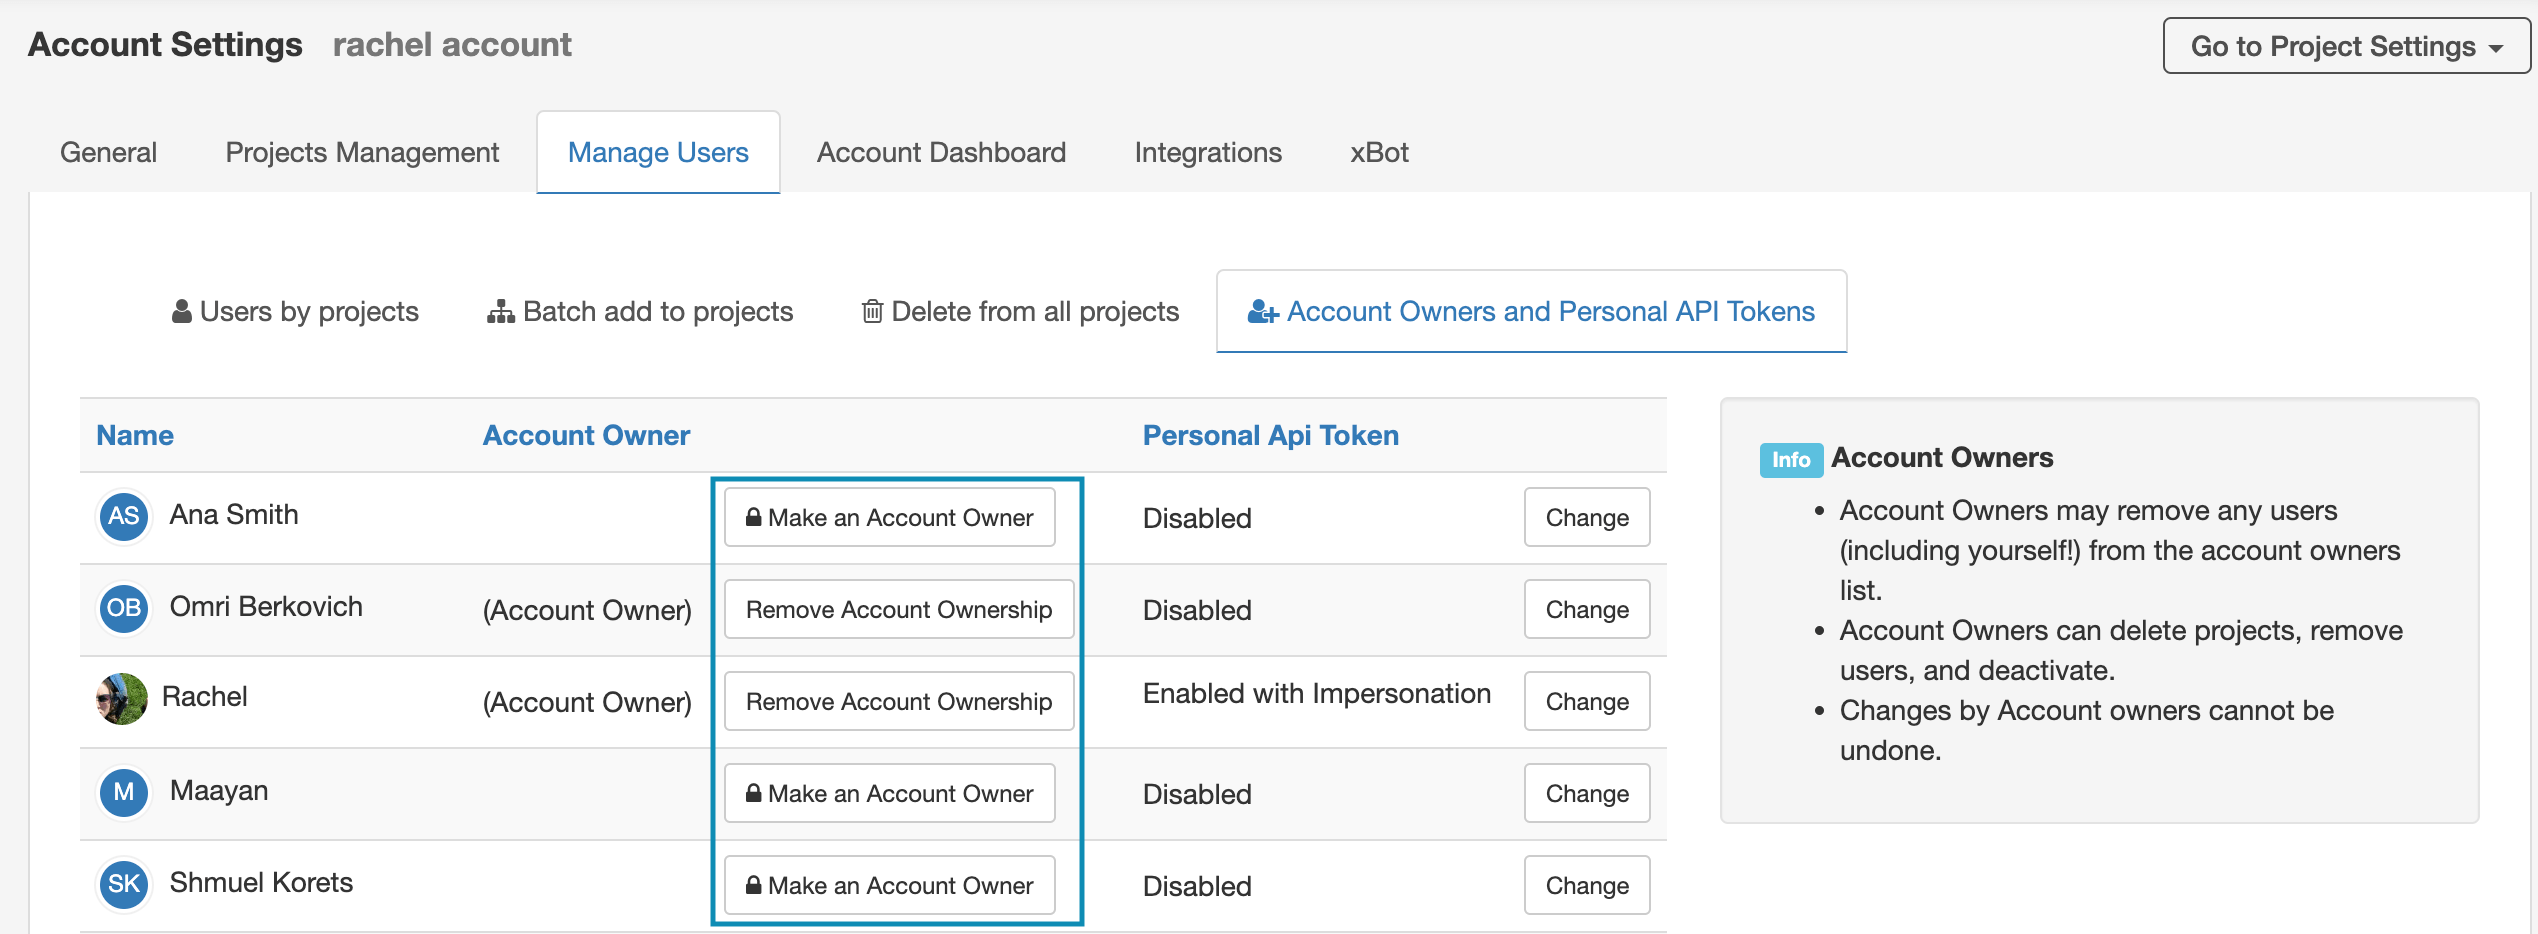
To enable/disable a user’s Personal API Token (PAT), go to Account Settings → Account Owners and API Tokens.
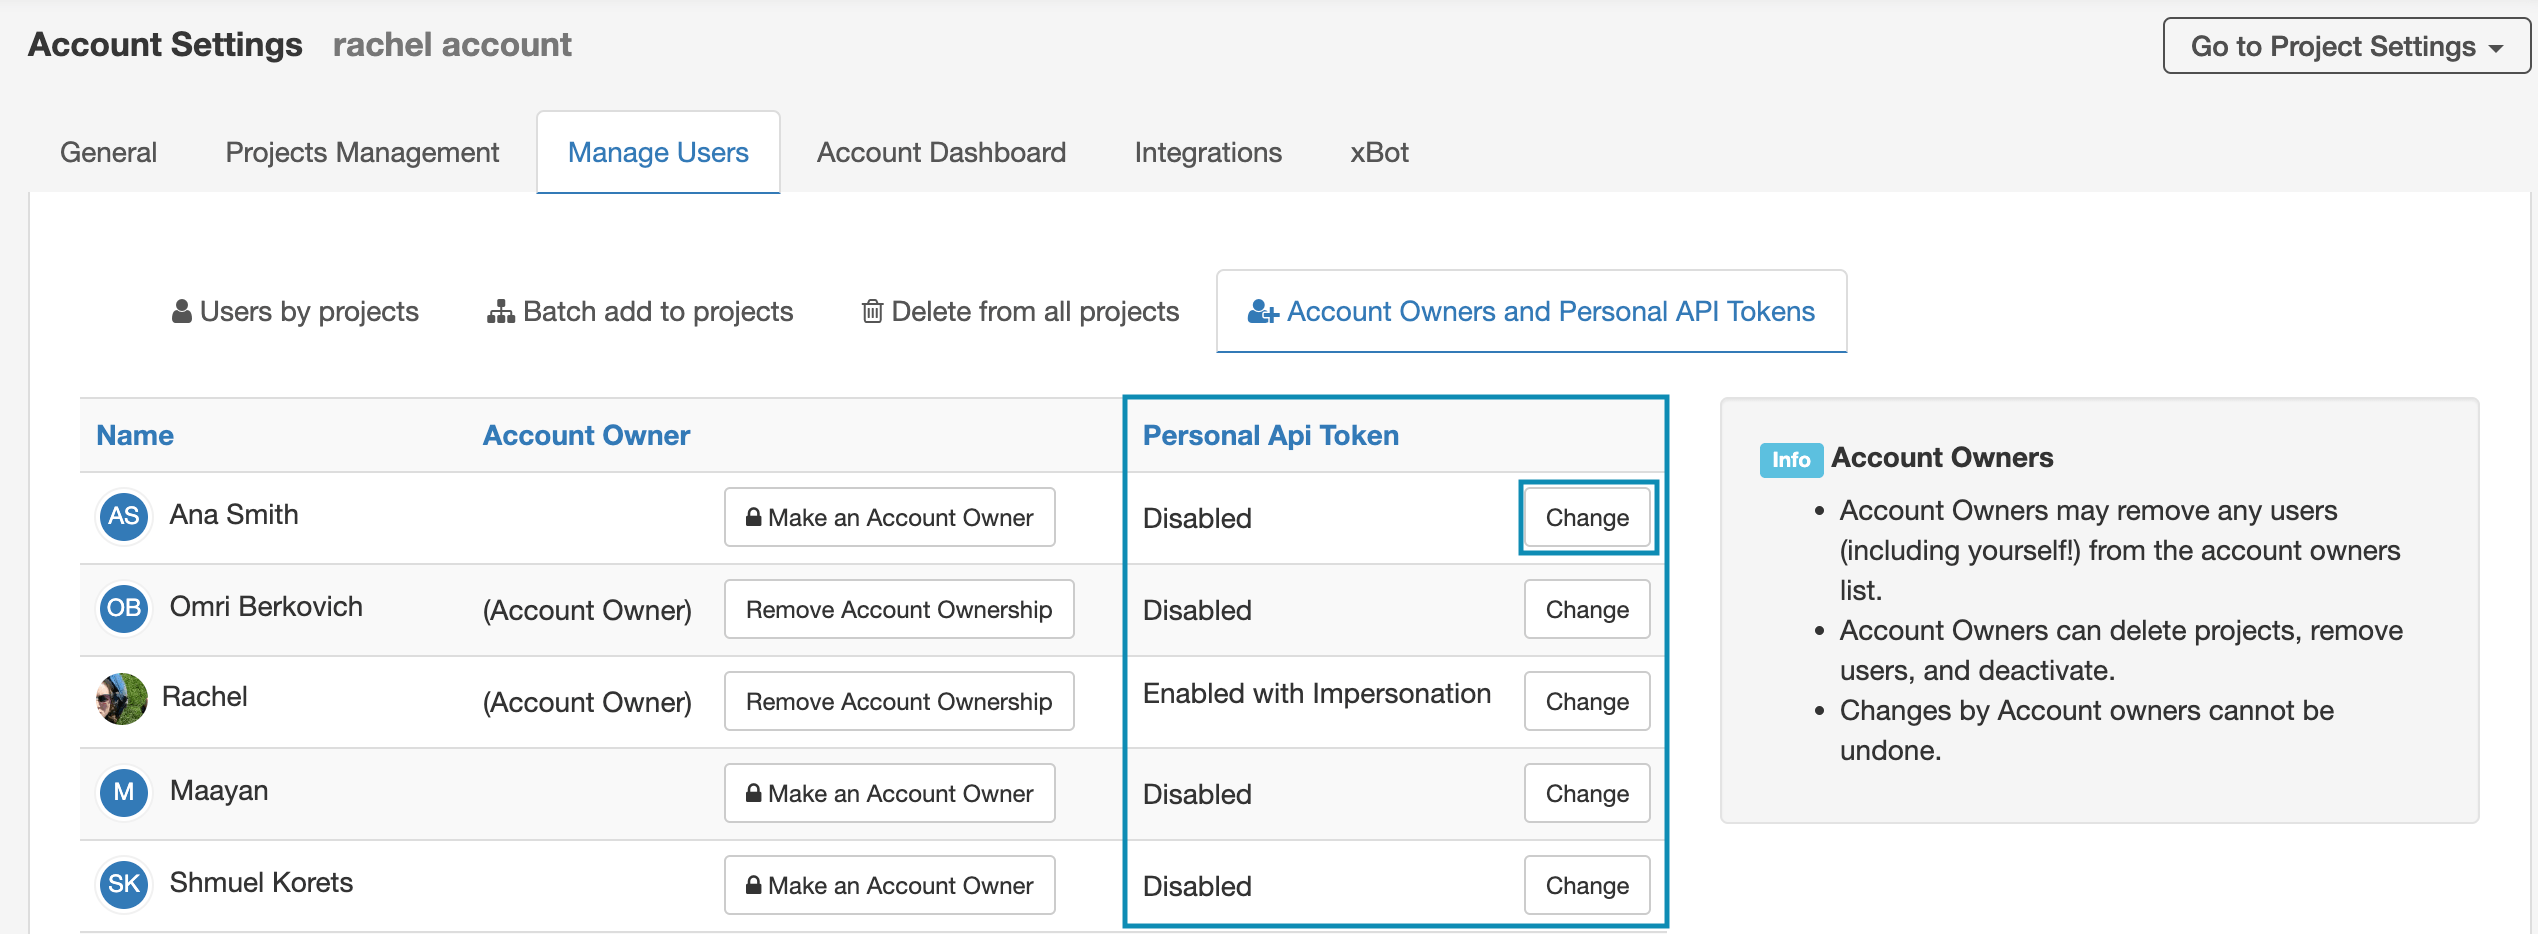
After clicking the “Change” button next to the relevant user, you will see a pop-up screen where you can choose to disable or enable the PAT.
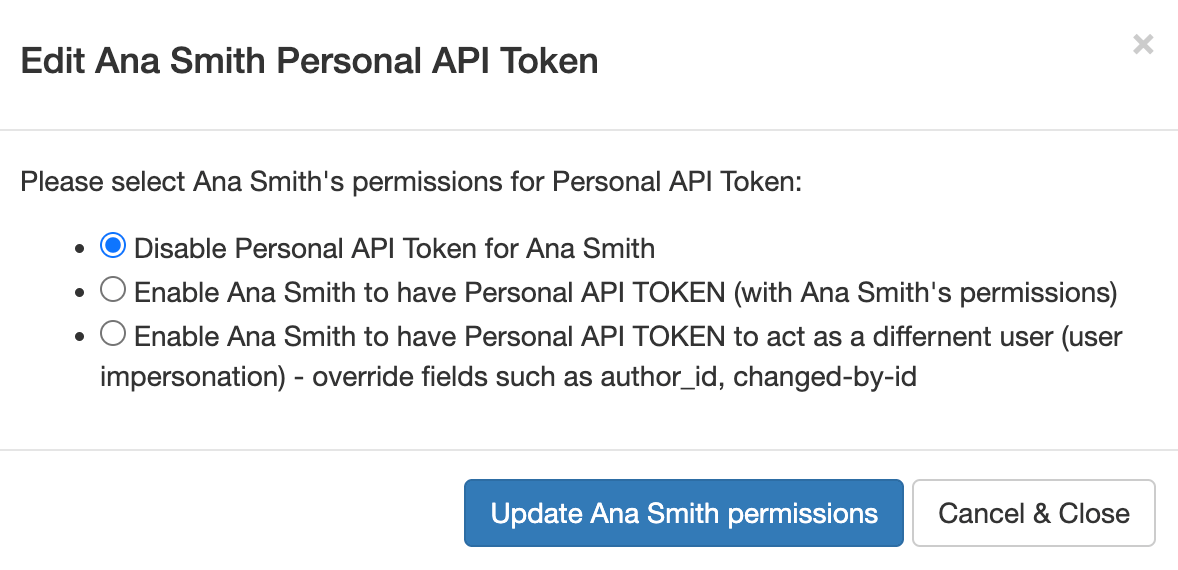
Once enabled, the user can find the PAT under their personal settings.
Managing Account Owners
PractiTest account owners can easily transfer their role to another user or add an additional owner to the account.
To change/add an account owner:
- Go to Account Settings → Manage Users → Account Owners* → Make an Account Owner.
- If an account owner has left your company without transferring their role to another user, another PractiTest user at your company should log in using the credentials of the account owner. Use the ‘Forgot my password’ option if needed. Go to Account Settings and perform the actions described in step 1 before removing the previous owner.
Once you are in the ‘Account Owners’ tab, you will see a list of users to name as an account owner.
Deleting a User From All Projects
Go to Account Settings → Manage Users tab, select a specific user and remove them from all projects.
