- General Project Settings
- Automation Settings
- Integration Settings
- Filter Settings
- Field Settings
- Step Parameter Settings
- Issue Workflow
- Dashboard Tab
- User and Groups
- Import and Export
You can customize almost every aspect of your PractiTest project to match your process and needs. For example, you can:
- Add custom fields to the issues, tests, test sets, instances, or requirements levels to specify the module and feature they refer to in your system
- Modify the issue lifecycle to match your bug management model
- Define the personal email notifications you want to receive for changes to the bugs, tests, and requirements you wrote
- Enable/disable different automation methods
These customizations are managed in the Project Setting module.
The Project Settings module contains several sub-tabs, allowing you to customize a different aspect of the platform.
If you cannot see or access all the tabs mentioned here, it’s possible that you don’t have the proper permissions to do so. Contact your PractiTest Account Owner to change your access level.
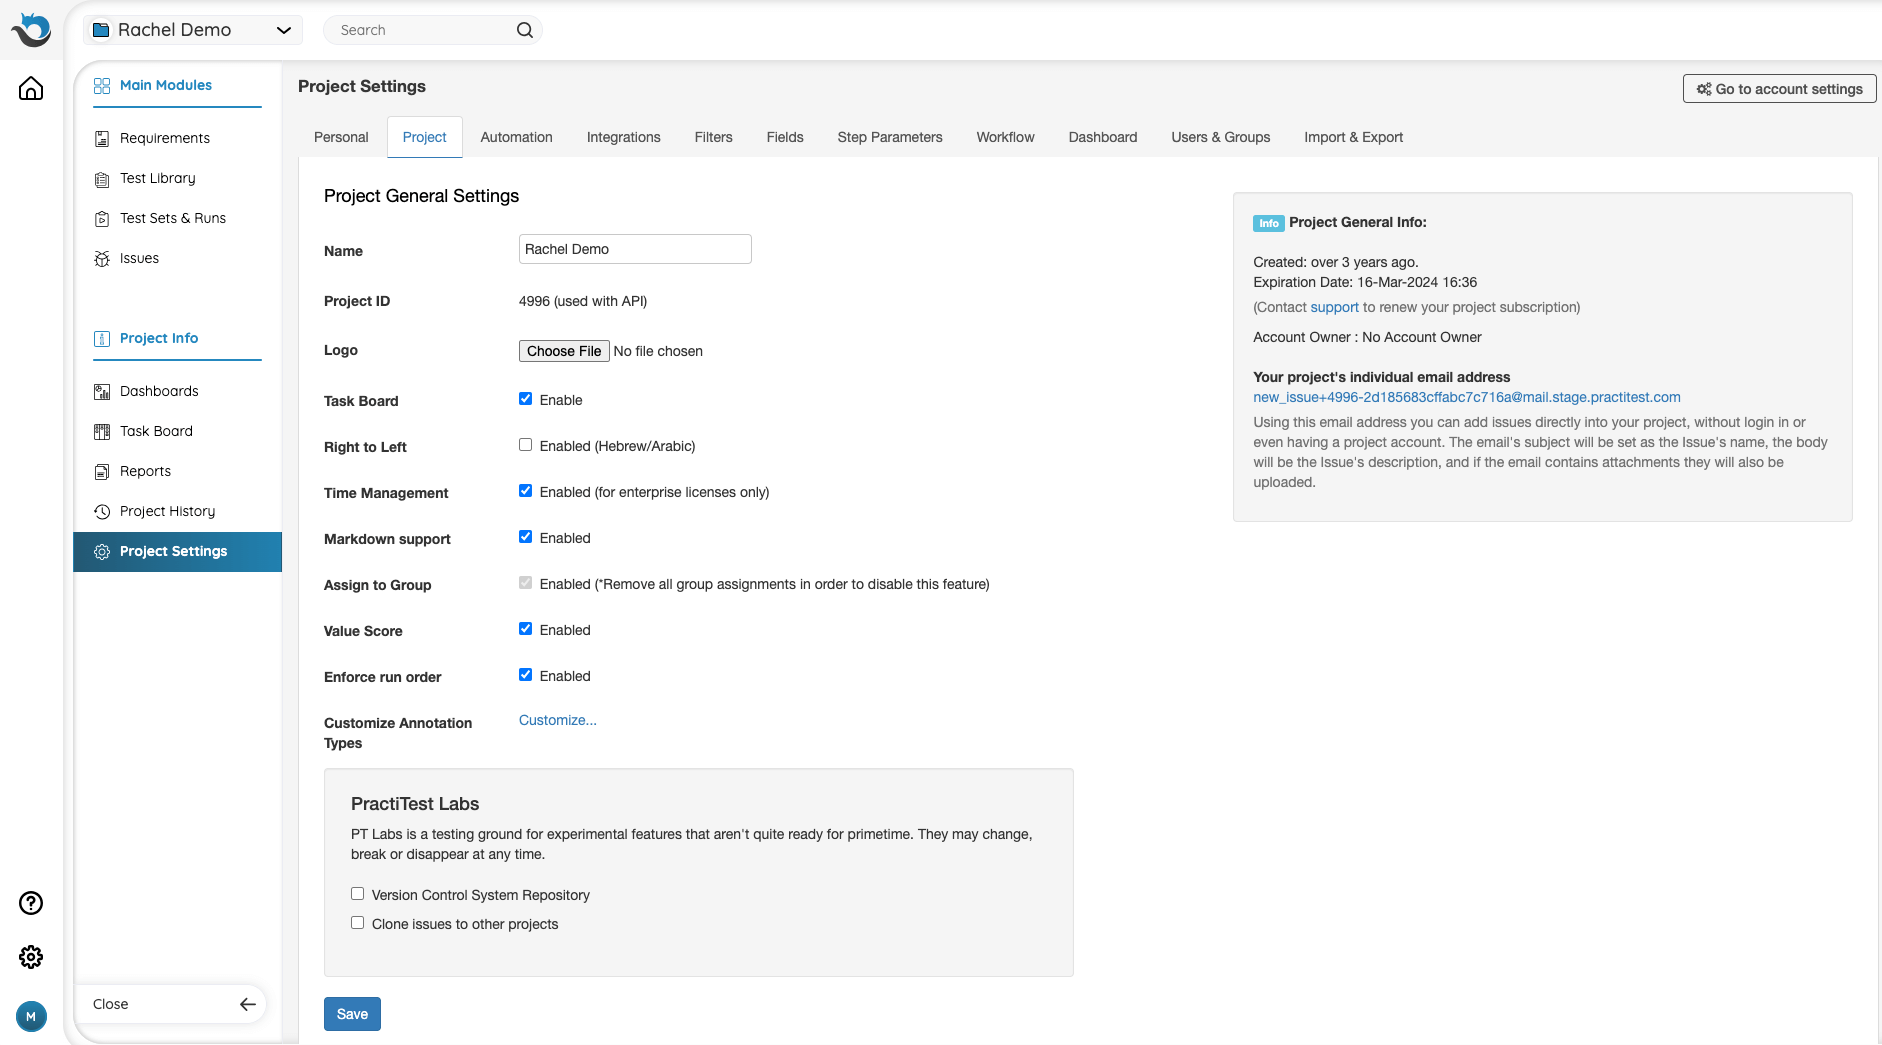
General Project Settings
On the Project tab, you can:
- Set and modify a project name
- See the project expiration date
- Upload your company’s logo, which will be visible to all users logging into the system
- Activate and configure the support of right-to-left text in the description field to support Hebrew and Arabic languages
- Enable and disable:
- The Task Board
- The Time Management feature
- Group Assignment
- The Test Score functionality for tests in the Test Library and instances in instance grid
- Enforce Run Order (mandates sequential test execution)
Automation Settings
To enable different automation test types for your project, go to the Automation tab.

To learn more about automation test types, visit the Test Automation Integration help page.
Integration Settings
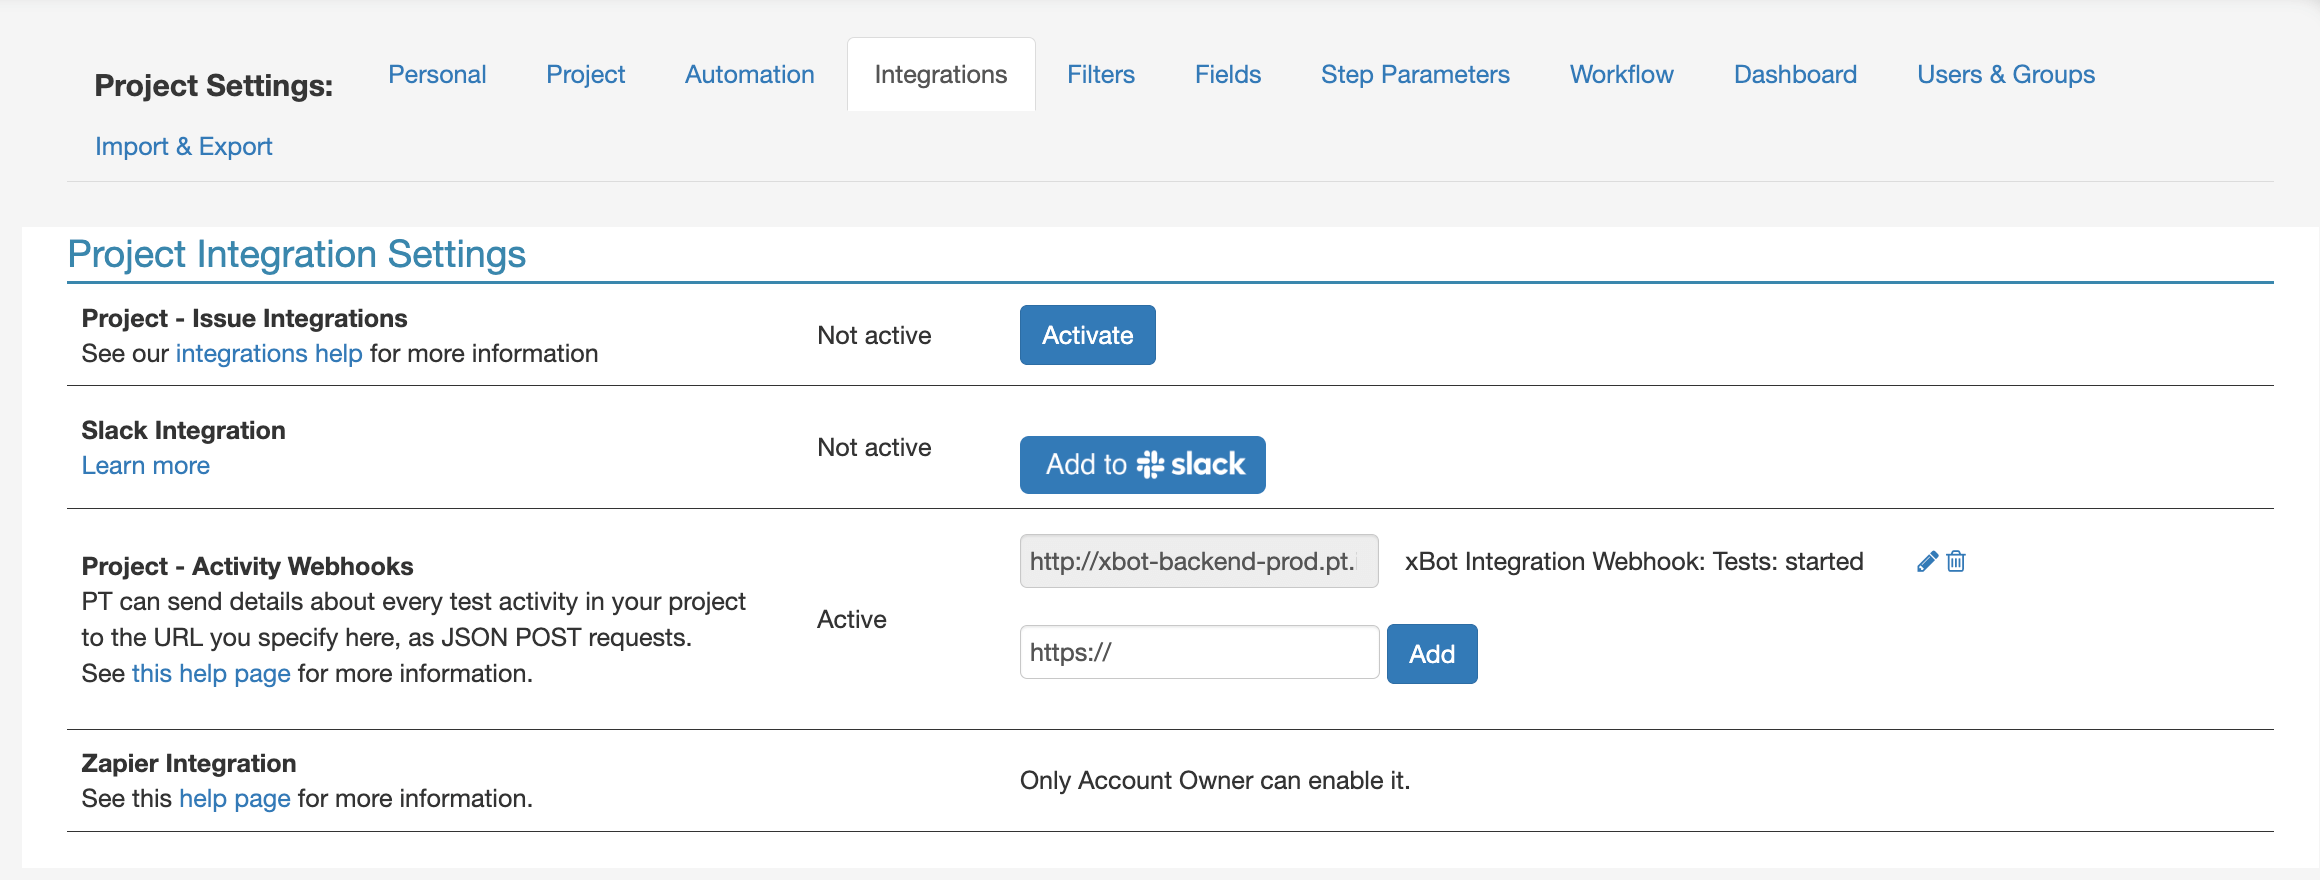
To configure your project integrations, go to the Integrations tab.
Note: before integrating an external system with PractiTest, your account owner must configure it in the account settings as explained here.
To configure an integration, click the ‘Activate’ button. Here you will find a list of the available two-way and one-way integrations. Choose and configure the integration you want according to the instructions here.
Filter Settings
In the Filters tab, you can create and edit any filter for any module.
Note: filters can also be created from within modules. For more information about filters, visit the Custom Filters help page.
Field Settings
In the Fields tab, you can create and edit any field for any entity.
Note: fields can also be created from within an entity. For more information about fields, visit the Custom Filters help page.
Step Parameter Settings
In the Step Parameters tab, you can create and edit step parameters that can be used in the manual scripted test steps.
Step Parameters can be either a list type with predefined options in a list, or a text - where the tester can later add a parameter. Step Parameters can also be created from within the step in the Test Library module. Read more about step parameters here.
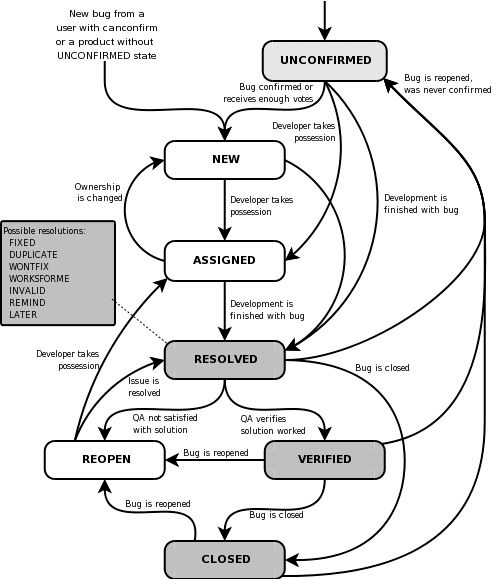
Issue Workflow
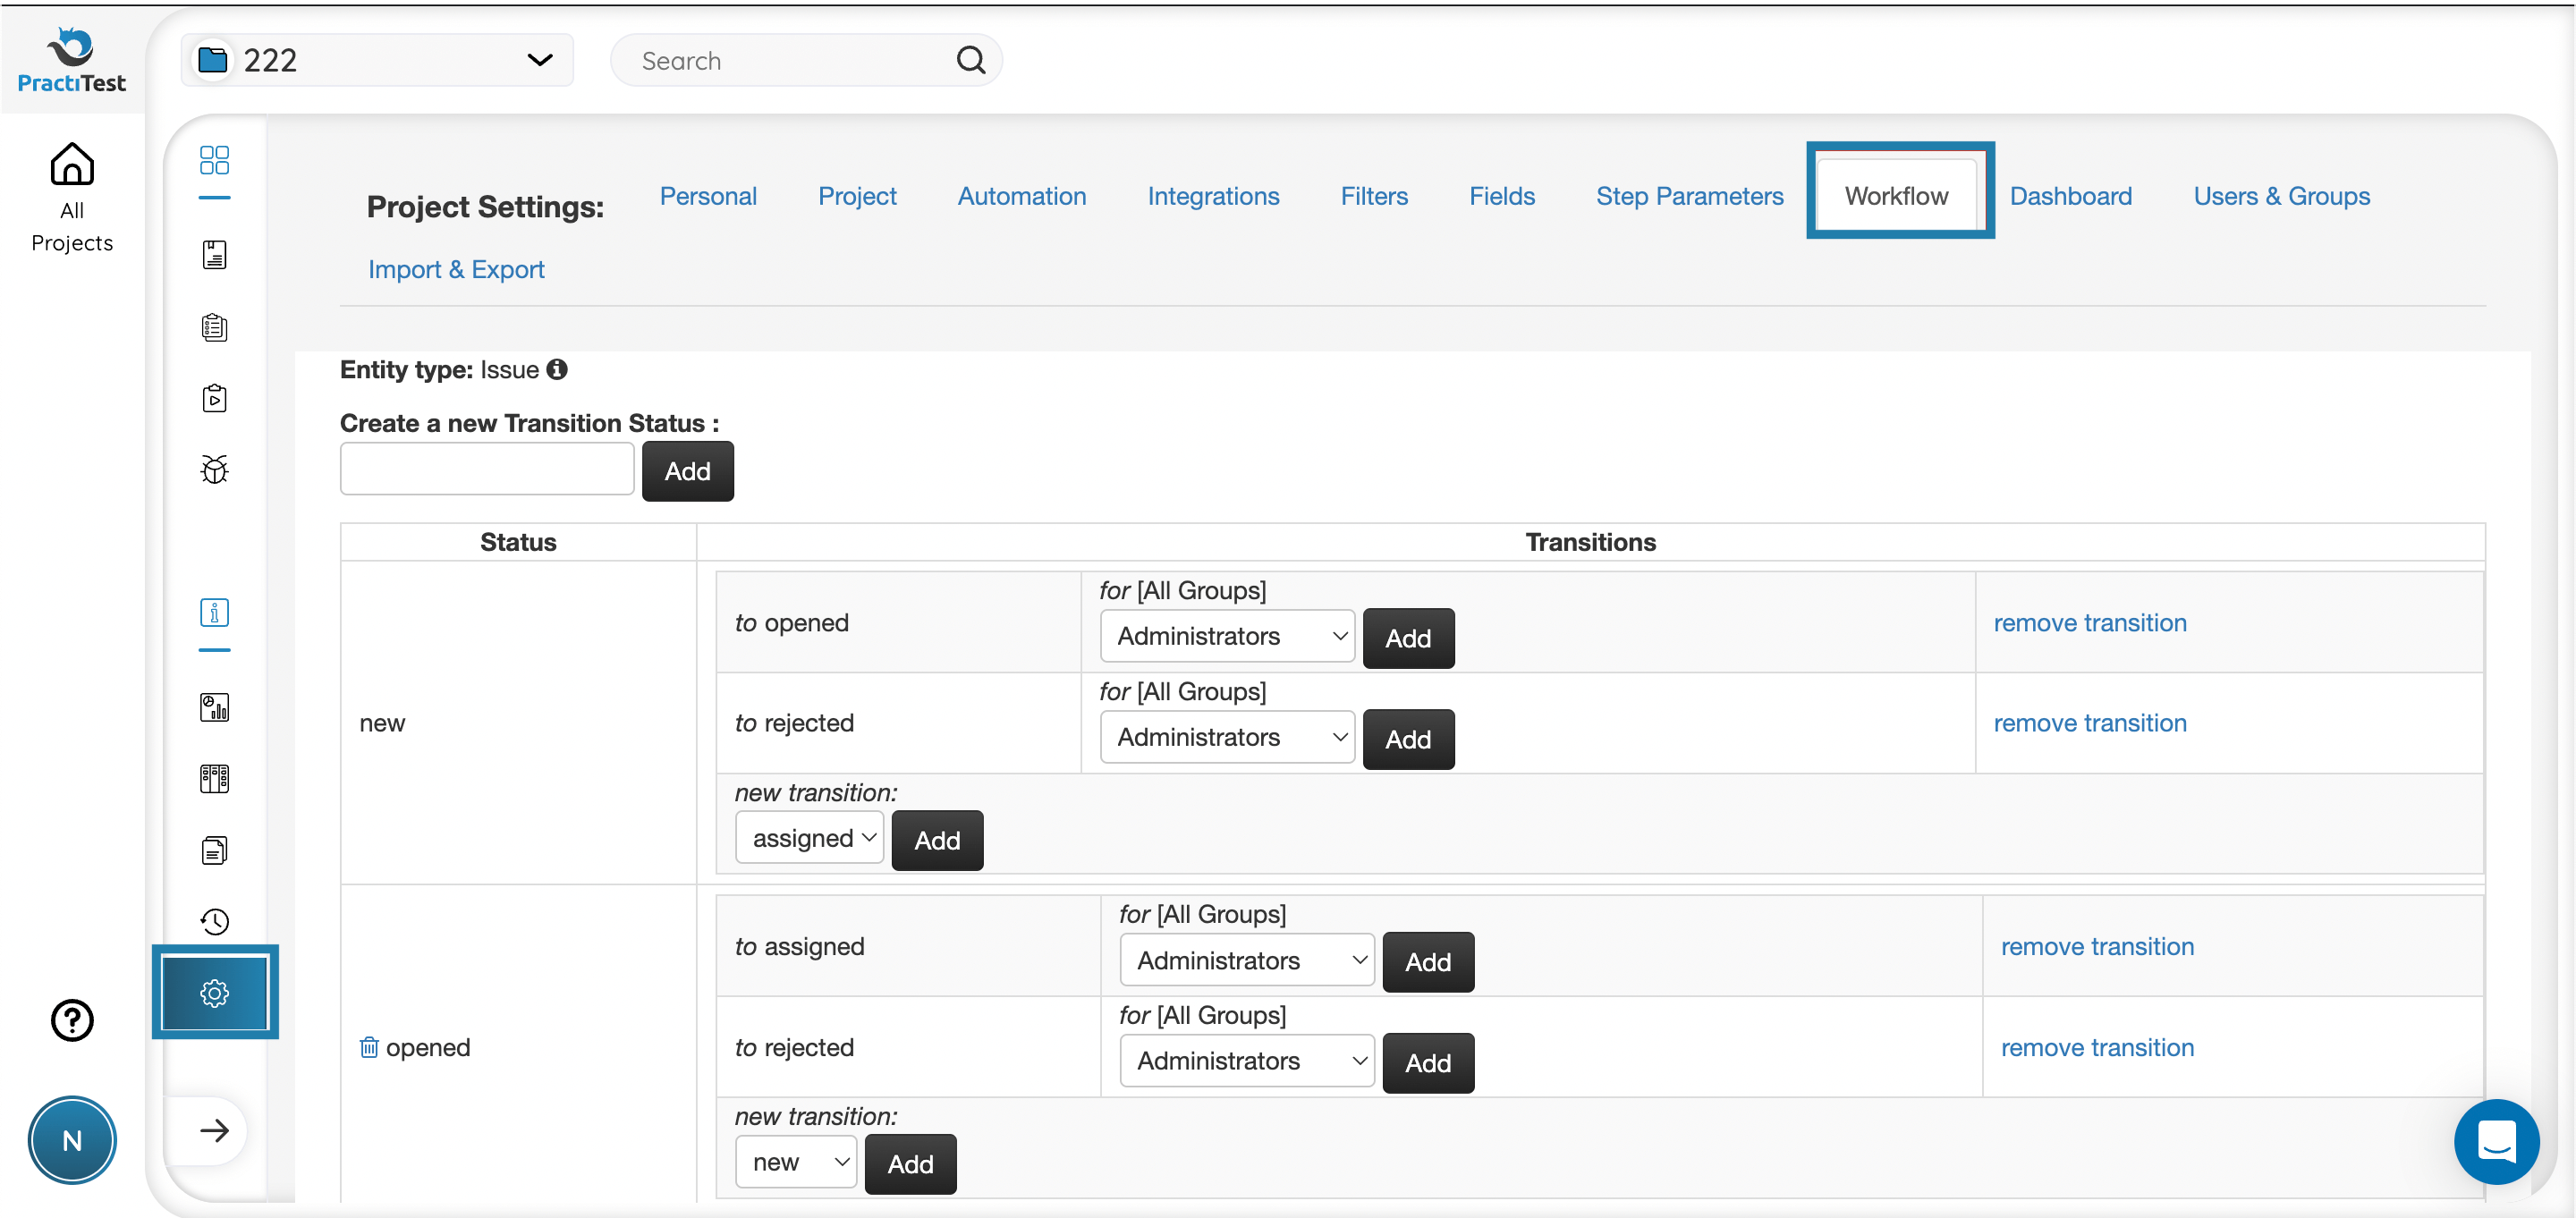
PractiTest’s workflow editor allows you to customize the lifecycle of your issues. You can add statuses and decide which statuses an issue can be changed to, based on its current status.
Adding a New Status
Add a new Transition Status by entering its name and then clicking the ‘Add’ button. For example, you can add a status “Rejected” for issues that become irrelevant.
To remove a status, click on the trash icon to the right of the status. Notice that some statuses cannot be removed since they are used by the system to perform internal calculations.
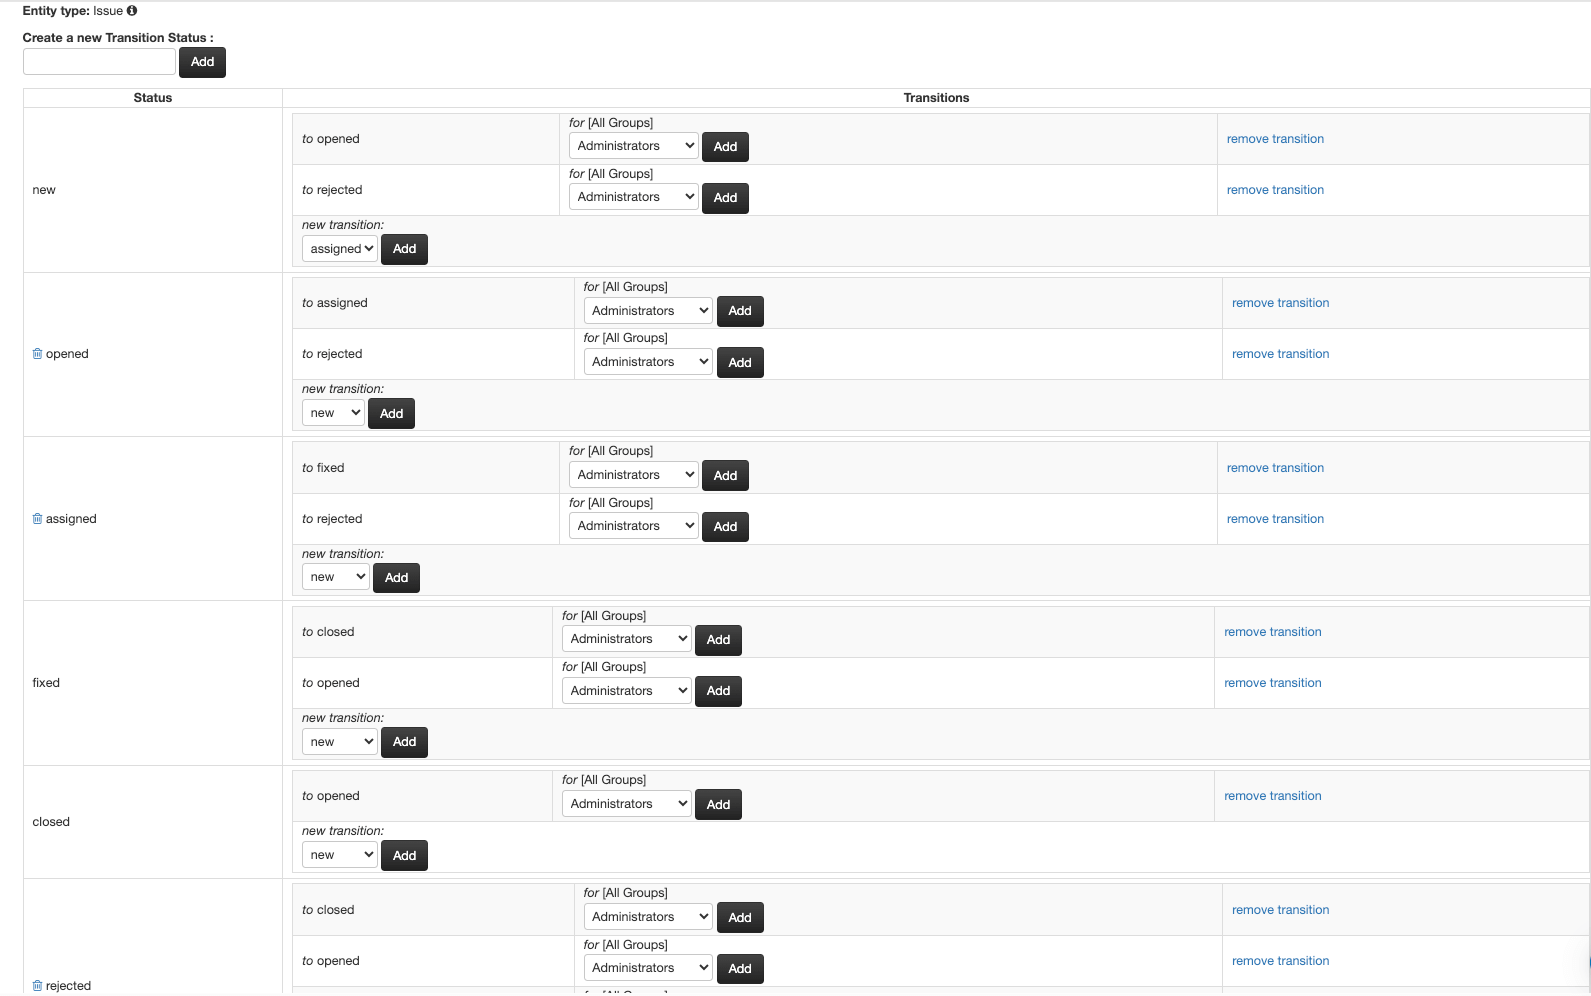
Status Transitions
For each status, you can define the allowed transitions to another status by choosing it from the dropdown list called new transition. Permissions to make these transitions can be given to all users of the system, or they can be limited to specific user groups (ie. allow only managers to reject issues). To do this, select the relevant group from the list. By default, transitions are set to all groups.
Defining a lifecycle as shown below is as easy a few clicks:
Dashboard Tab
In the dashboard tab, you can clone, edit, delete, reorder, and add Dashboard Tabs. You can also add, edit, reorder and delete dashboard items. If you would like to enable and view the URL for external dashboard items and tabs, visit the dashboards help page.
User and Groups
Use this tab to manage your groups’ users and permissions, add new users, and more. For more information on defining users and groups, visit the Users and Groups help page.
Import and Export
You can import Requirements, Tests, Steps, Issues and their linked entities (traceability). For more details about each option, please visit the dedicated help page.
Exporting Information From PractiTest
From the Import & Export tab, you can choose to export all the information available in PractiTest.
This includes:
- Issues
- Tests
- Test Runs
- Test Sets
- Requirements
Extracting Partial Data as XLSX (Excel)
PractiTest allows you to export partial data based on filters as Tabular Summary Report XLSX files. This is done from the filter tree in Requirements, Test Library, Test Sets & Runs, and Issues modules. This mechanism uses the PractiTest general reports engine (available under Project Info) so you can add fields and details to your report, export linked entities to preserve traceability, and more.
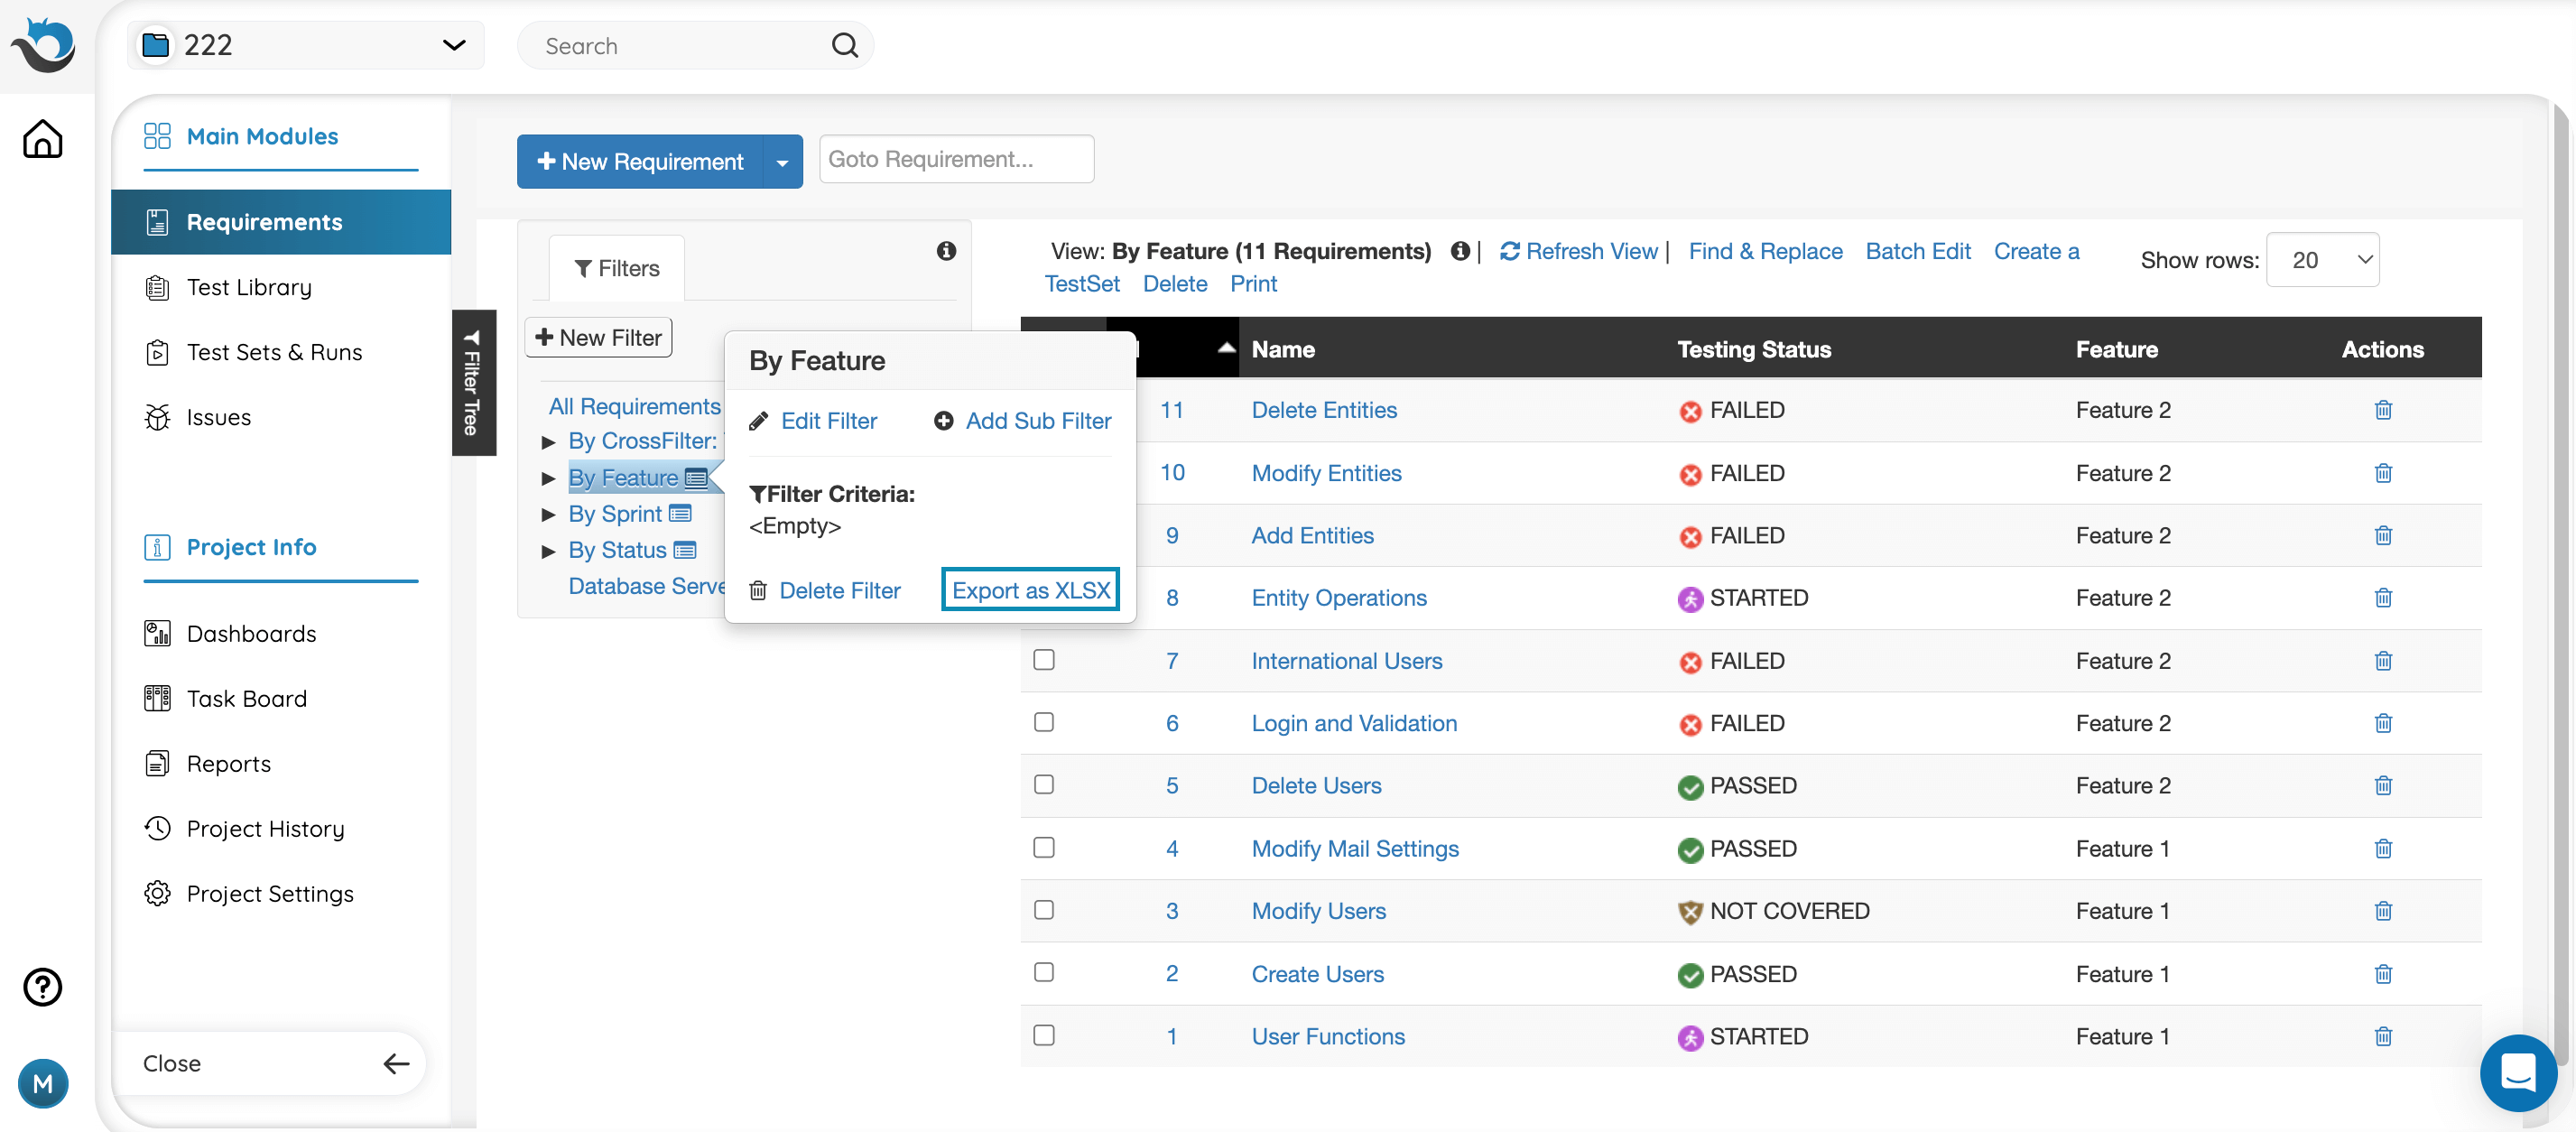
To export partial data, follow these instructions:
- Go to the relevant module (Requirements, Test Library, Test Sets & Runs, or Issues)
- Expand the filter/view tree by clicking the light blue bar on the left side of the screen.
- Click the filter’s information icon
- Click the link to export the view as XLSX
Note: The ‘Export as XLSX’ option redirects you to the report center and predefines your reports settings based on the selected view.
If the entities you want to export do not belong to a specific filter, follow the steps described here. Read more about Tabular Summary Reports here.
Exporting Attachments From PractiTest
Note: this operation can only be performed by the Account Admin.
To export attachments from PractiTest, go to the Import & Export tab under Settings and click the “Export All Attachments” button.
The system will create a download link that is available to all users, which will appear in the same tab. The link will be available for 24 hours and will download all attachments as a zip file.