Following this guide will help you configure your PractiTest projects in alignment with best practices. The guide is built in a sequential order of steps to follow in order to ensure your account is properly configured.
Before you start with the configuration, we recommend you take a few minutes to watch the below video, which covers the entire PractiTest flow.
If you need help with anything, please don't hesitate to let us know! You can reach out to our support team directly from within the platform.
Getting Started Checklist:
- Set Up Your PractiTest Projects
- Configure Relevant Integrations
- Create Tests Infrastructure Using Fields
- Import/Create Tests
- Structure Tests Using Filters
- Create and Organize Test Sets
- Import/Create System Requirements & User Stories
- Run Your First Test Cycle
- Manage Issues
- Dashboards & Reports
- Test Automation Integration
Set Up Your PractiTest Projects
PractiTest projects are independent entities. By default, your account is created with one project. The first thing you need to consider is if you need to work with multiple projects, or within a single project framework.
As a best practice, we recommend working within a single project framework when testing is done by the same team and on the same product. Using PractiTest’s dynamic fields and filters organizational method, which will be explained later in this guide, you can organize your project data in a hierarchical structure and display data in different views based on different types of product components, features, modules, and even products.
The main reason why we consider working with a single project framework as best practice is reporting. Each project has its own unique set of dashboards and reports. Therefore, to create a consolidated dashboard for all testing activities of the team/product, it is best to work with a single project.
These are the main reasons why you may want to have more than one project in PractiTest:
- When you have multiple independent teams working on separate projects
- When your company has multiple development projects with different external customers and you don’t want them to see each other’s information
- You are testing 2 or more completely separate products that have no tests and issues overlapping whatsoever
Adding New Projects
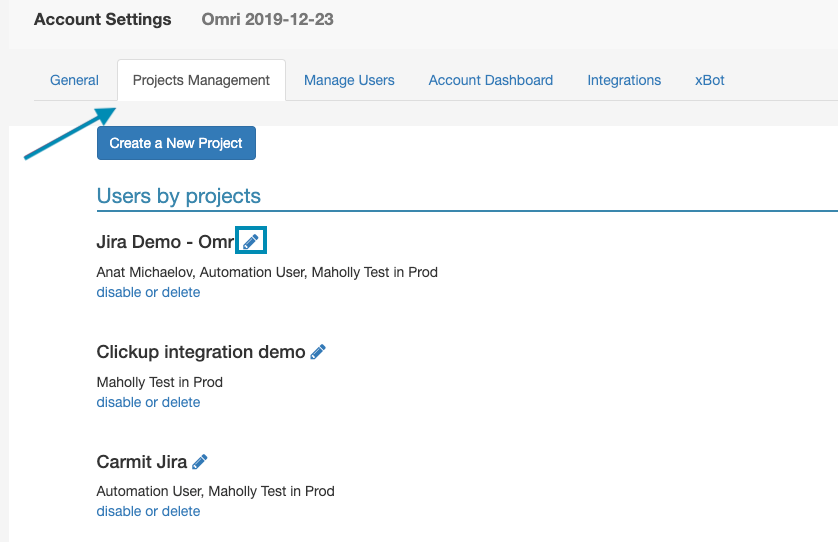
You can add new projects from the Project Management tab of the Account Settings.
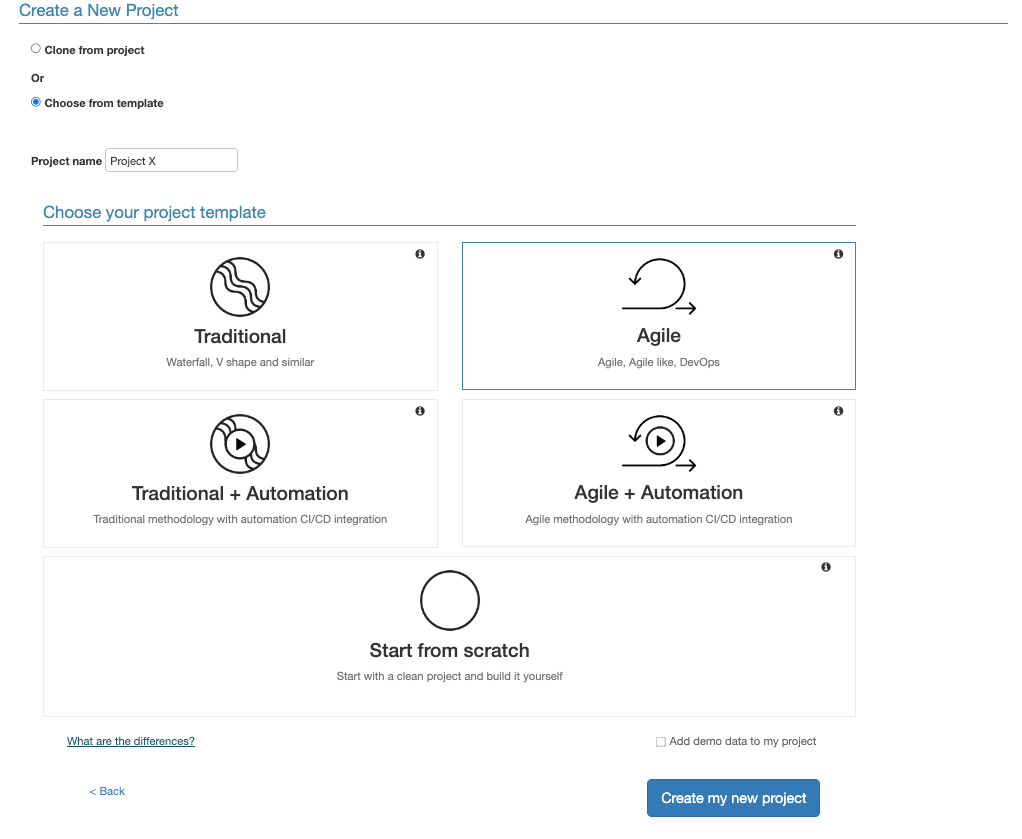
Choose from template
When selecting the “choose from template” option, you will have the option to choose the method according to which you want your project structure to be.
The following options are available:
Traditional - supports Waterfall methodology or similar
Traditional + Automation - same as Traditional with a few additions to support automation
Agile - supports Agile, DevOps and Agile-like methodologies
Agile + Automation - same as Agile with a few additions to support automation
Start from scratch - clean and empty project
Demo data - you can also decide to add demo data to your project, and thus see an example setup for a project that includes data. To add demo data, tick the ‘Add demo data to my project’ checkbox at the bottom of the page. If you are planning on working with this project, we don’t recommend adding data to it.
Renaming your project
Make sure you edit the default name assigned to your project to reflect the project goals and avoid unnecessary confusion in the future. You can edit project names from the project management tab of account settings, by clicking the pencil icon next to the project name.
Configure Bug Tracker Integration
If you are working with platforms such as Jira, ClickUp, Azure DevOps, and others for bugs and product management - start by configuring the integration between PractiTest and the bug tracker you are using.
You can find all our integration help guides here.
Create Tests Infrastructure Using Fields
The PractiTest organizational method is unique and highly reliant on fields and filtered views. Fields are dynamic labels that are used to associate tests and other items in the platform with their relevant organizational units. The field association for each one of your tests can be used to define filtered views that display tests by their units. Sorting your tests using filters allows you quick access to test units, reuse the same tests in multiple units, and get insights related to specific units
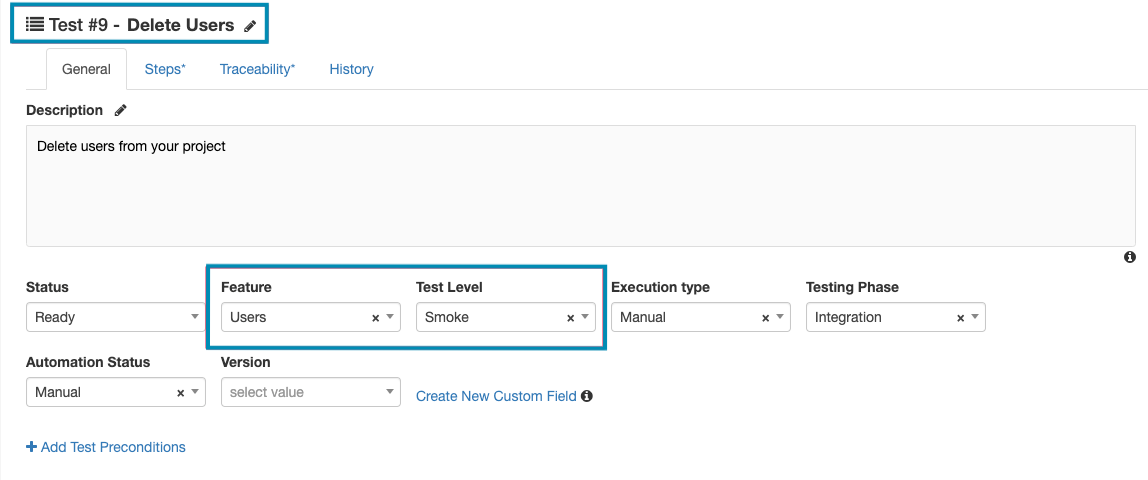
A correct and early definition of fields for a project is crucial for the project’s success.
Before you start importing or creating your tests in PractiTest, we recommend that you consider how you want to structure and categorize them, and set up your fields based on the categories. By setting up fields before you start creating your tests, you can ensure your project will be organized from the very beginning, and that will make test set creation and reporting much easier later on.
Here are a few examples of tests categorization options you can use in your project:
- By Modules
- By Components
- By Features
- By Products
- By Areas
- By Test Levels (Sanity, Regression, etc..)
Once you have the structure in mind, start by setting up fields based on your categories.
System Fields

System fields will be available in every PractiTest project by default. You can edit your system fields, and decide where you want to display them from the ‘Fields’ section of settings.
Depending on the project template you selected, a few custom fields will be created for your project by default. You can also edit and remove those fields from the custom fields section of the fields page.
Custom Fields
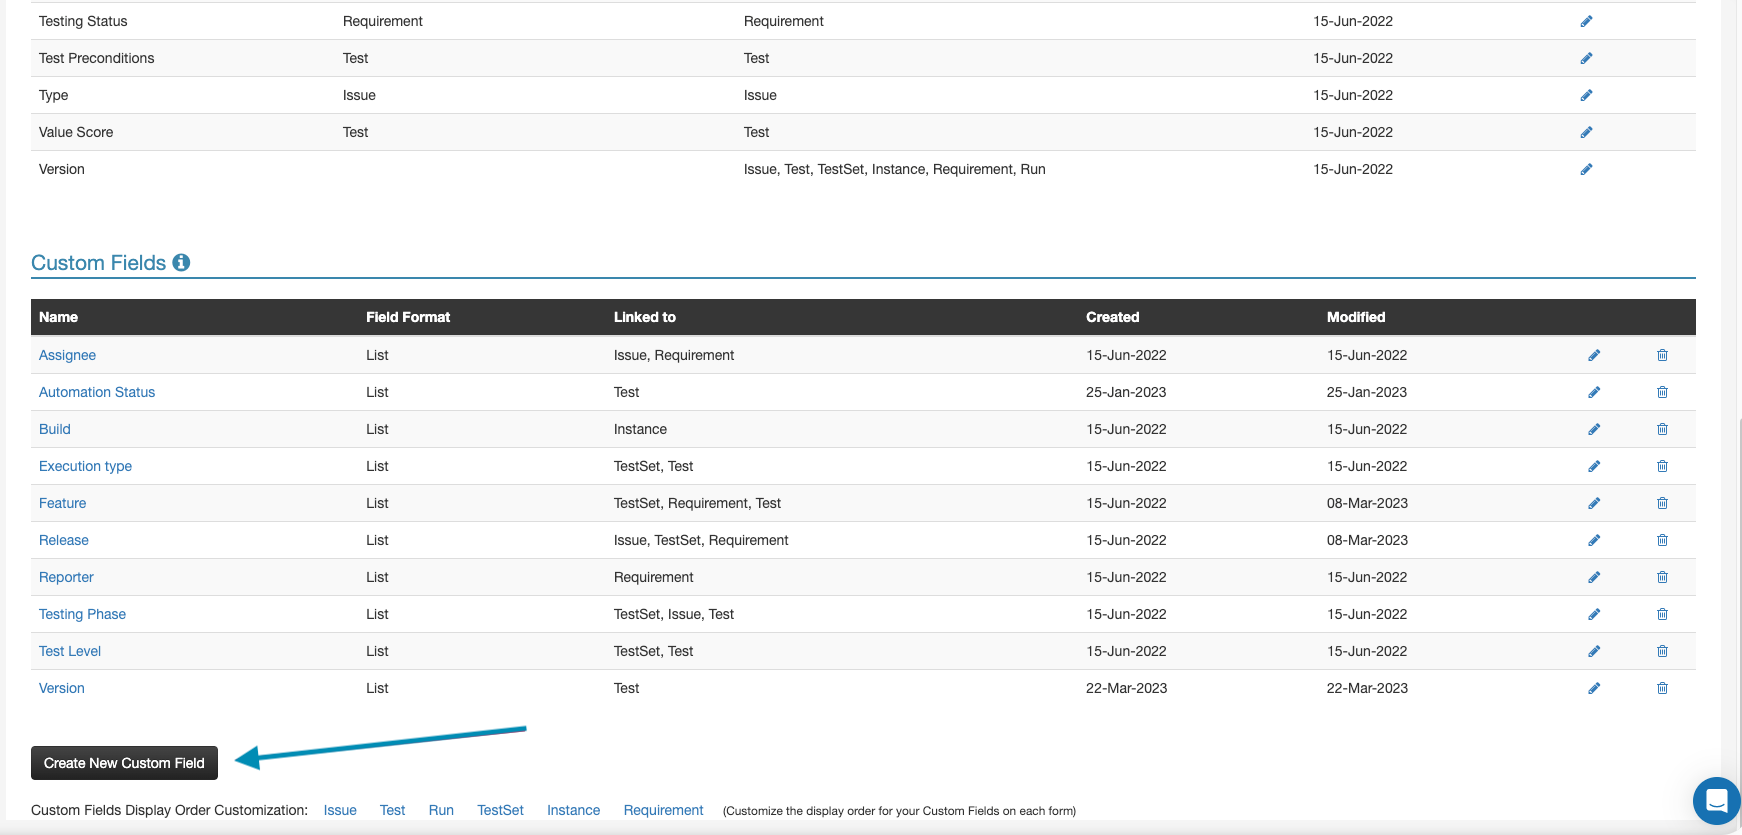
You can create new custom fields either directly from your tests, or from the ‘Fields’ section of your project settings. We highly recommend using list-type custom fields in most cases. Using list fields, you can pre-define a set of values that can be selected to populate the field. You can also make fields mandatory. This will require your team to fill in the fields in order to save their tests. Make sure to link the field you are creating to the relevant module, by ticking the relevant box in the ‘Field linkage to entities’ section.
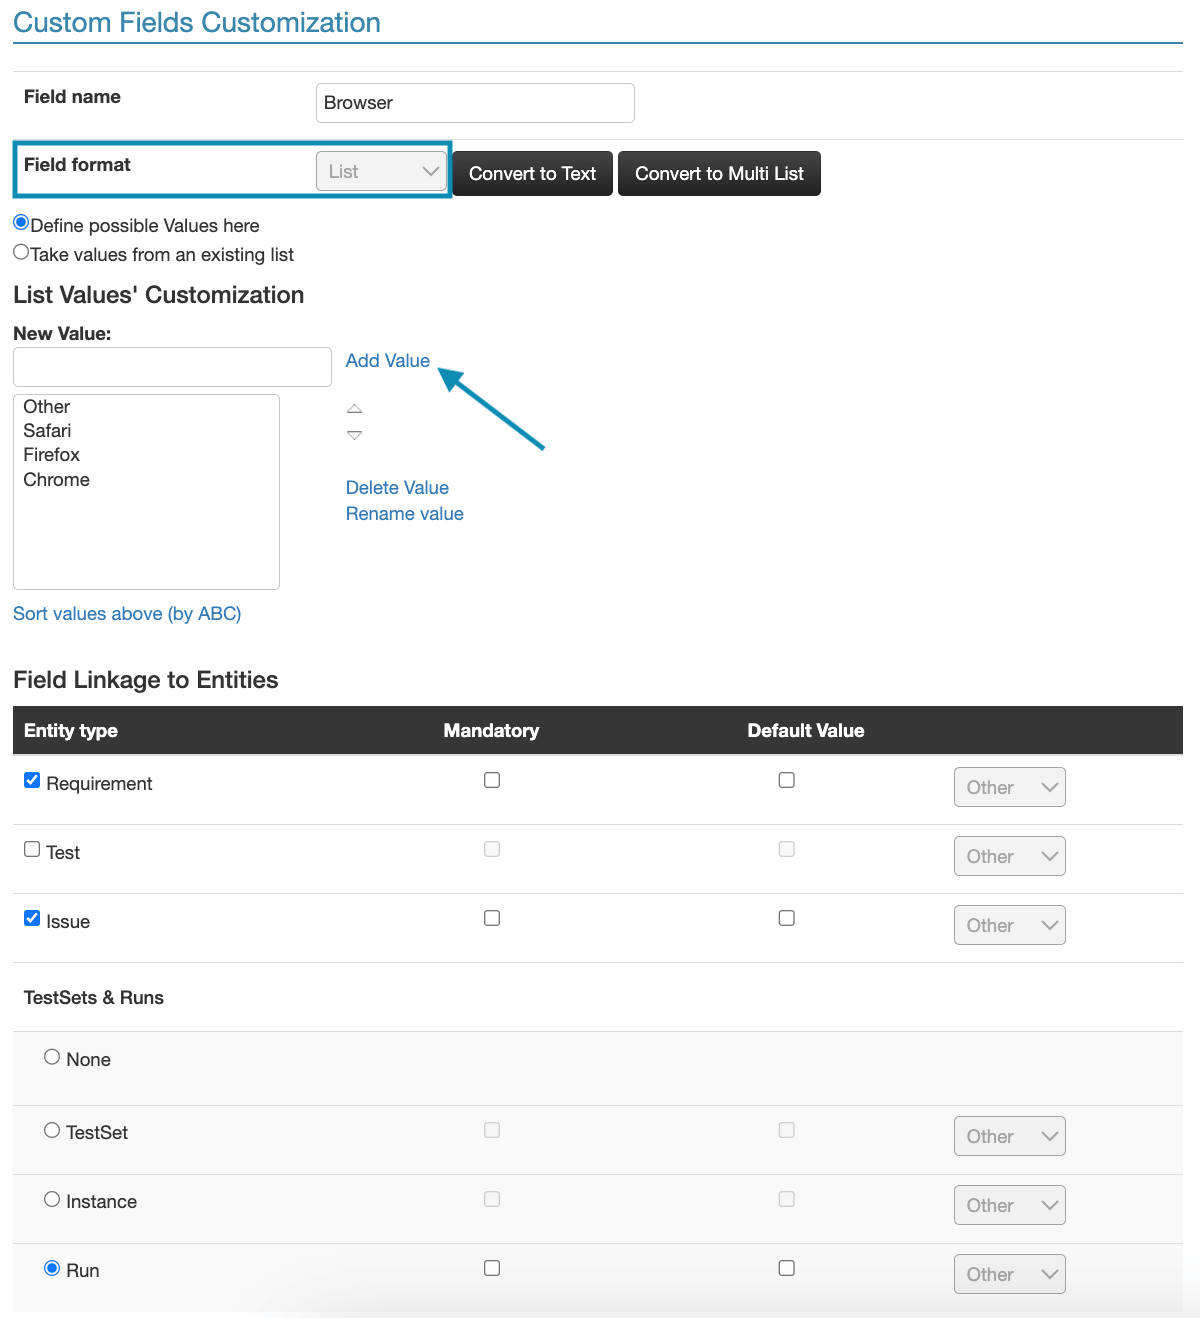
You can find a detailed step-by-step guide for setting up your custom fields here.
Import/Create Tests
Importing Tests
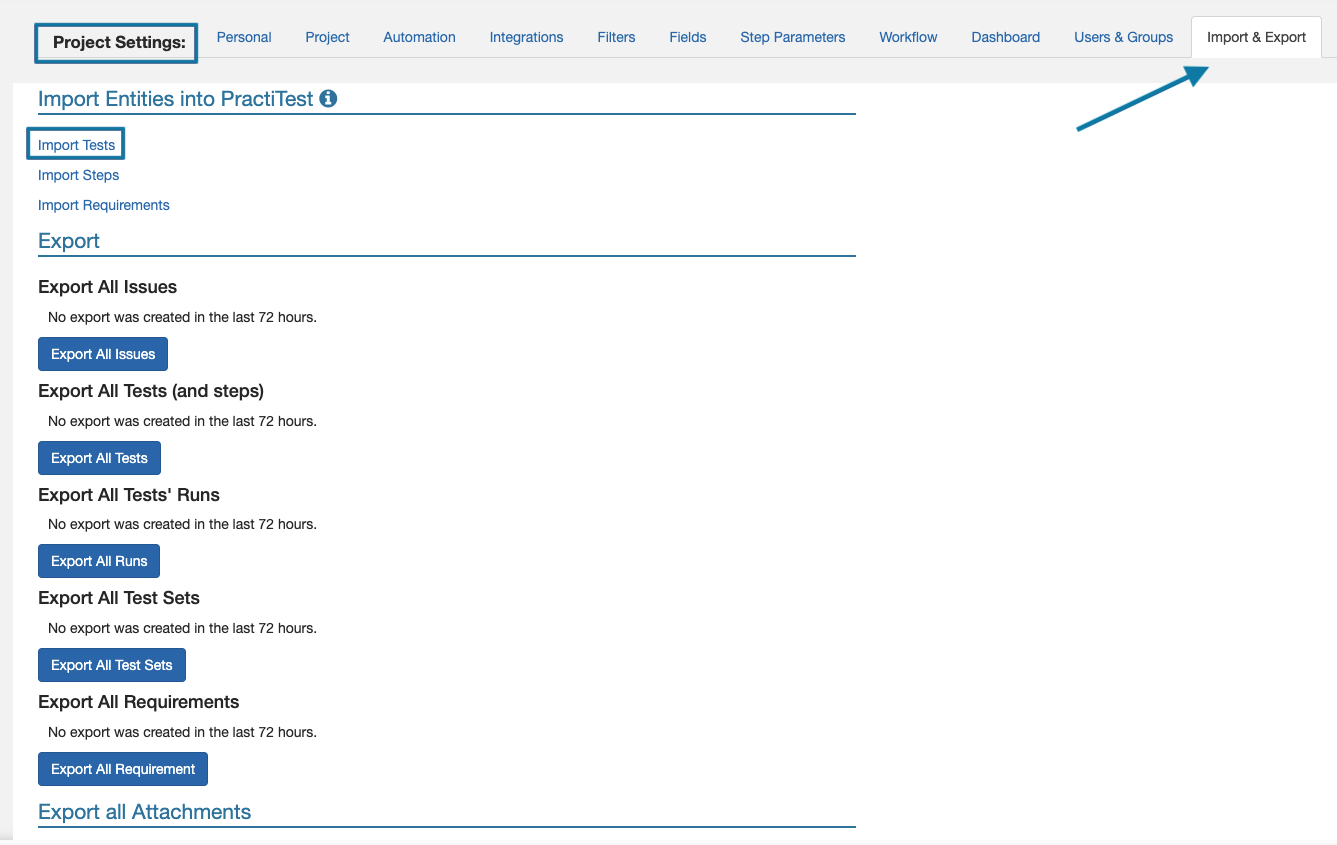
When you are done with the initial setup for your fields, you can start importing your tests from Excel/Google Sheets. To access the import page, click on Settings - Import & Export. Then click on ‘Import tests’. In the tests import screen, all the fields you created for your project will appear.
Instead of populating fields individually for each test you import, you can populate the fields directly from the import process. This is the first step to ensure your project is organized from the get-go.
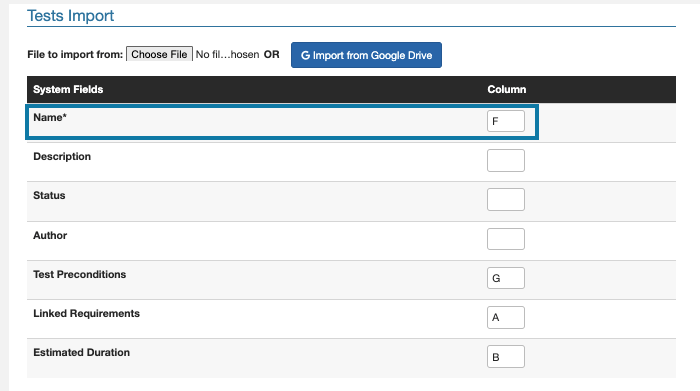
On the import page, you need to map the columns of your spreadsheet, to the fields shown on the page.
For example, if test names are listed in column ‘F’ of my spreadsheet, I will replace the latter A with an ‘F’.
When you import tests, you can import the link between tests to requirements using the ‘Linked Requirements’ field. The corresponding column in the spreadsheet should contain the requirements IDs of the requirements you want to link to a test.
You can find the full import guide here.
Creating Tests
There are four types of tests you can create in PractiTest - Scripted, Exploratory, BDD, and Automated.
Scripted Tests
Scripted tests contain predefined steps for the tester to verify.
The general tab of the test contains the test name and description, metadata, all system and custom fields related to the test, and a comments section.

The steps tab contains all steps information. Each step consists of 3 fields - name, description, and expected result. You can add attachments and comments for each step.
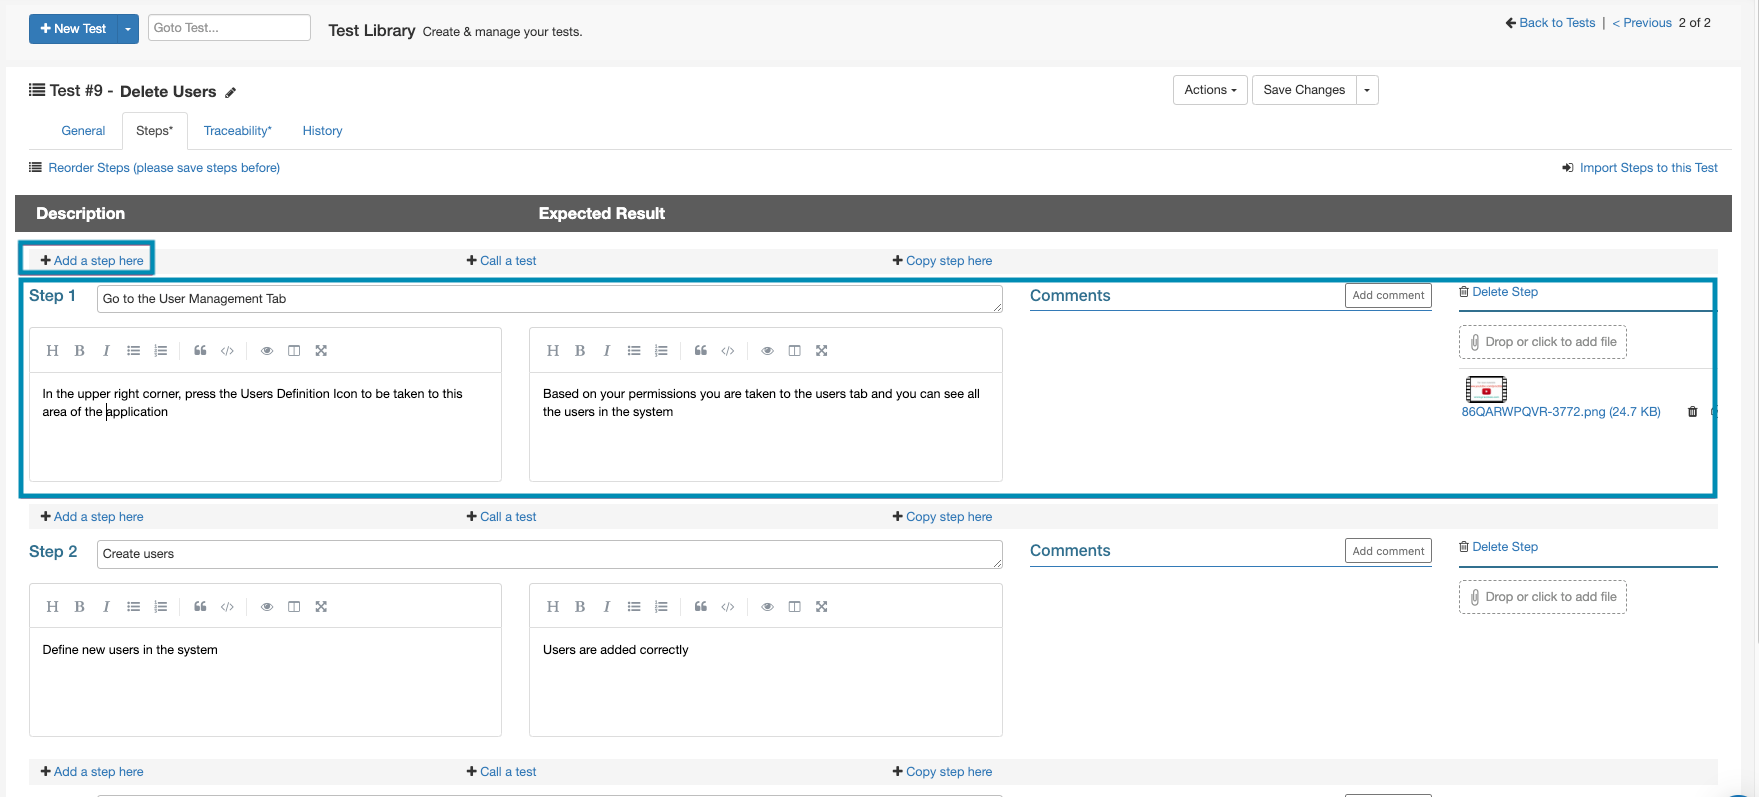
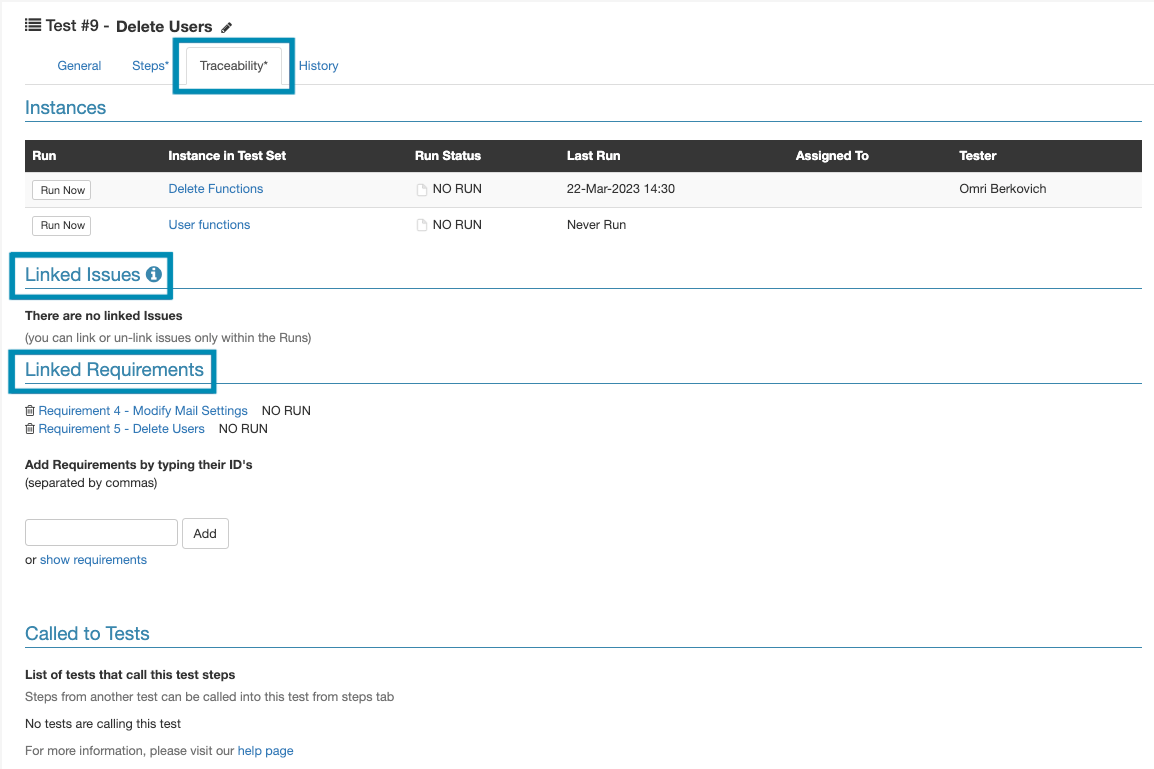
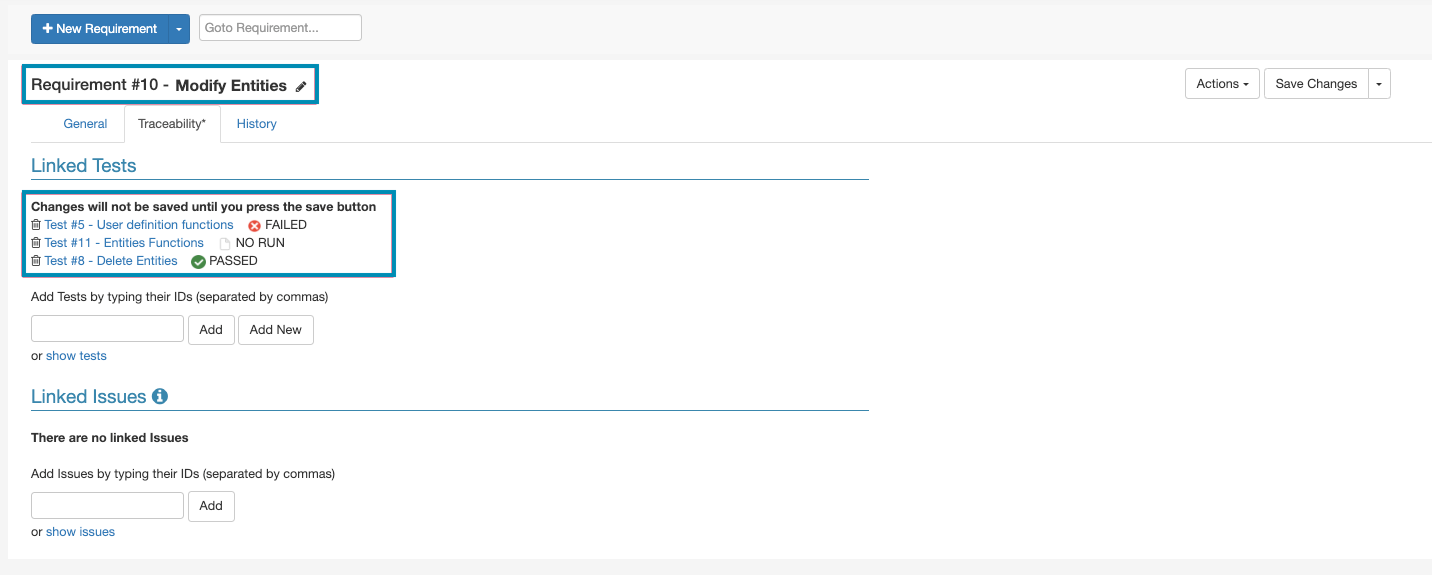
The traceability tab is where linkage to requirements and issues is defined and displayed.
The history tab displays the history log of the tests.
Exploratory Tests
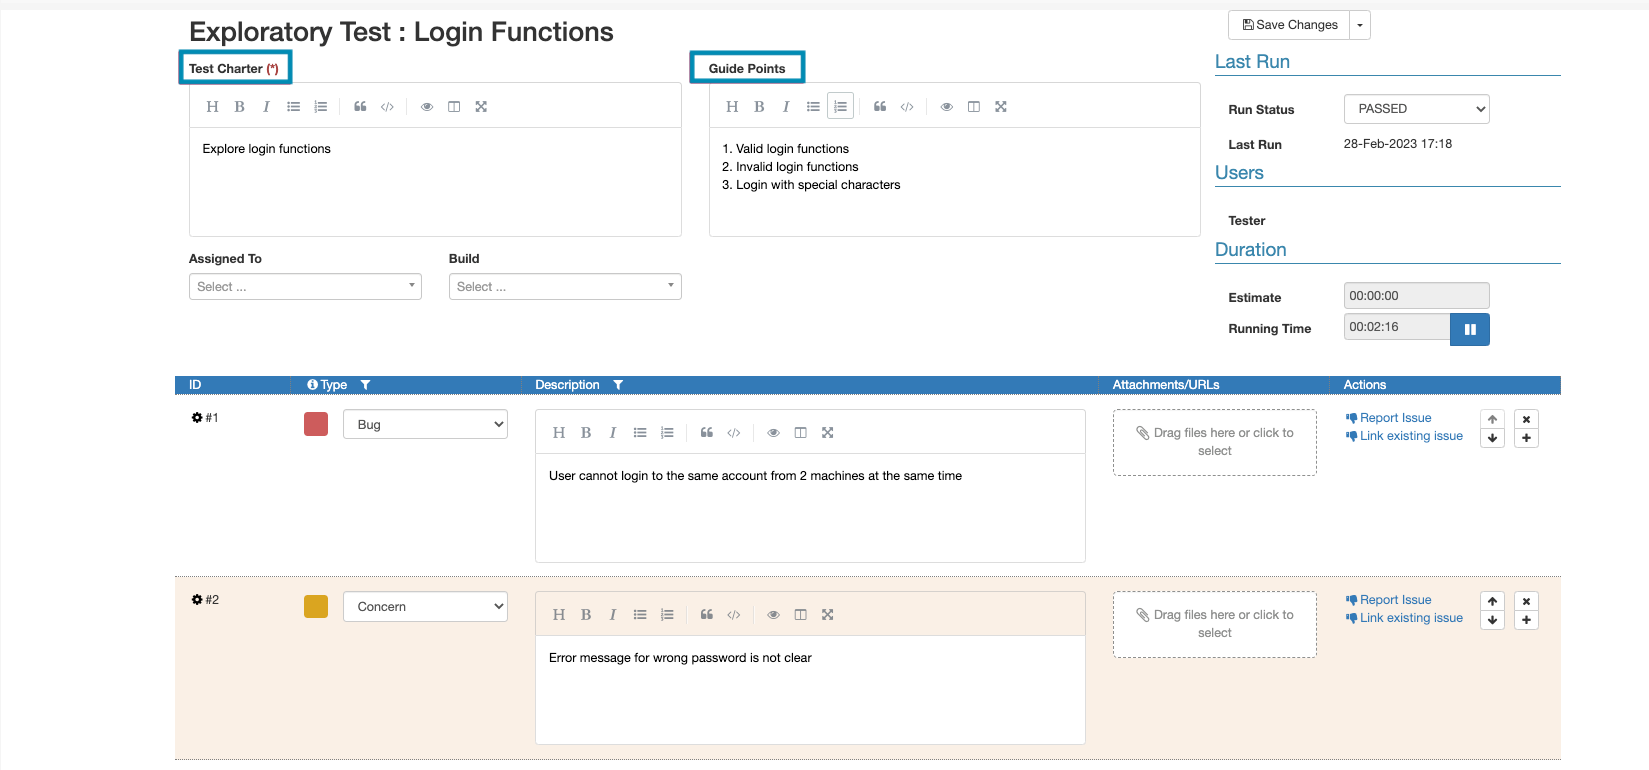
Exploratory tests contain a charter (mission), for the exploratory session. And, guide points for the executing tester. During the session, the tester can add annotations on the fly based on their findings.
Exploratory tests are structured like scripted tests, but have 'Charter', and 'Guide Points' fields instead of the 'Description' field.
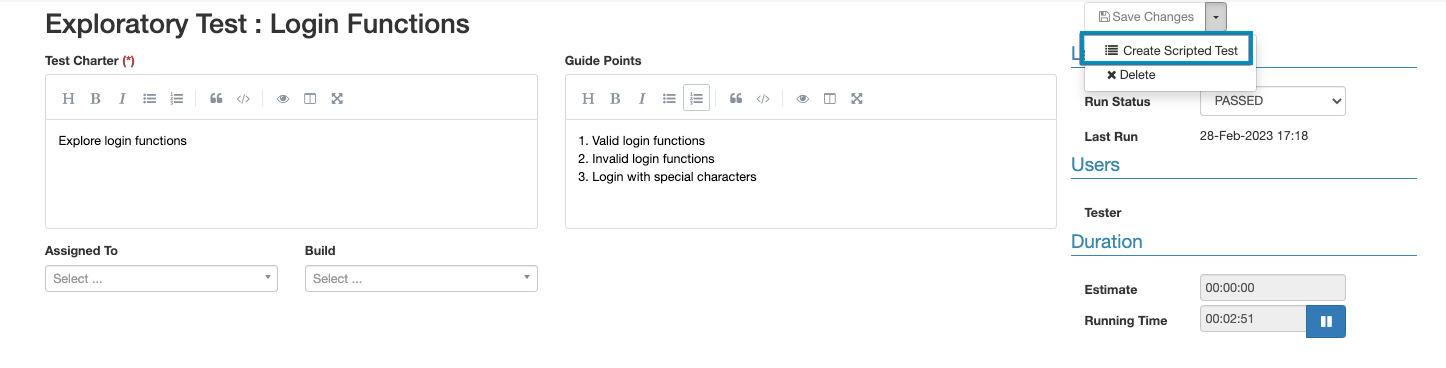
After the exploratory session is done, you can convert it to a scripted test, and reuse it in test sets for step-by-step validation.
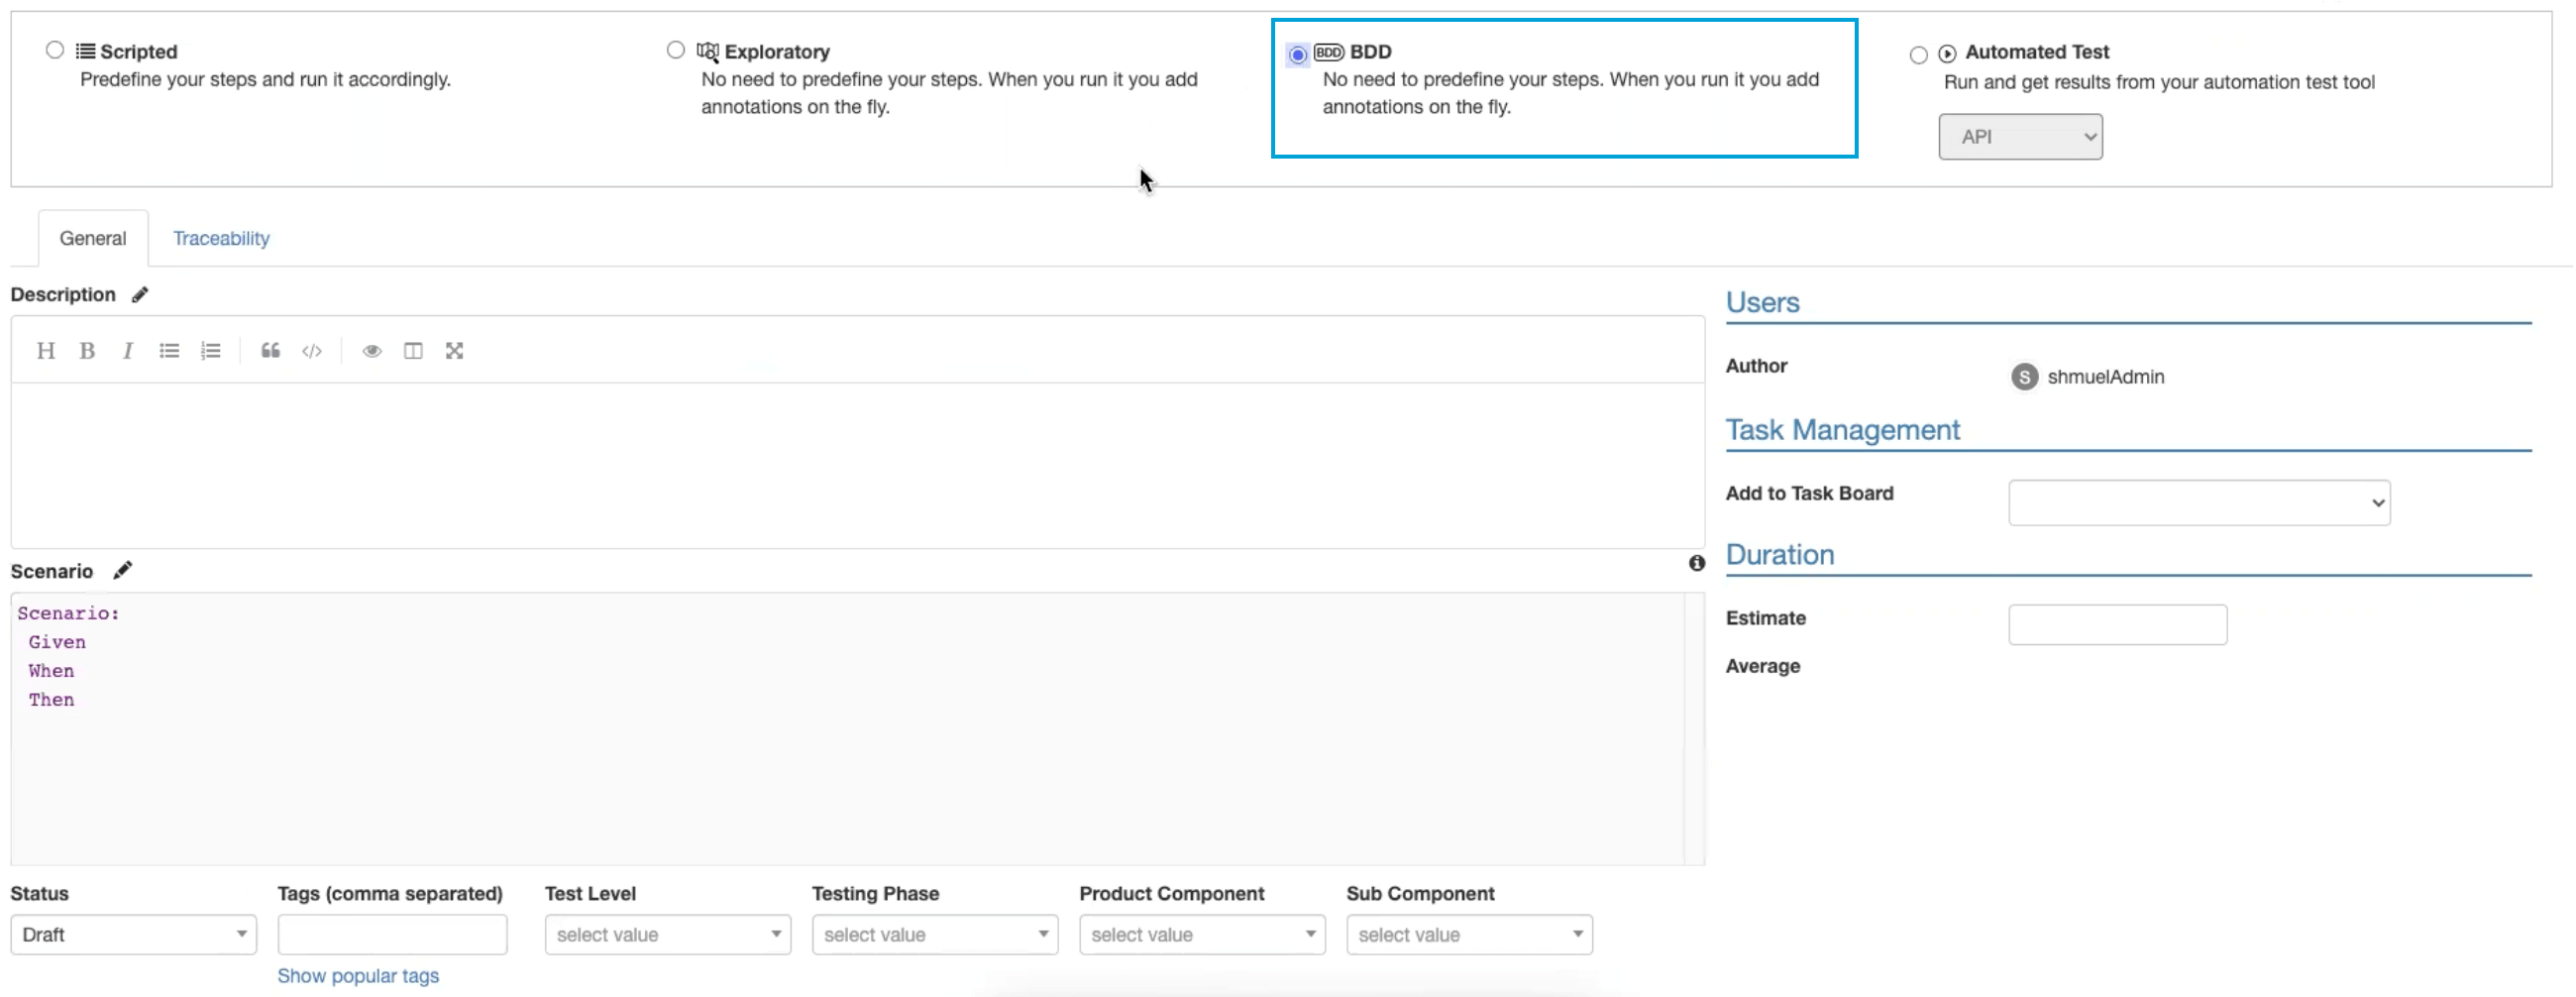
BDD Tests
BDD test is written as a scenario or as a scenario outline. When choosing BDD tests, you can use the common Gherkin syntax in the added Scenario field. Each Gherkin row you add will become a step when you run it. If you use Scenario Outline, each example will be added to the test set as a separate instance.
Read more about BDD tests here.

Automated Tests
Tests which run automatically and update PractiTest using one of the following ways:
- API: reporting automation results using the REST API
- FireCracker: automatically converts XML results files received from CI/CD tools to PractiTest tests and runs
- xBot: - an internal automation framework to run, schedule, and execute tests. When choosing any of the automation-type tests, you can add the description in the general tab and an “Automation Info” tab will appear where you can write down your Automated Test Design and the Script Repository.
Read more about Automated tests here.

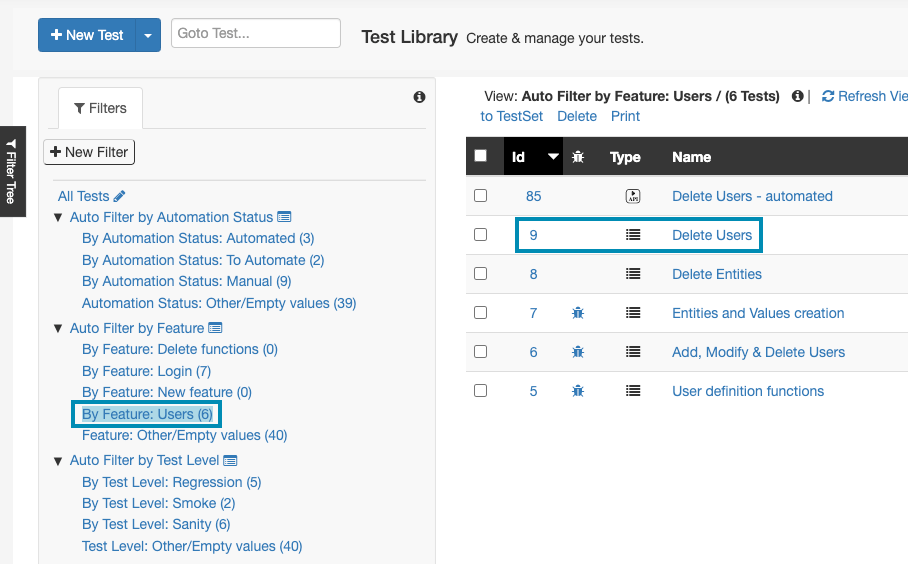
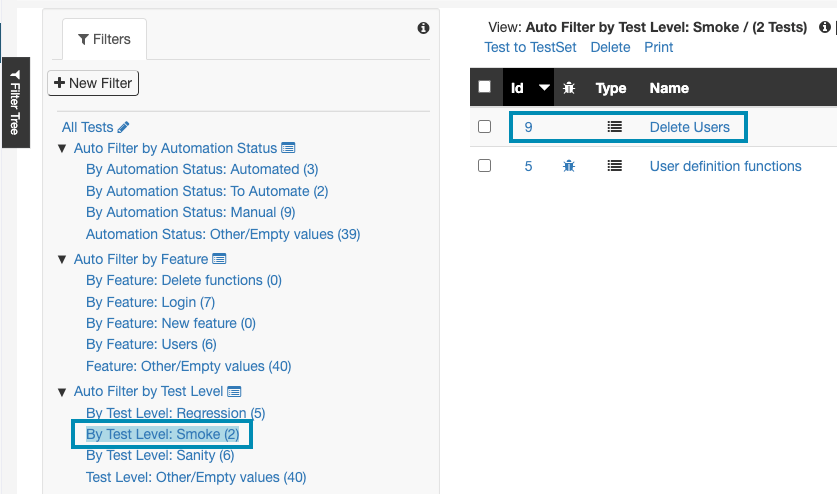
Structure Tests Using Filters
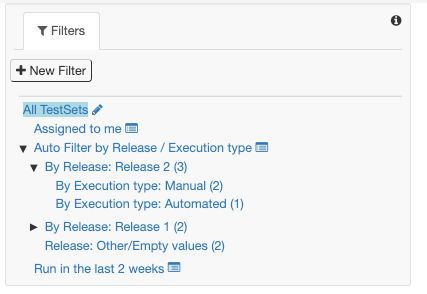
Working with filters allows you to have a flexible structure for your tests, and to reuse tests efficiently. You can create filters based on any field available in your project, and display tests by multiple relevant categories. Filters can also be created hierarchically, allowing you to break down your information into subcategories as well.
Creating the correct filter trees and hierarchies in your test library will make your job easier for yourself and the team. It will ensure easy navigation in the test library, and easy creation of test sets later on. Filters are also used to break down reporting items, so a correct setup will allow you to report on individual groups of your tests, monitor risky areas, and more.
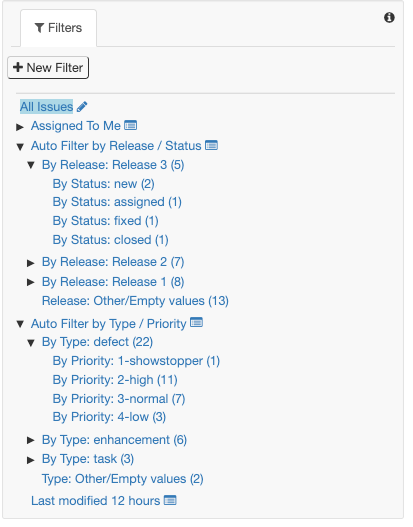
Creating Filters
To create a new filter - navigate to the test library and click ‘+ New Filter’. Add a name for your filter, then add criteria in the filter criteria section. Finally, select which fields you want to add to the view of your filter from the custom fields section of this page.
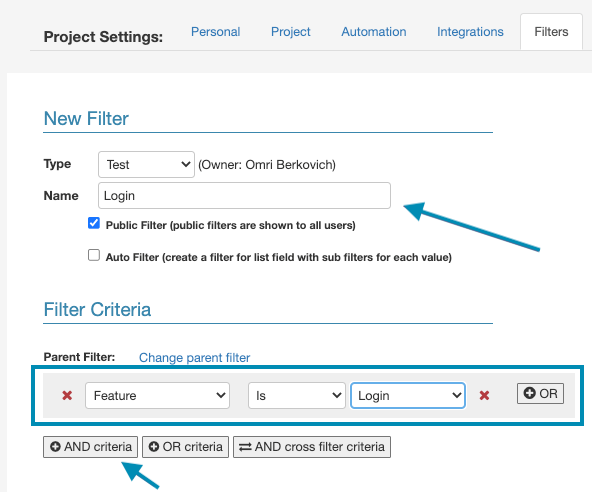
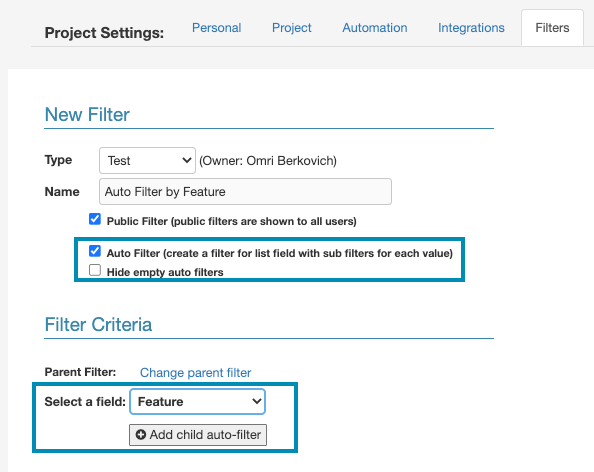
Auto filters - The auto filter feature creates filters automatically based on the field’s selection options. For example, if you created a new field for a category called ‘Area’ and defined 5 different selection options for this field, the auto filter feature will create 5 filters for you automatically based on these options. If you add a new selection option for this field later on, a filter will be created automatically based on the new option. You can also create a single auto filter based on two fields, to create filter hierarchies. To create an auto filter, tick the ‘Auto filter’ checkbox on the filter creation page. Then, select a field in the filter criteria section. Your filter will be named automatically based on the selected field.
You can find a detailed step-by-step guide for setting up your filters here.
Create and Organize Test Sets
The Test Sets & Runs module is where test execution takes place and test results are recorded. A Test Set is a group of tests that you want to run together for a unified purpose.
Test Sets allow you to organize your testing activities in the same way that you organize your work into cycles, tasks, or assignments.
Good candidates for Test Sets can be, for example:
- Tests that focus on a certain part of the system, such as GUI or Database
- Tests that belong to a certain task, such as Regression or Sanity
- A set of tests that need to be run by a single tester during a day or calendar week
- Tests that are being executed manually vs test sets that run automatically
Terminology Clarification: Test Sets, Test Instances & Test Runs
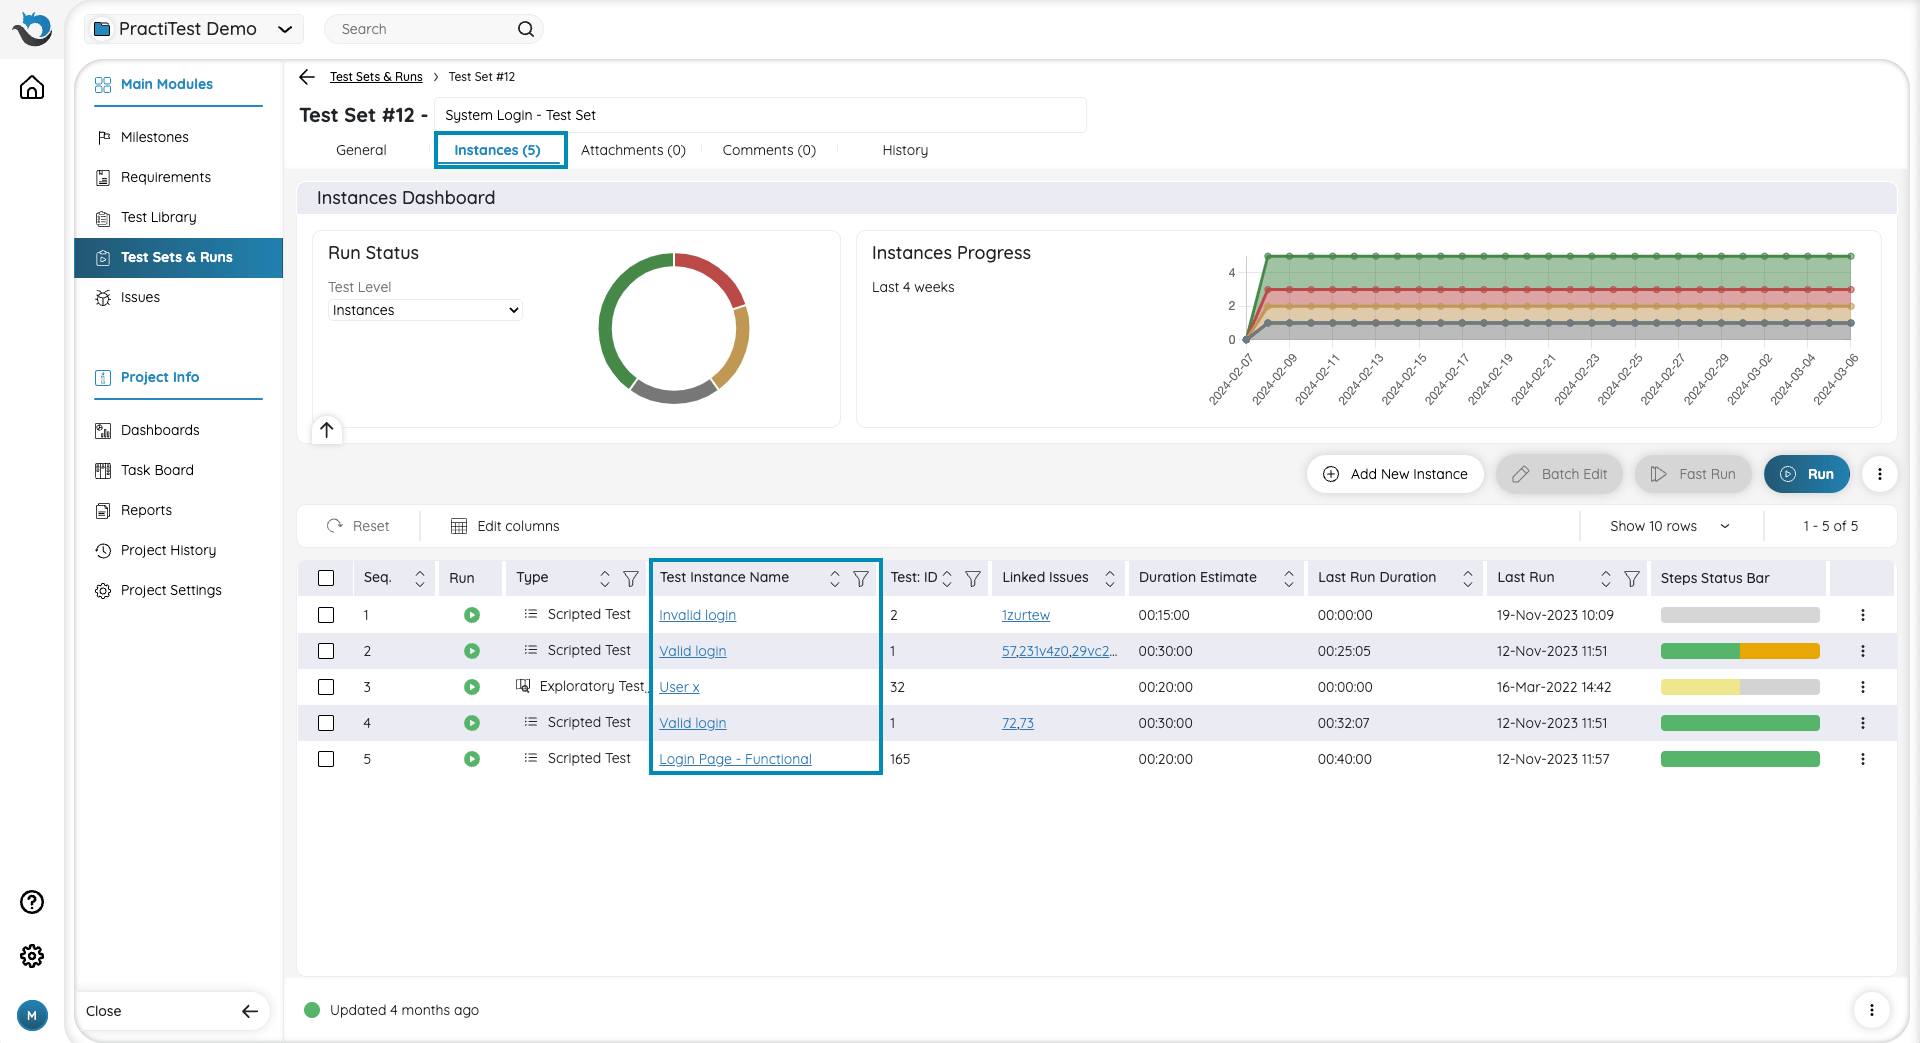
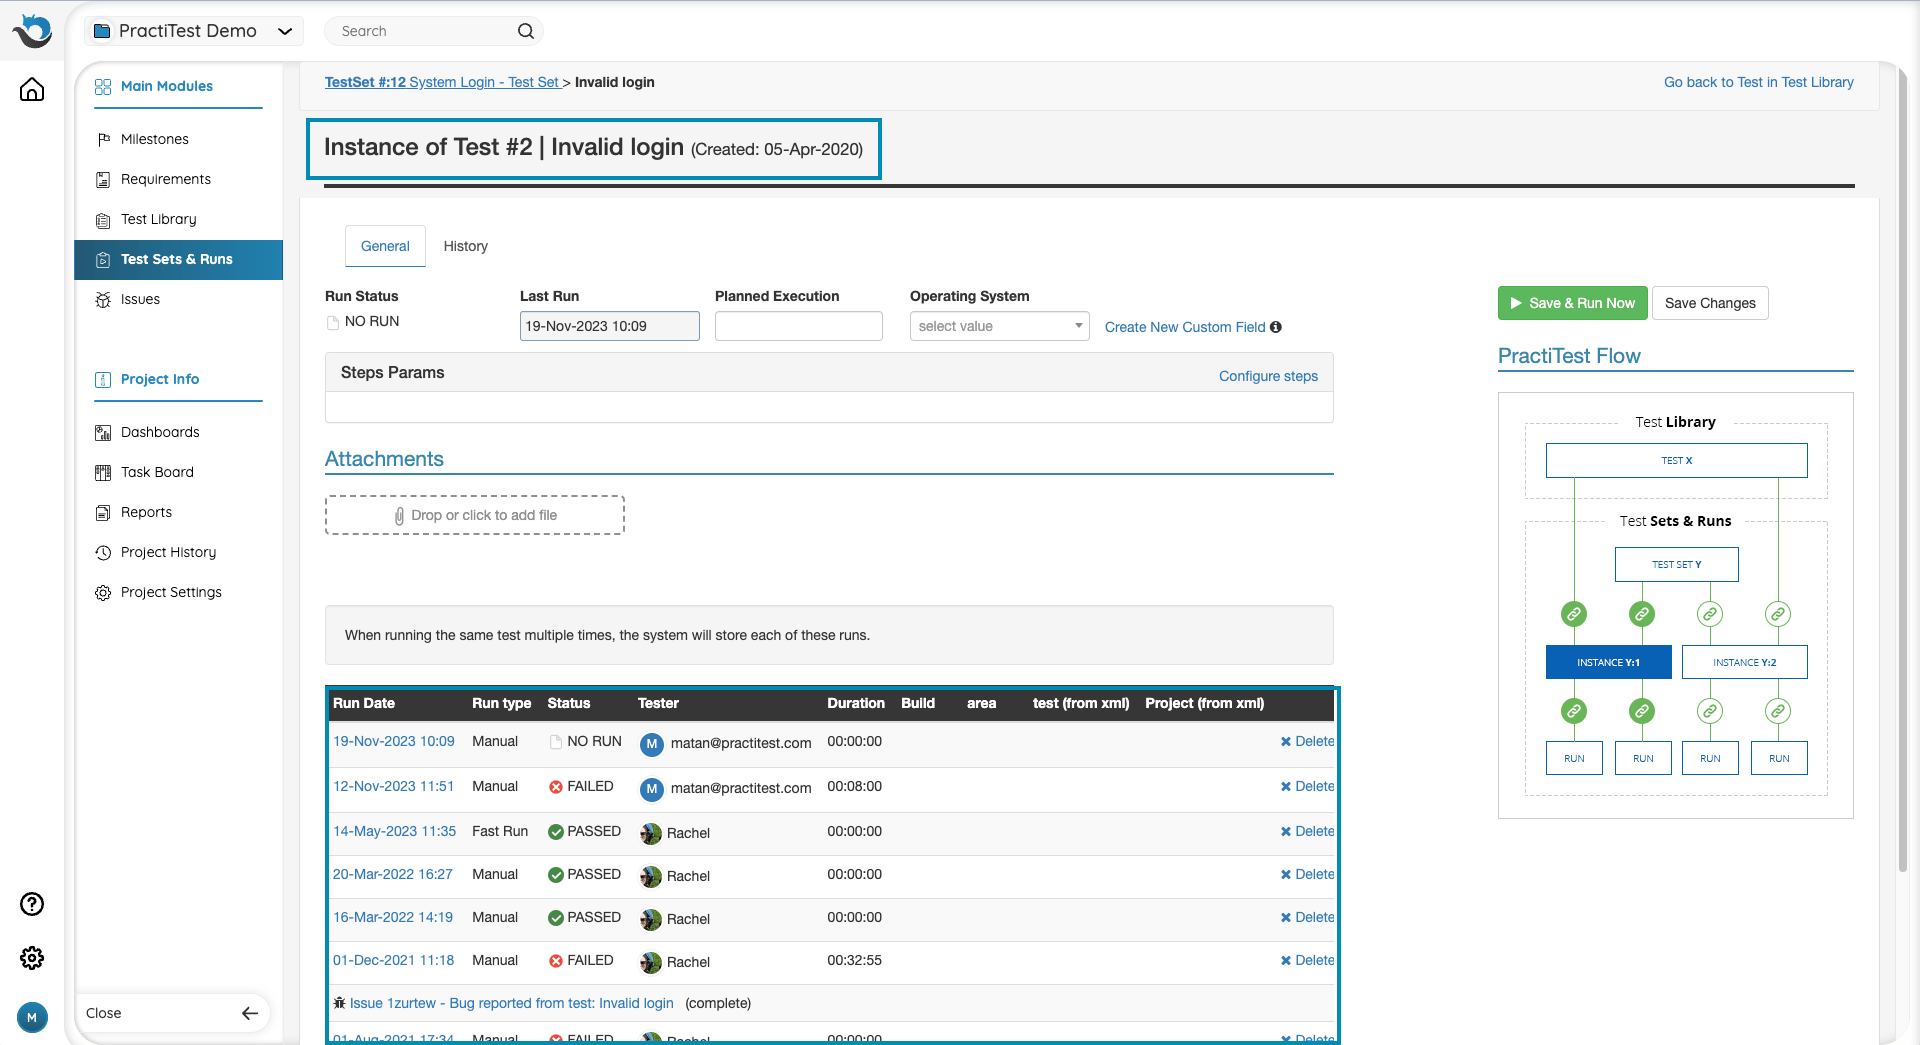
When you add a test to a test set, you create a copy of the original test from the library, in the context of the specific test set you are adding it to. This copy is a different entity in PractiTest called the test instance. An Instance is a dynamic copy of a test from the test library that allows you to run the test as many times as you need as part of multiple test sets.
When you run your instance, the test information is copied to a new Test Run. This ensures that you are running the latest version of the test from the test library. You can have multiple instances of the same test in a different, or a single test set. In addition, you can run instances as many times as you like. Under each instance, you can see its full run history in a table, displaying the runs by their dates.
Test Set Fields and Filters
To establish context for your test sets, you will need to set up fields for them. The field setup work is similar to the one you went through while setting up your test library. The only difference is the content of the fields. In some cases, you will want to use the same fields you are using in the test library for your test sets. But, in most cases, you will want to work with different fields that are more suitable for test execution. For example, iteration-based fields such as - sprints, releases, cycles, and versions. Or, fields such as features, test levels (regression, sanity, etc), and assignments. This, of course, depends on the methodology you use and your overall process.
As mentioned in the Tests section, we highly recommend using list-type fields in most cases.
You can find the full Test Sets & Runs guide here.
Import/Create System Requirements & User Stories
The requirements module is where you create and manage your system requirements, user stories, and tasks, and create traceability coverage for them by linking them to tests. You can either create and define your requirements/user stories directly in PractiTest, or import them from an Excel spreadsheet.
Importing Requirements From Excel
The import process for requirements is similar to the test import process. Please note, that when you import requirements, you can import the linkage to tests as well using the ‘Linked Tests’ field. The corresponding column in the spreadsheet should contain the test IDs of the tests you want to link to a requirement. To access requirements import, navigate to settings - import & export. Then select ‘Import Requirements’.
Creating Requirements in PractiTest
When creating a new requirement in the system, you will first need to fill in the information of the requirement in the Name and Description fields. After you fill in the requirements information, you can proceed by linking it to tests that cover the requirement, from the traceability tab.
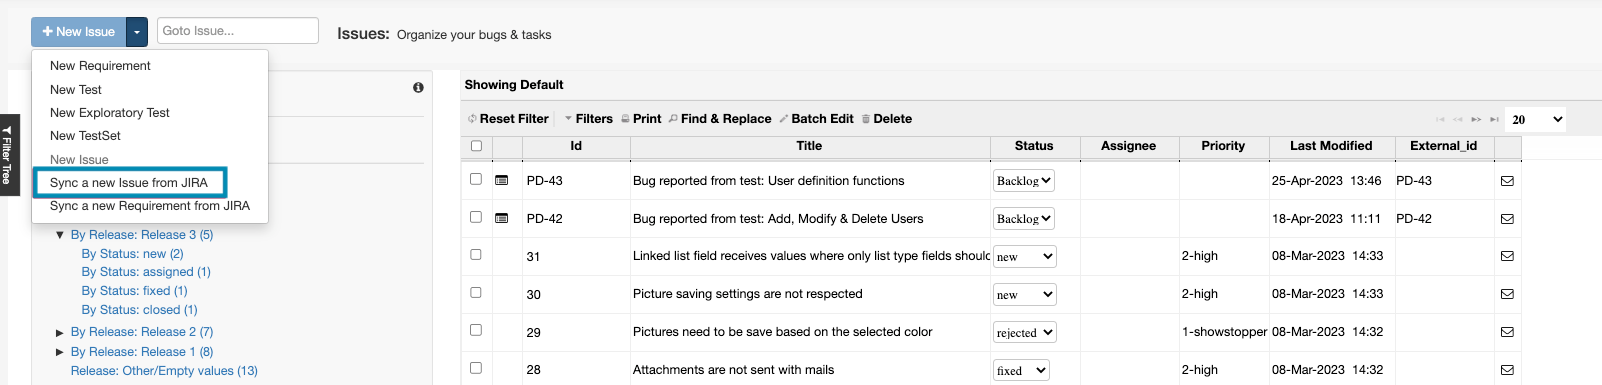
Syncing Requirements From a Third Party System
If you are working with an integrated third-party system like Jira, you can sync tickets from the other system into PractiTest, and create coverage for them by linking tests from the traceability tab. By syncing in tickets from Jira, and linking them to tests, the traceability linkage will be reflected on the Jira side as well.
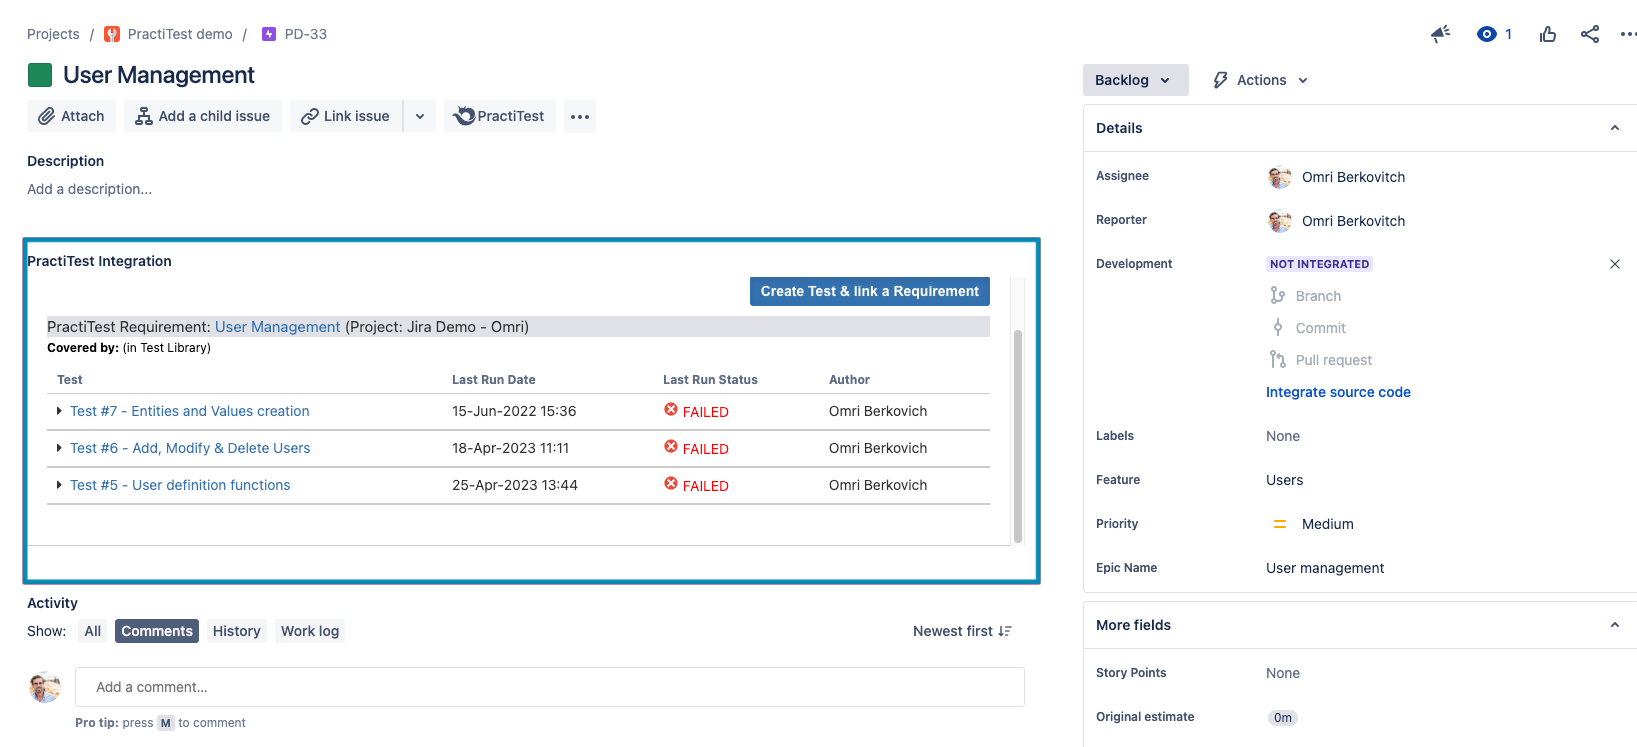
You can find additional instructions for setting this up when integrated with Jira here.
If you are working with another system, you can find the details in the dedicated integration help guide page. You can find all integration guides here.
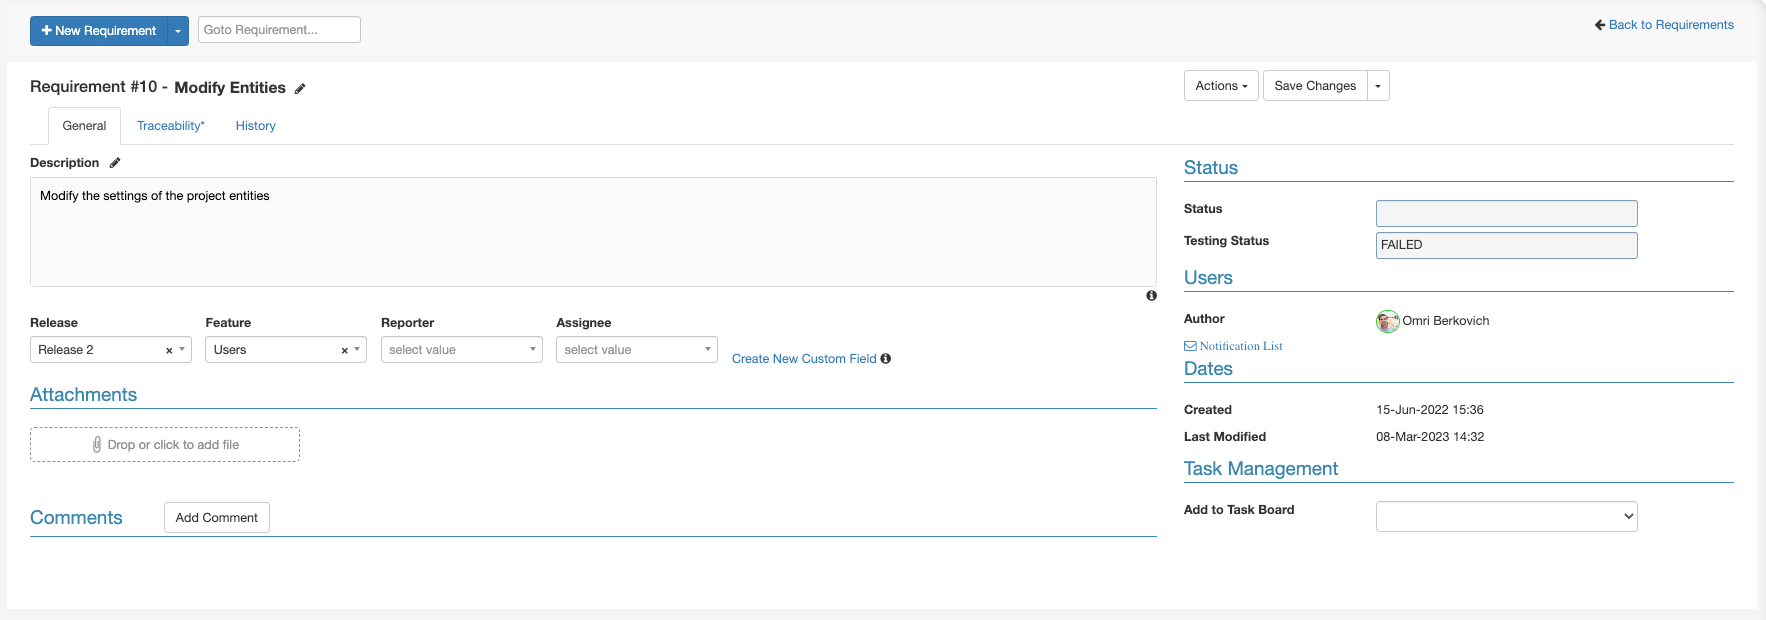
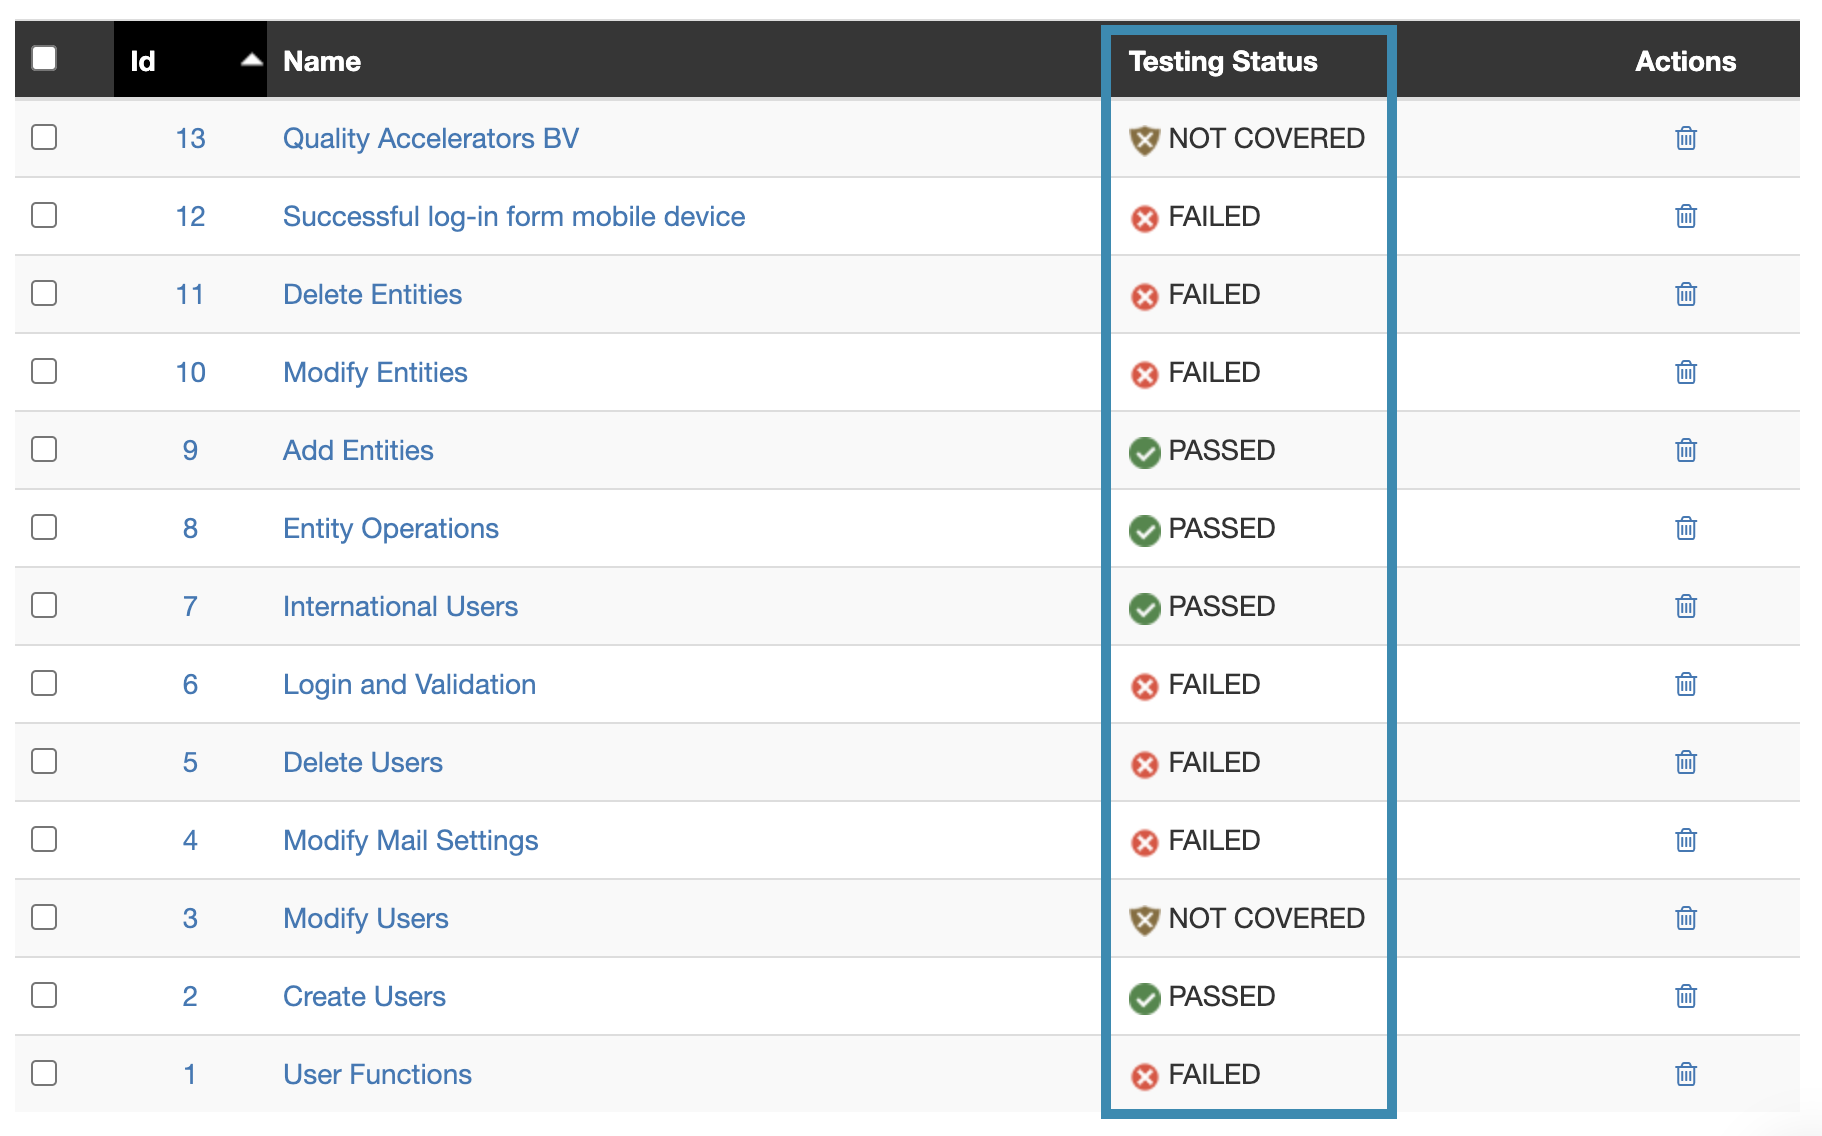
Requirements Status Field
The requirements testing status field is populated automatically based on the aggregated status of the tests you link to the requirement. This field will help you view the progress being made on the testing of each requirement with a quick glance.
Below you can find the criteria for each status:
NOT COVERED – There are no tests linked to this Requirement.
NO RUN – There is at least one test linked to the requirement. None of the linked tests has been run.
STARTED – There is at least one test linked to the requirement that started running. None of them Failed or was set to Blocked.
PASSED – All linked tests ran and passed.
BLOCKED – At least one of the linked tests was set to blocked. None of the linked Tests was Failed.
FAILED – At least one of the linked tests failed.
N/A – All tests linked to this requirement marked as N/A
Organizing requirements in the requirements module
To structure and organize your requirements, create or use your existing custom fields to associate requirements with their relevant categories as mentioned in previous sections of this guide. Then, proceed to create filters and filter hierarchies in the requirements module as was described previously. Requirements filter hierarchies will often consist of the relevant iteration (spring, cycle, version, release), and ‘Testing Status’.
Run Your First Test Cycle
Congratulations, your project is now ready to go live! Below are a few tips for your first test execution with PractiTest.
To make sure your testing is documented correctly, verify that the relevant fields are being populated for every test set created for the cycle.
Assigning Test Sets and Instances
Make sure you are using the ‘Assigned to’ field to assign test sets to testers. If your workflow requires a few testers to execute a single test set, you can also assign individual test instances to different testers.

To enable the assignment of individual instances using the ‘Assigned To’ field, navigate to settings - fields, edit the ‘Assigned to’ field, and activate it for ‘Instances’.

Training your team
Provide training materials and training sessions for your team based on your individual setup. This will help you avoid mistakes and increase productivity.
You can find the full getting started guide for testers here.
The Tester Field
The ‘Tester’ field is a default system field that is populating automatically and showing the person that ran a test instance.
To enable it, navigate to settings - fields. Edit the ‘Tester’ field from the system fields section, and activate it for instances.
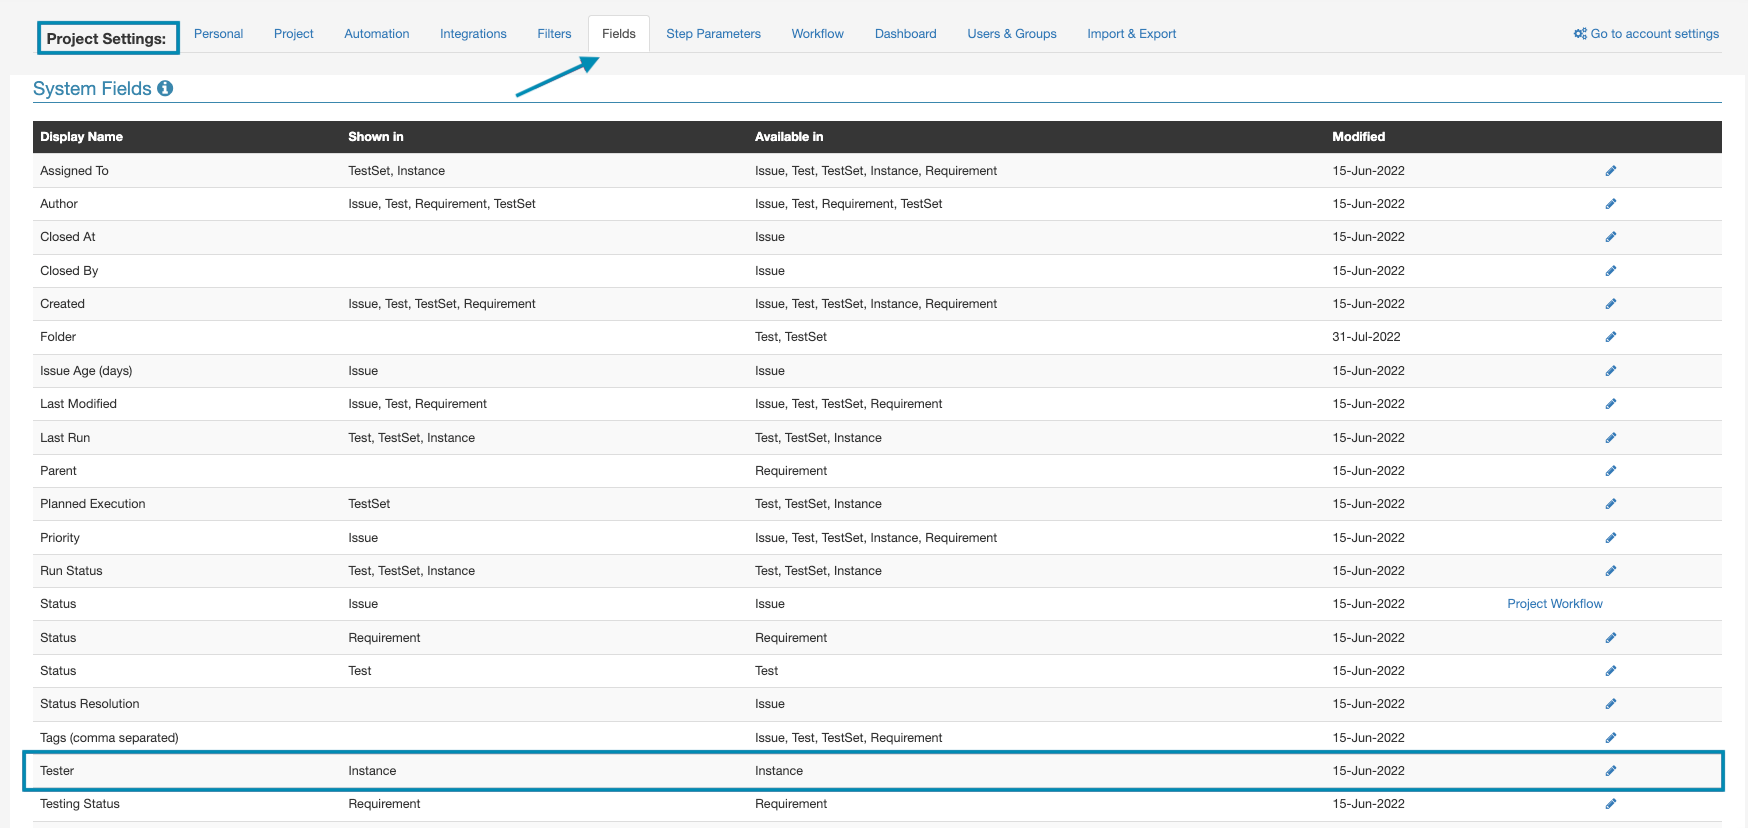
Once enabled, you can add the field as a column to your test instances grid using the ‘Columns’ option. You can also use the ‘Tester’ field in the dashboards and reporting items. This will help you get a clearer picture of the progress each member of the team is making.
See the full test sets and runs guide here.
Manage Issues
Issues/Bugs are managed in the Issues module. Issues that were created directly from test runs will be added automatically to the issues module. You can also create issues directly from the issues module.
To create an organizational structure for your Issues modules, we recommend using fields and filters as suggested in previous sections of this guide. Filter hierarchies in the issues module will often include the relevant iteration (spring, cycle, release, version), Status, and Priority.
Issues Workflow
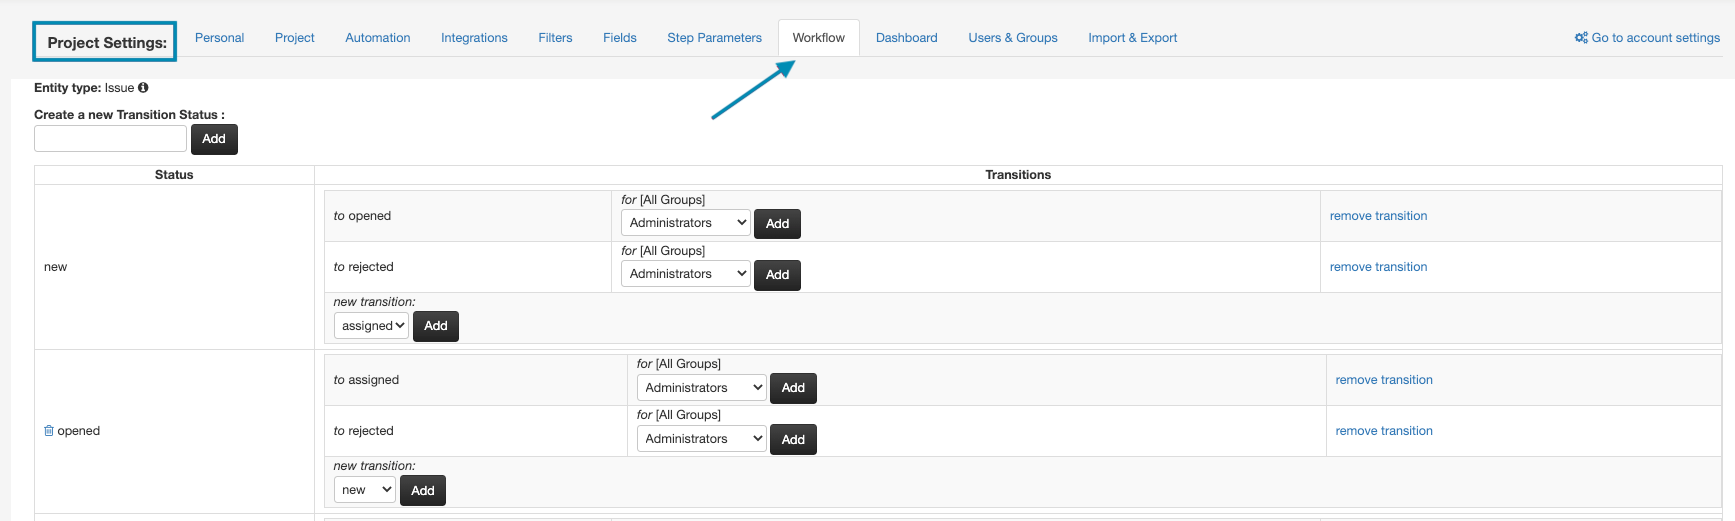
The workflow editor, allows you to customize the Life-Cycle of your issues to match your needs. You can add custom statuses to issues, and dictate the transition between existing issues' statuses. To access the workflow editor, navigate to settings - workflow. Please note that if you integrate a third-party issue tracker, this option will not be available and the workflow will match the logic of the external platform.
See the full guide for issues workflows here.
Defect Age
The defect age field is added to every issue created in your project. This field displays the time (in days) that the issue was opened. You can also generate a dashboard graph to reflect the data from this field.
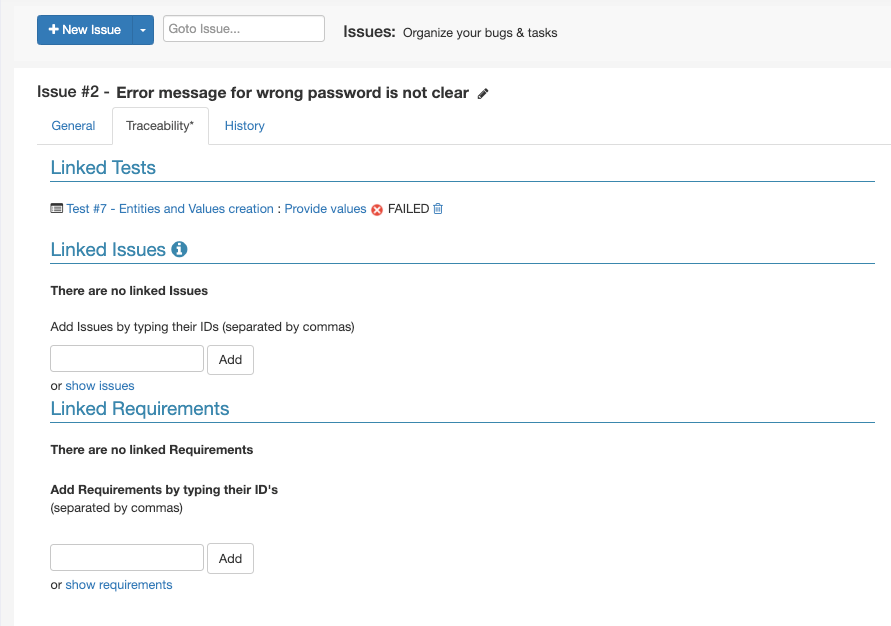
Traceability
In the traceability tab of your issues you can see the tests and requirements that the issue is linked to.
Deleting Issues
Issues deletion is disabled by default. To enable issue deletion for a project, navigate to the account settings - project management tab. Then, edit the relevant project and tick the ‘Enable issue deletion’ box. Only account owners have permission to enable issue deletion.
See the full issues module guide here.
Bug tracker Integration
When working with a bug tracker integration, Issues reported from test runs will be reported to the integrated bug tracker directly. If you are using a two-way integration, a copy of the issue will also be created in PractiTest, and the name, description, and status fields will be synced between the PractiTest issue ticket to the bug tracker’s issue ticket. Changes that are done in the Issues status, name, and description will also synched into PractiTest.
Jira Integration
As described above, when working with Jira two-way integration, issues you report from PractiTest to Jira will be created in your PractiTest issues module as synced copies. Additionally, you can also decide to sync tickets that were created directly in your integrated Jira projects.
You can find more details about that here.
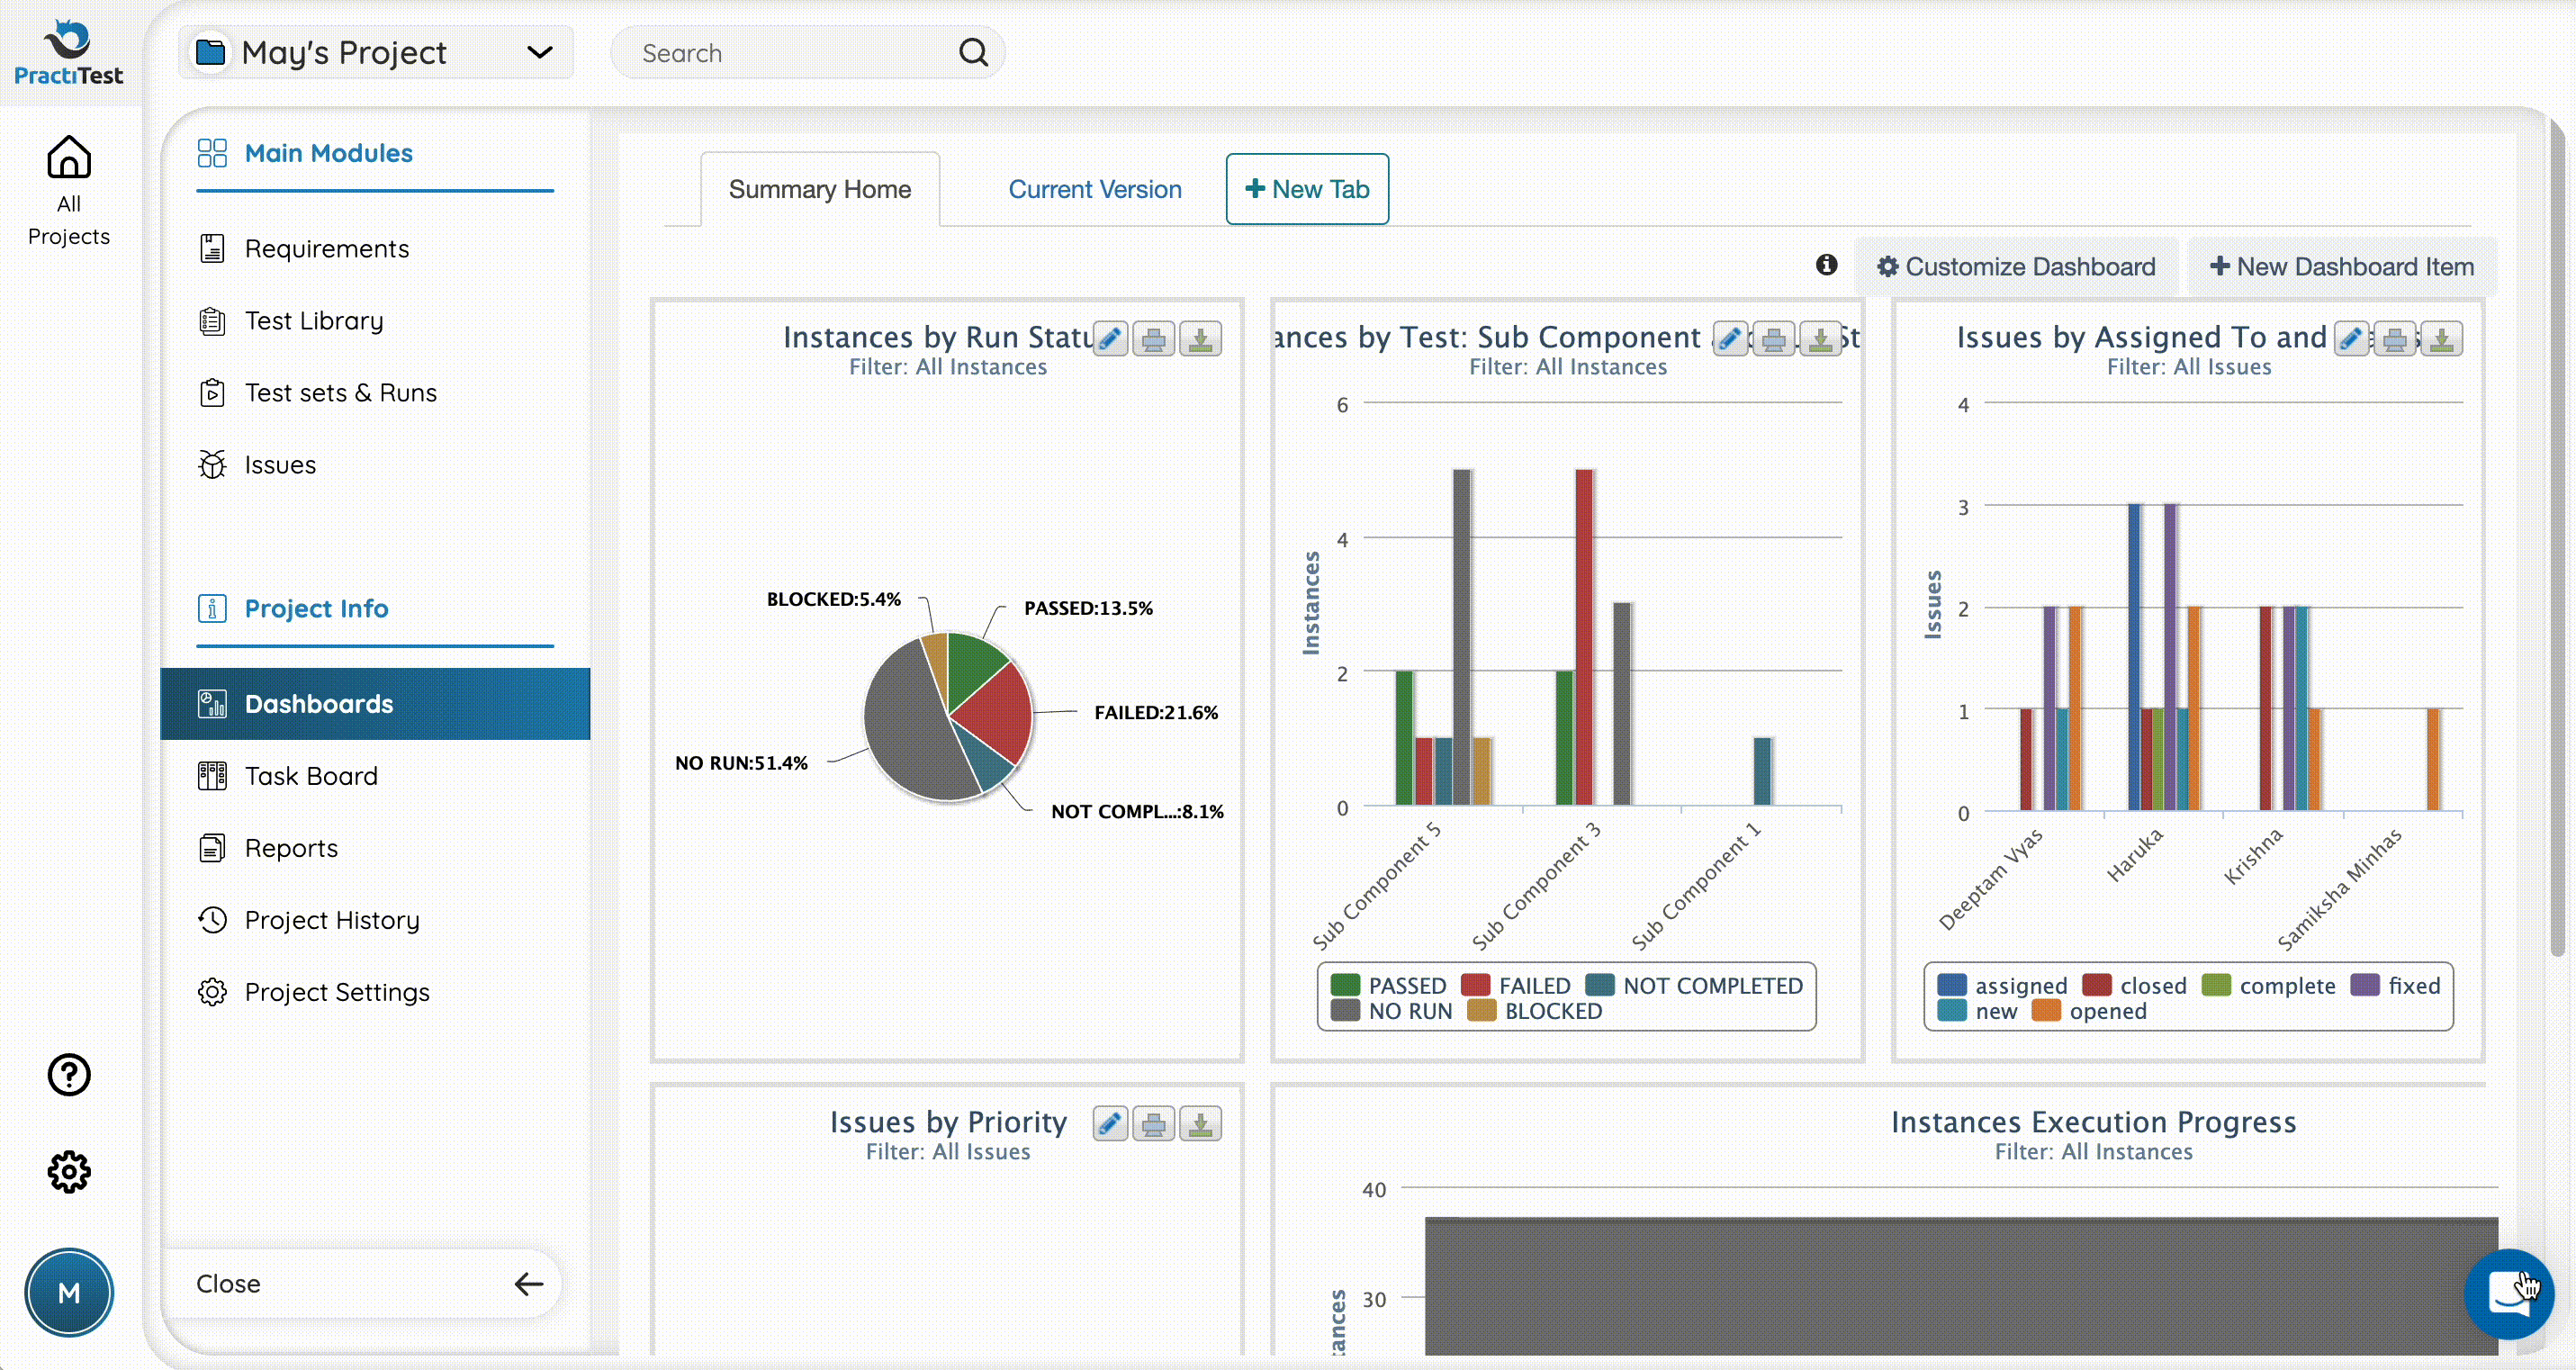
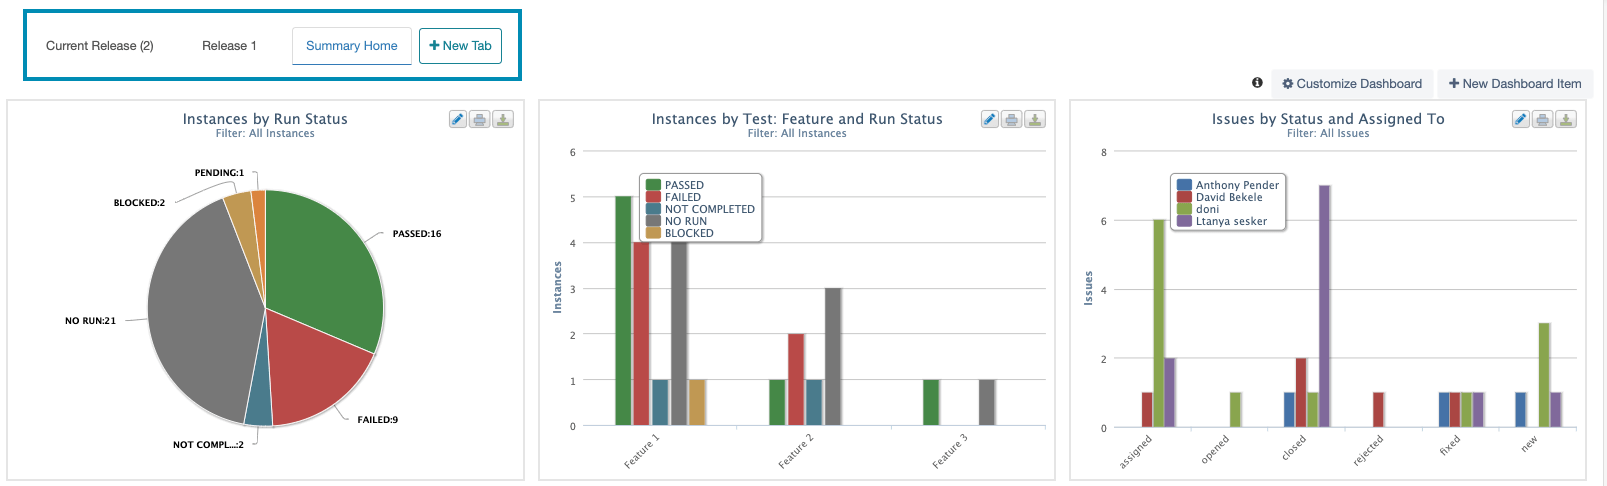
Dashboards & Reports
PractiTest dashboards and reports is where you get visibility into your projects. These two modules are highly configurable, allowing you to do breakdowns of the information you have in your projects. You can access both dashboards and reports from the ‘Info center’ section in the main navigation bar.
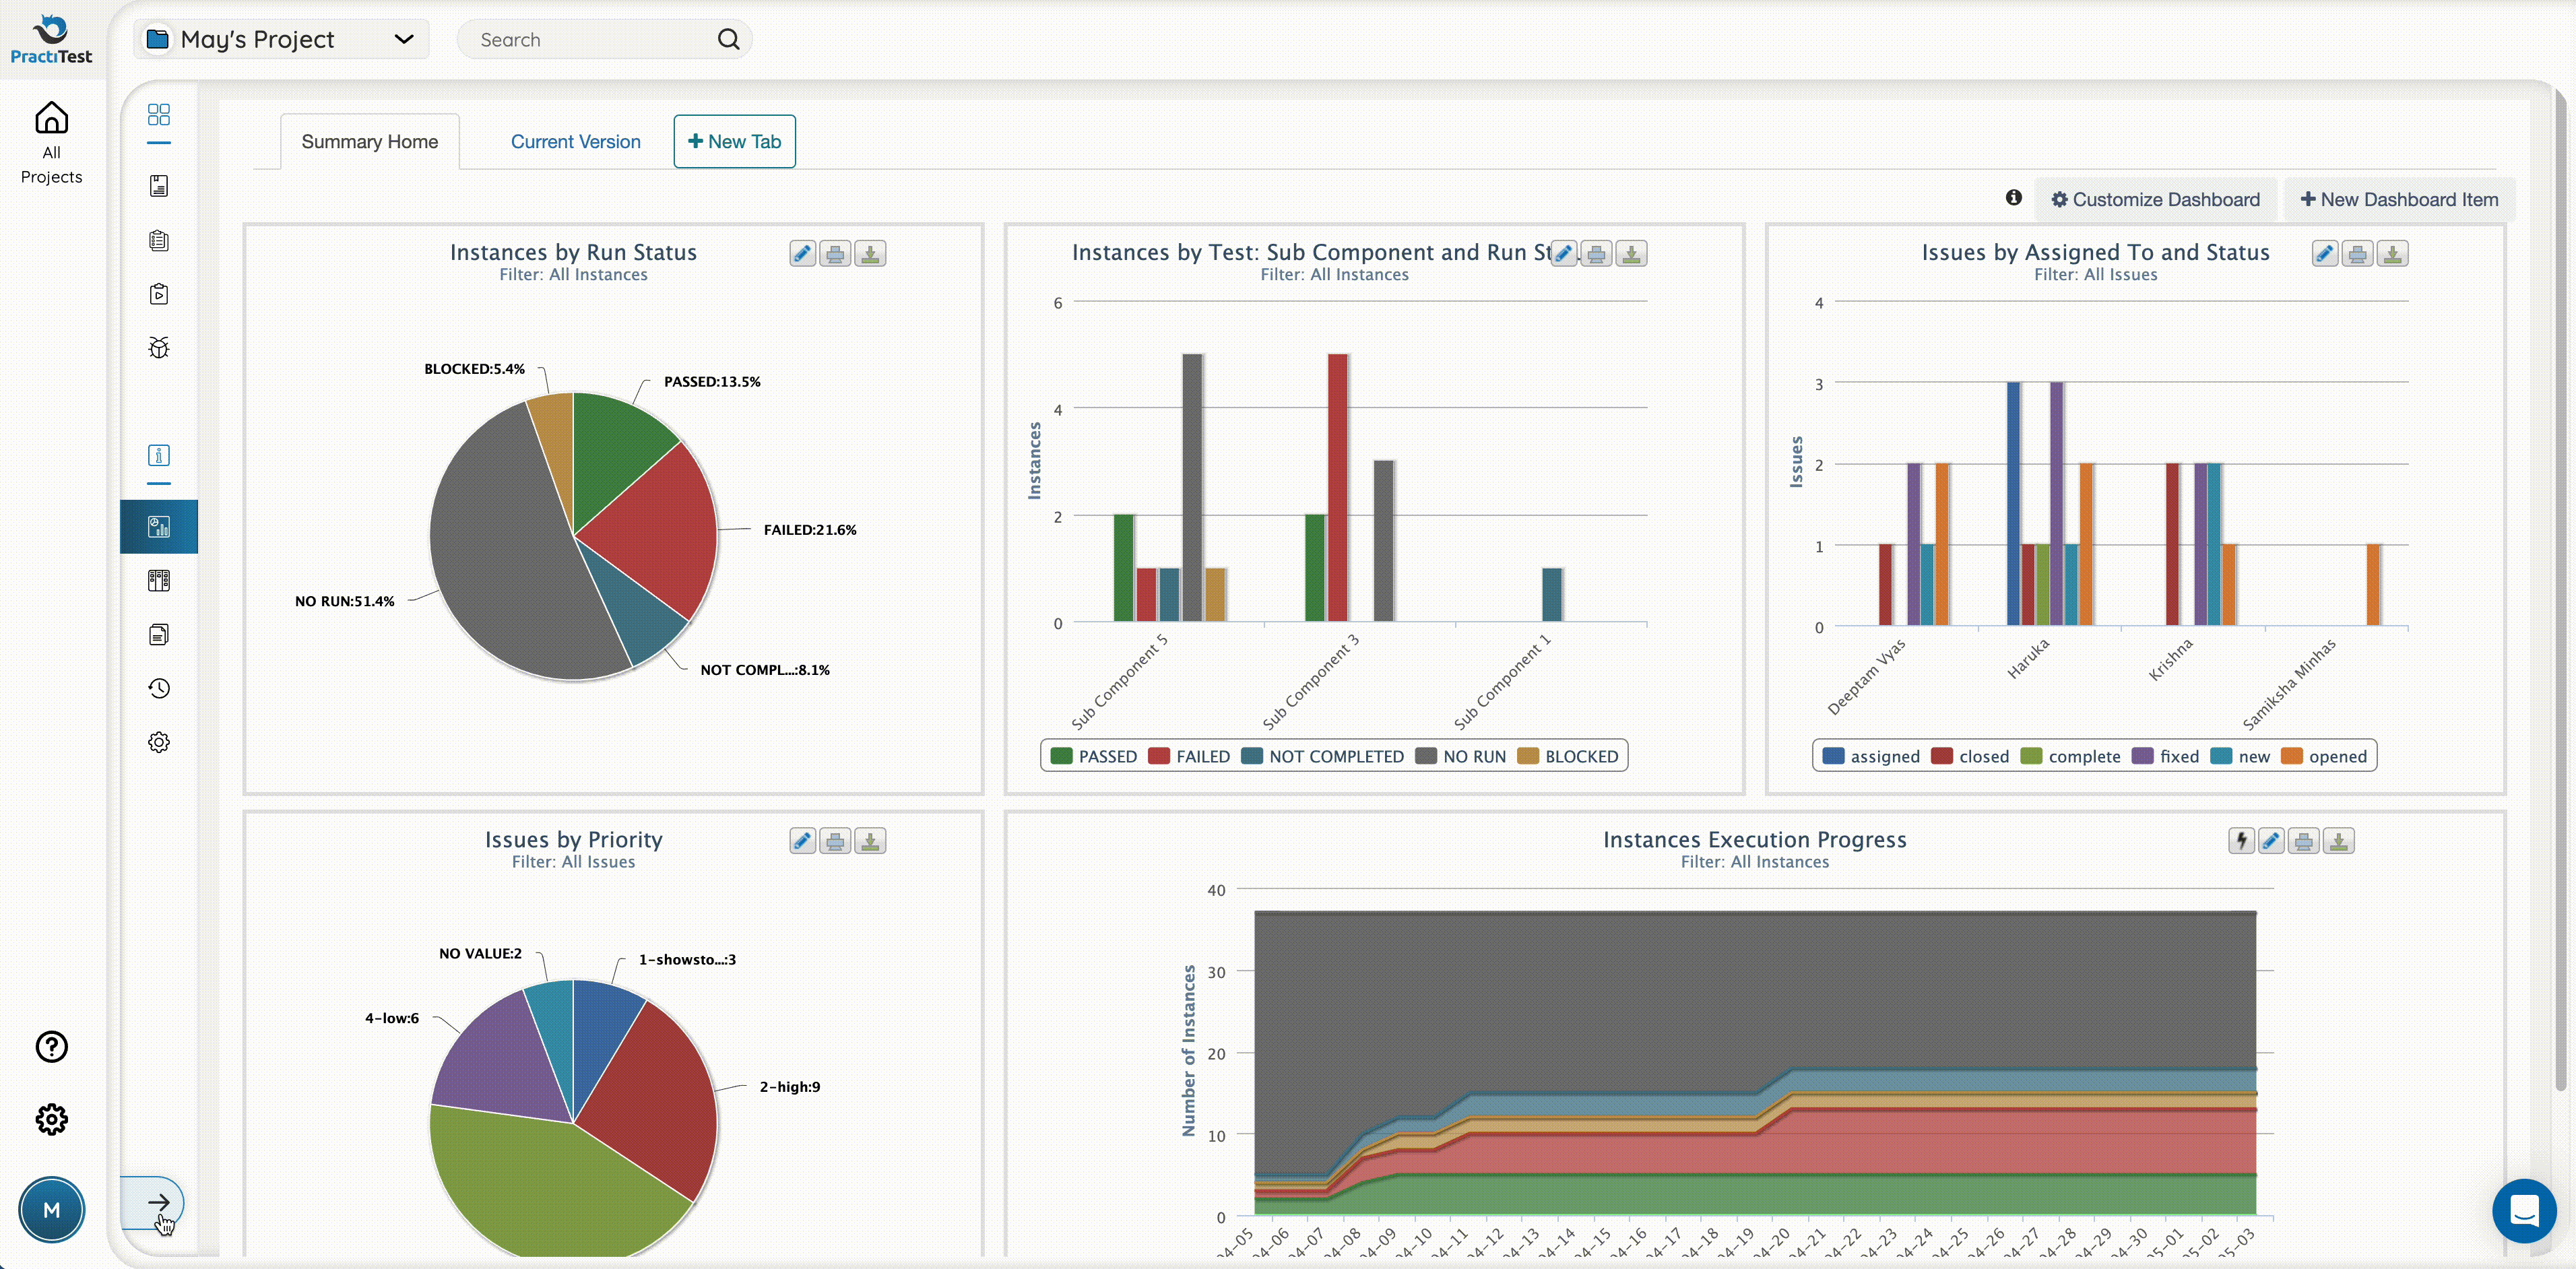
Dashboards
Every PractiTest project is created with a set of default dashboard items. We highly recommend adding new dashboard items and tabs and customizing the default dashboard to tailor it to your needs and your specific projects. Every dashboard tab can contain up to 8 items, and you can create unlimited tabs for every project.
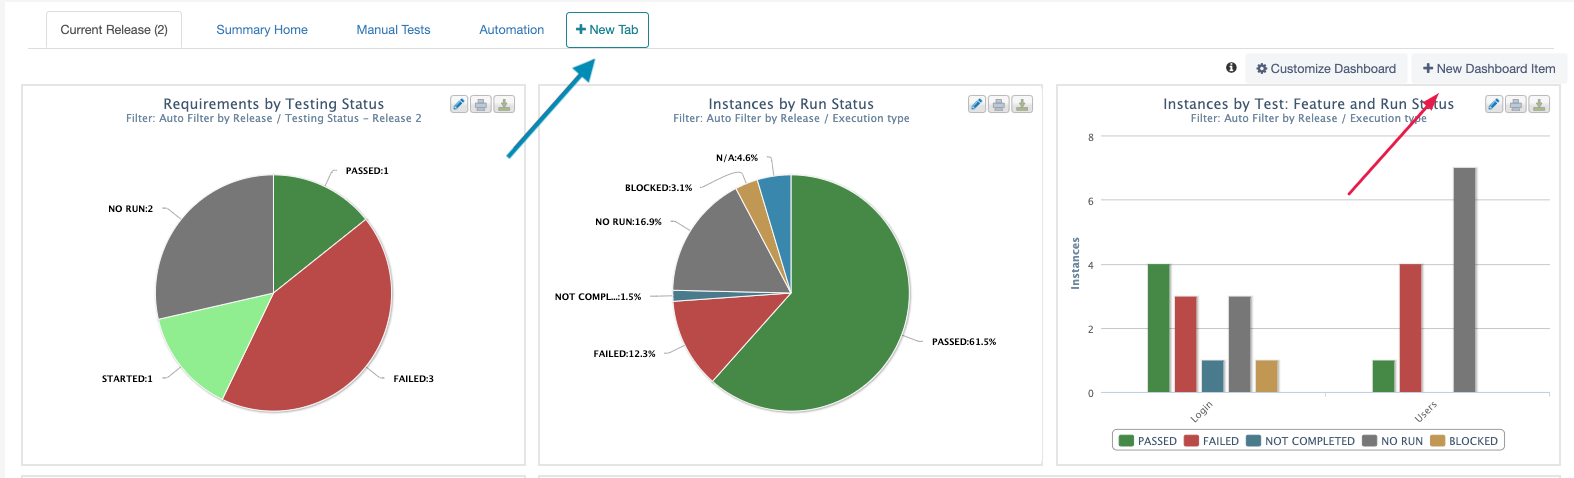
Dashboard Items
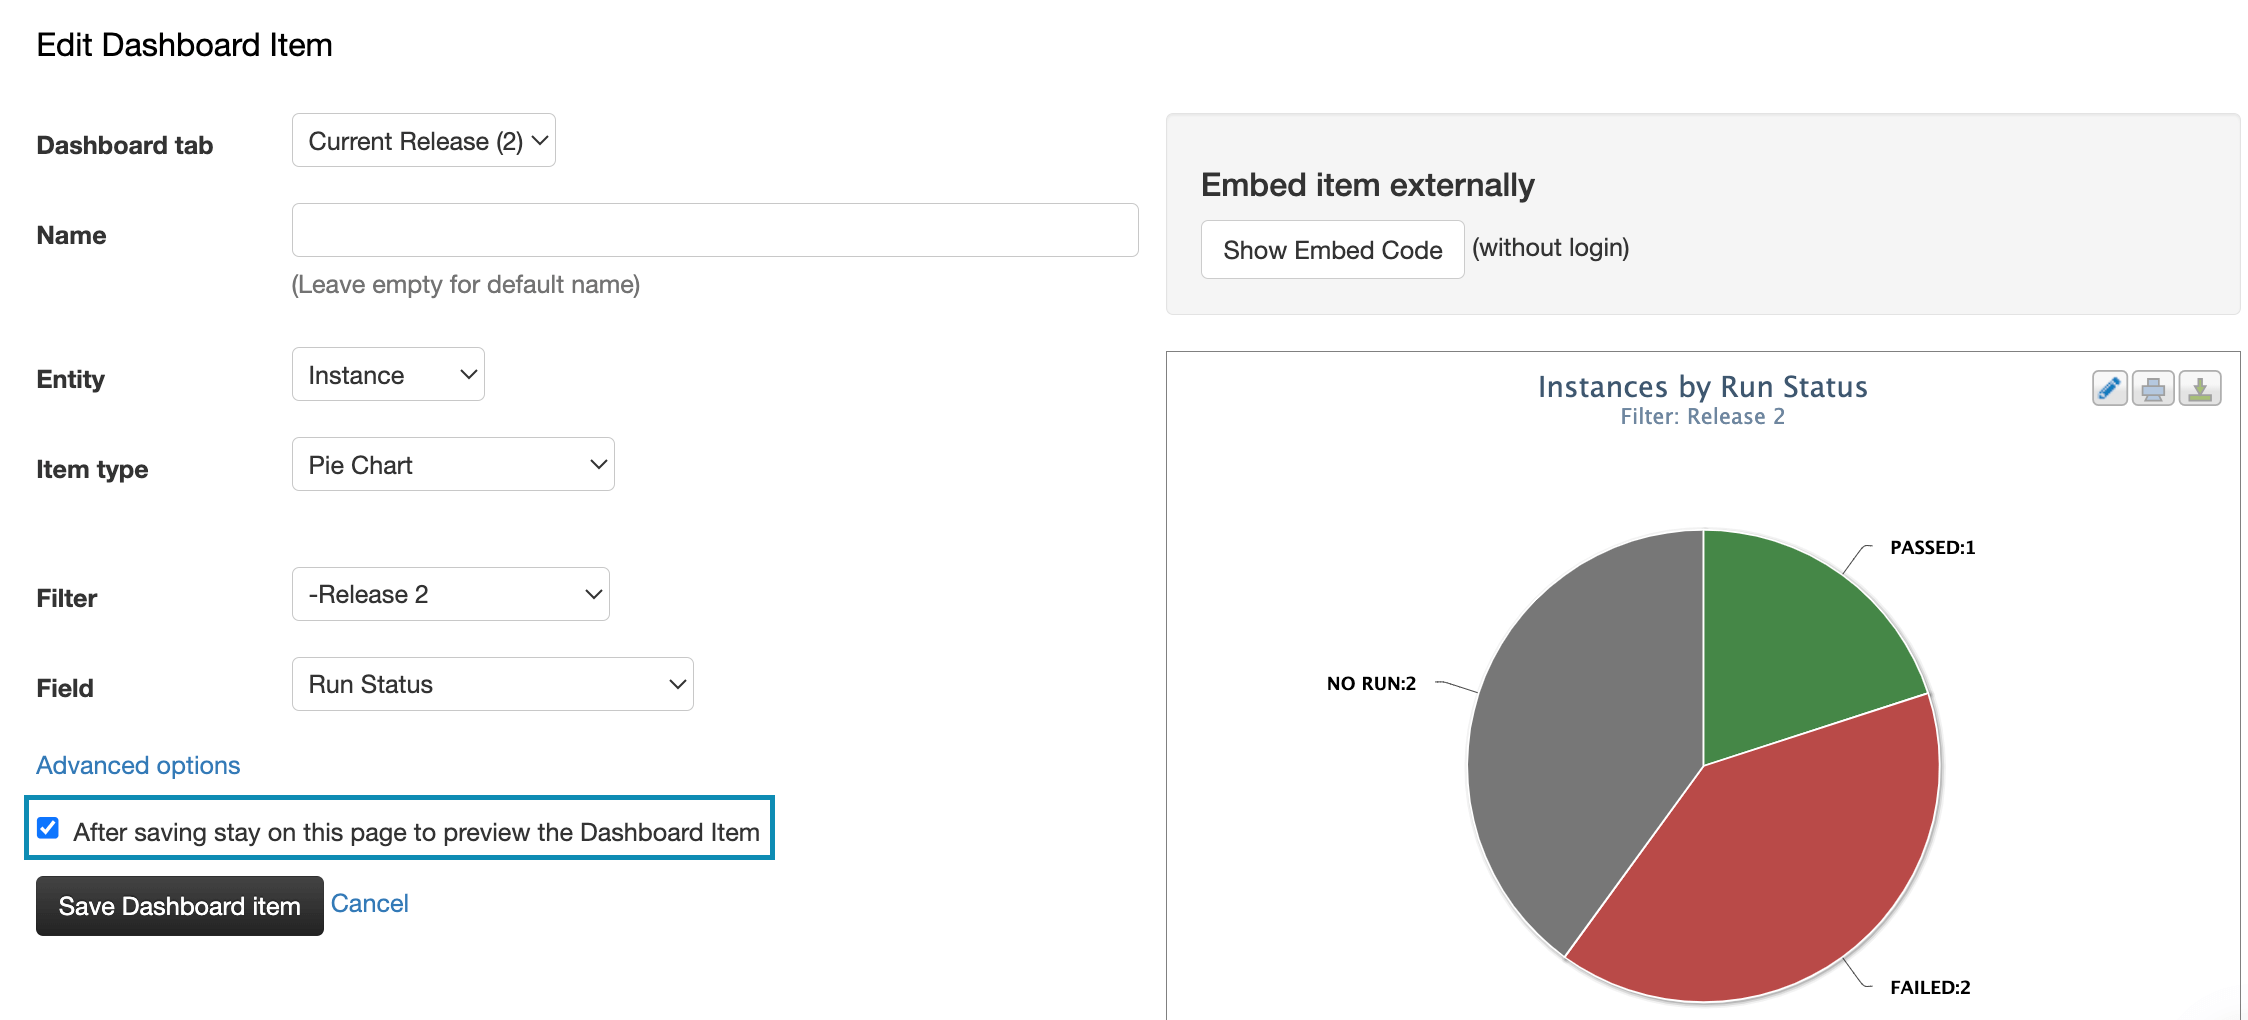
When creating a new dashboard item, first, you need to select the module/entity you want to focus on: Tests (Test Library), Test Sets, Instances, Runs, Issues, or Requirements.
To focus on test execution data, make sure you select the ‘Instance’ entity.
After selecting the entity, select the item type you would like to create, and press on continue.
Next, select the filter you want to focus on from the selected entity.
Example: to create an item that will display test execution data from my last cycle (Sprint 3) - I will create an instance-based item and the ‘Sprint 3’ filter.
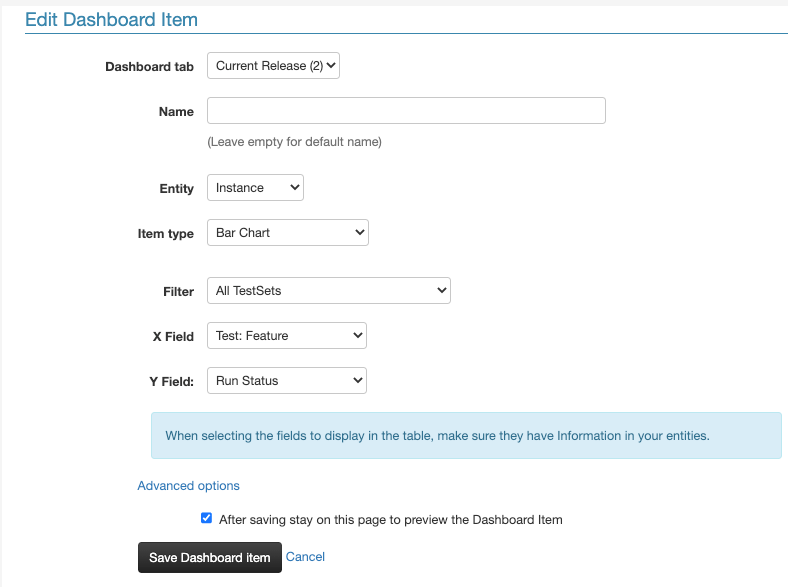
By ticking the box next to ‘After saving stay on this page to preview the Dashboard Item’, you can preview your item in this same page, and make changes to it until you are satisfied with the result.
Using Field Information From Other Modules
You can use field information from other modules in dashboard items you create. The field selection in the dashboard item configuration will be divided by their corresponding modules. The screenshot below shows the option available when creating a new dashboard item for instances.
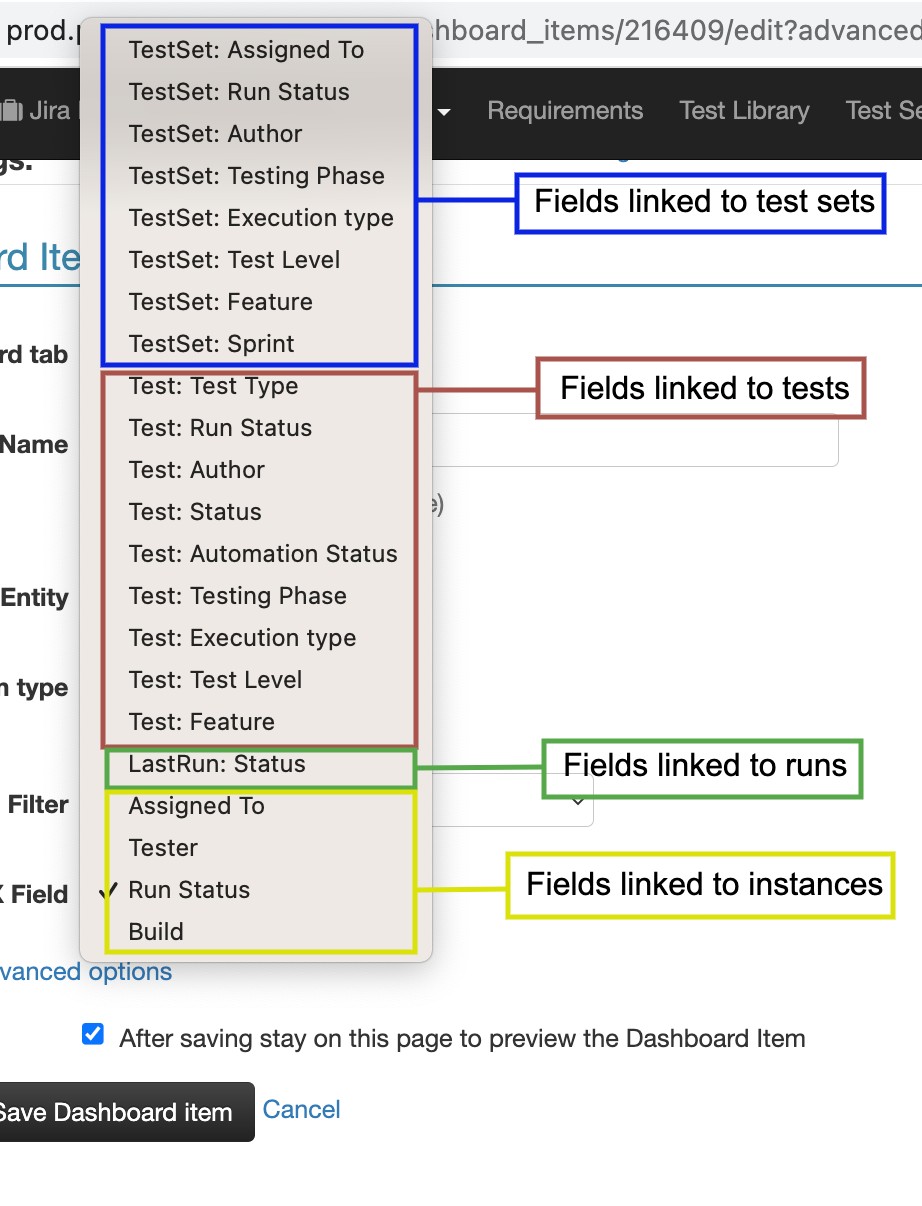
Example: I am using a ‘Feature’ field in my test library to associate tests with their relevant features. This field is only linked to my tests in the test library. I want to create a new dashboard item that shows my test execution based on test association with features. To achieve this, I use the configuration below:

See the full guide for dashboards here.
Reports
While dashboards help you visualize high-level progress, you can utilize reports to get an in-depth look into your data. There are two main formats of reports available for all modules, and a few additional types depending on the module you want to create the report for.
Like with dashboards, test execution reports should be created based on the instance entity, and test automation execution reports should be created based on the run entity.
When creating a new report, make sure you select a filter from the relevant module to display information for a specific slice of your information. For example, to create a report based on information from ‘Cycle 3’, I will create an instance report with the ‘Cycle 3’ filter selected.
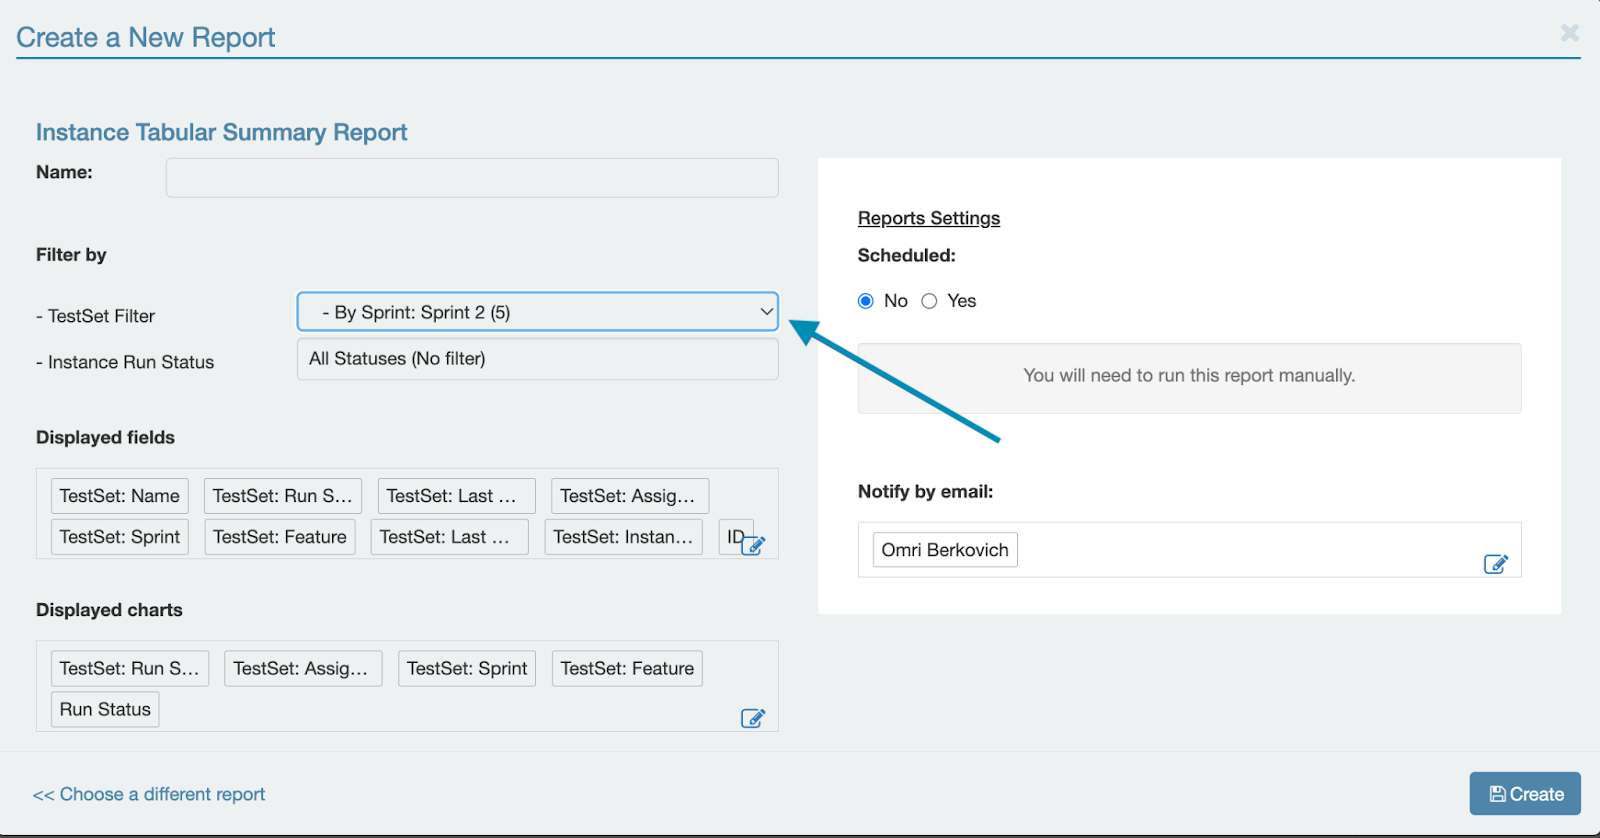
Tabular summary reports - Excel-based report. Using tabular summary reports, you can customize the data displayed in the report, and decide which fields you want to display, and which charts you want to display. Tabular with steps reports are identical to tabular summary reports, but also include steps data, and issues data.
Detailed reports - PDF based reports that provide detailed information about the selected entity and scope.
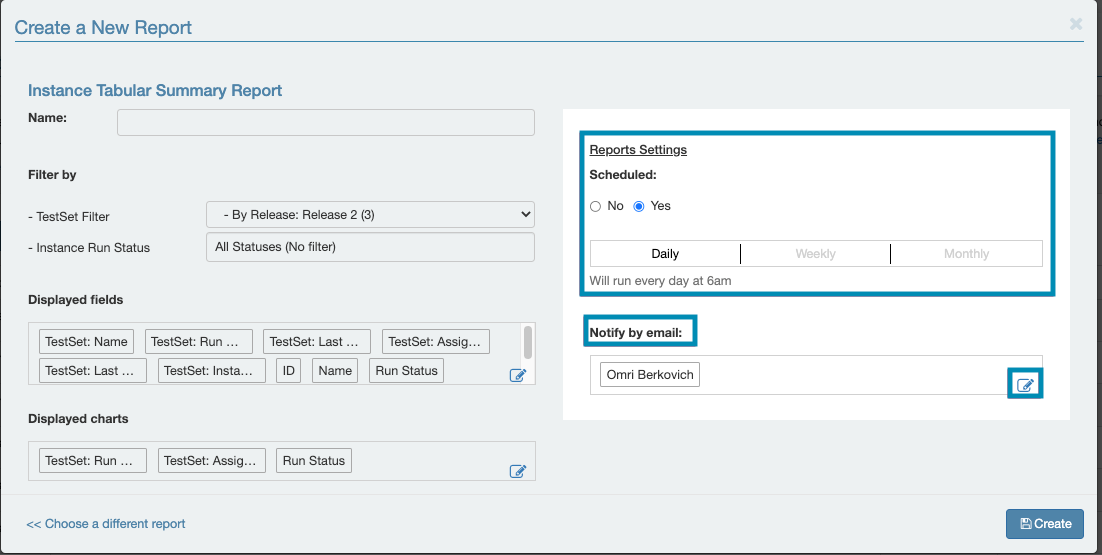
Scheduling Reports
When creating a report, you can decide to schedule it to run on a daily, weekly, or monthly basis. The report will be regenerated with the settings you define for it based on the selected interval and will be sent by email to users you select from the reports settings.
See more information about the reports module here, and report samples here.
Test Automation Integration
With PractiTest, you can run, control, view, and manage your automation testing alongside your manual testing. Thus, have complete visibility for your entire process in one place. Below you can find the details about the different methods available for integrating your automated testing into PractiTest.
API
We have a fully featured JSON-based REST API that covers all modules of the platform and can integrate PractiTest with any automated testing framework. Our API allows you to fetch details of test sets from the system and then push back the results of your automated runs into PractiTest. Our API documentation is here.
FireCracker
Firecracker is a PractiTest developed tool that allows you to integrate any CI/CD framework and any XML test result file with your PractiTest project. FireCracker allows you to parse and modify XML report files and upload them into PractiTest easily and automatically. See the step-by-step guide for using FireCracker here.
xBot
xBot is a PractiTest internal automation framework that allows users to run (or initiate a run by scheduling) automated test scripts on a remote machine from the PractiTest UI. See the step-by-step guide for using xBot here.