For the new Issues UI help page, please click here.
Issues
The Issues module is where you can add, view, modify and manage issues. An issue can be a bug, task, enhancement, or feature request. Issues that are reported directly from Test Runs will also appear in the Issues grid.
You can manage issues in PractiTest alone, or you can integrate PractiTest with a bug-tracking tool such as Jira or ClickUp. In both cases, issues will appear in the Issues module in PractiTest, providing you with an end-to-end view of all tests and issues in one platform. If the issues are synced to a third-party tool, you will find the link to the synced issue inside the issue description.
Create an Issue
An issue can be created from the Issues module or directly from a test run by pressing the ‘Fail & Issue’ button.
Anti Bug-Duplication Mechanism
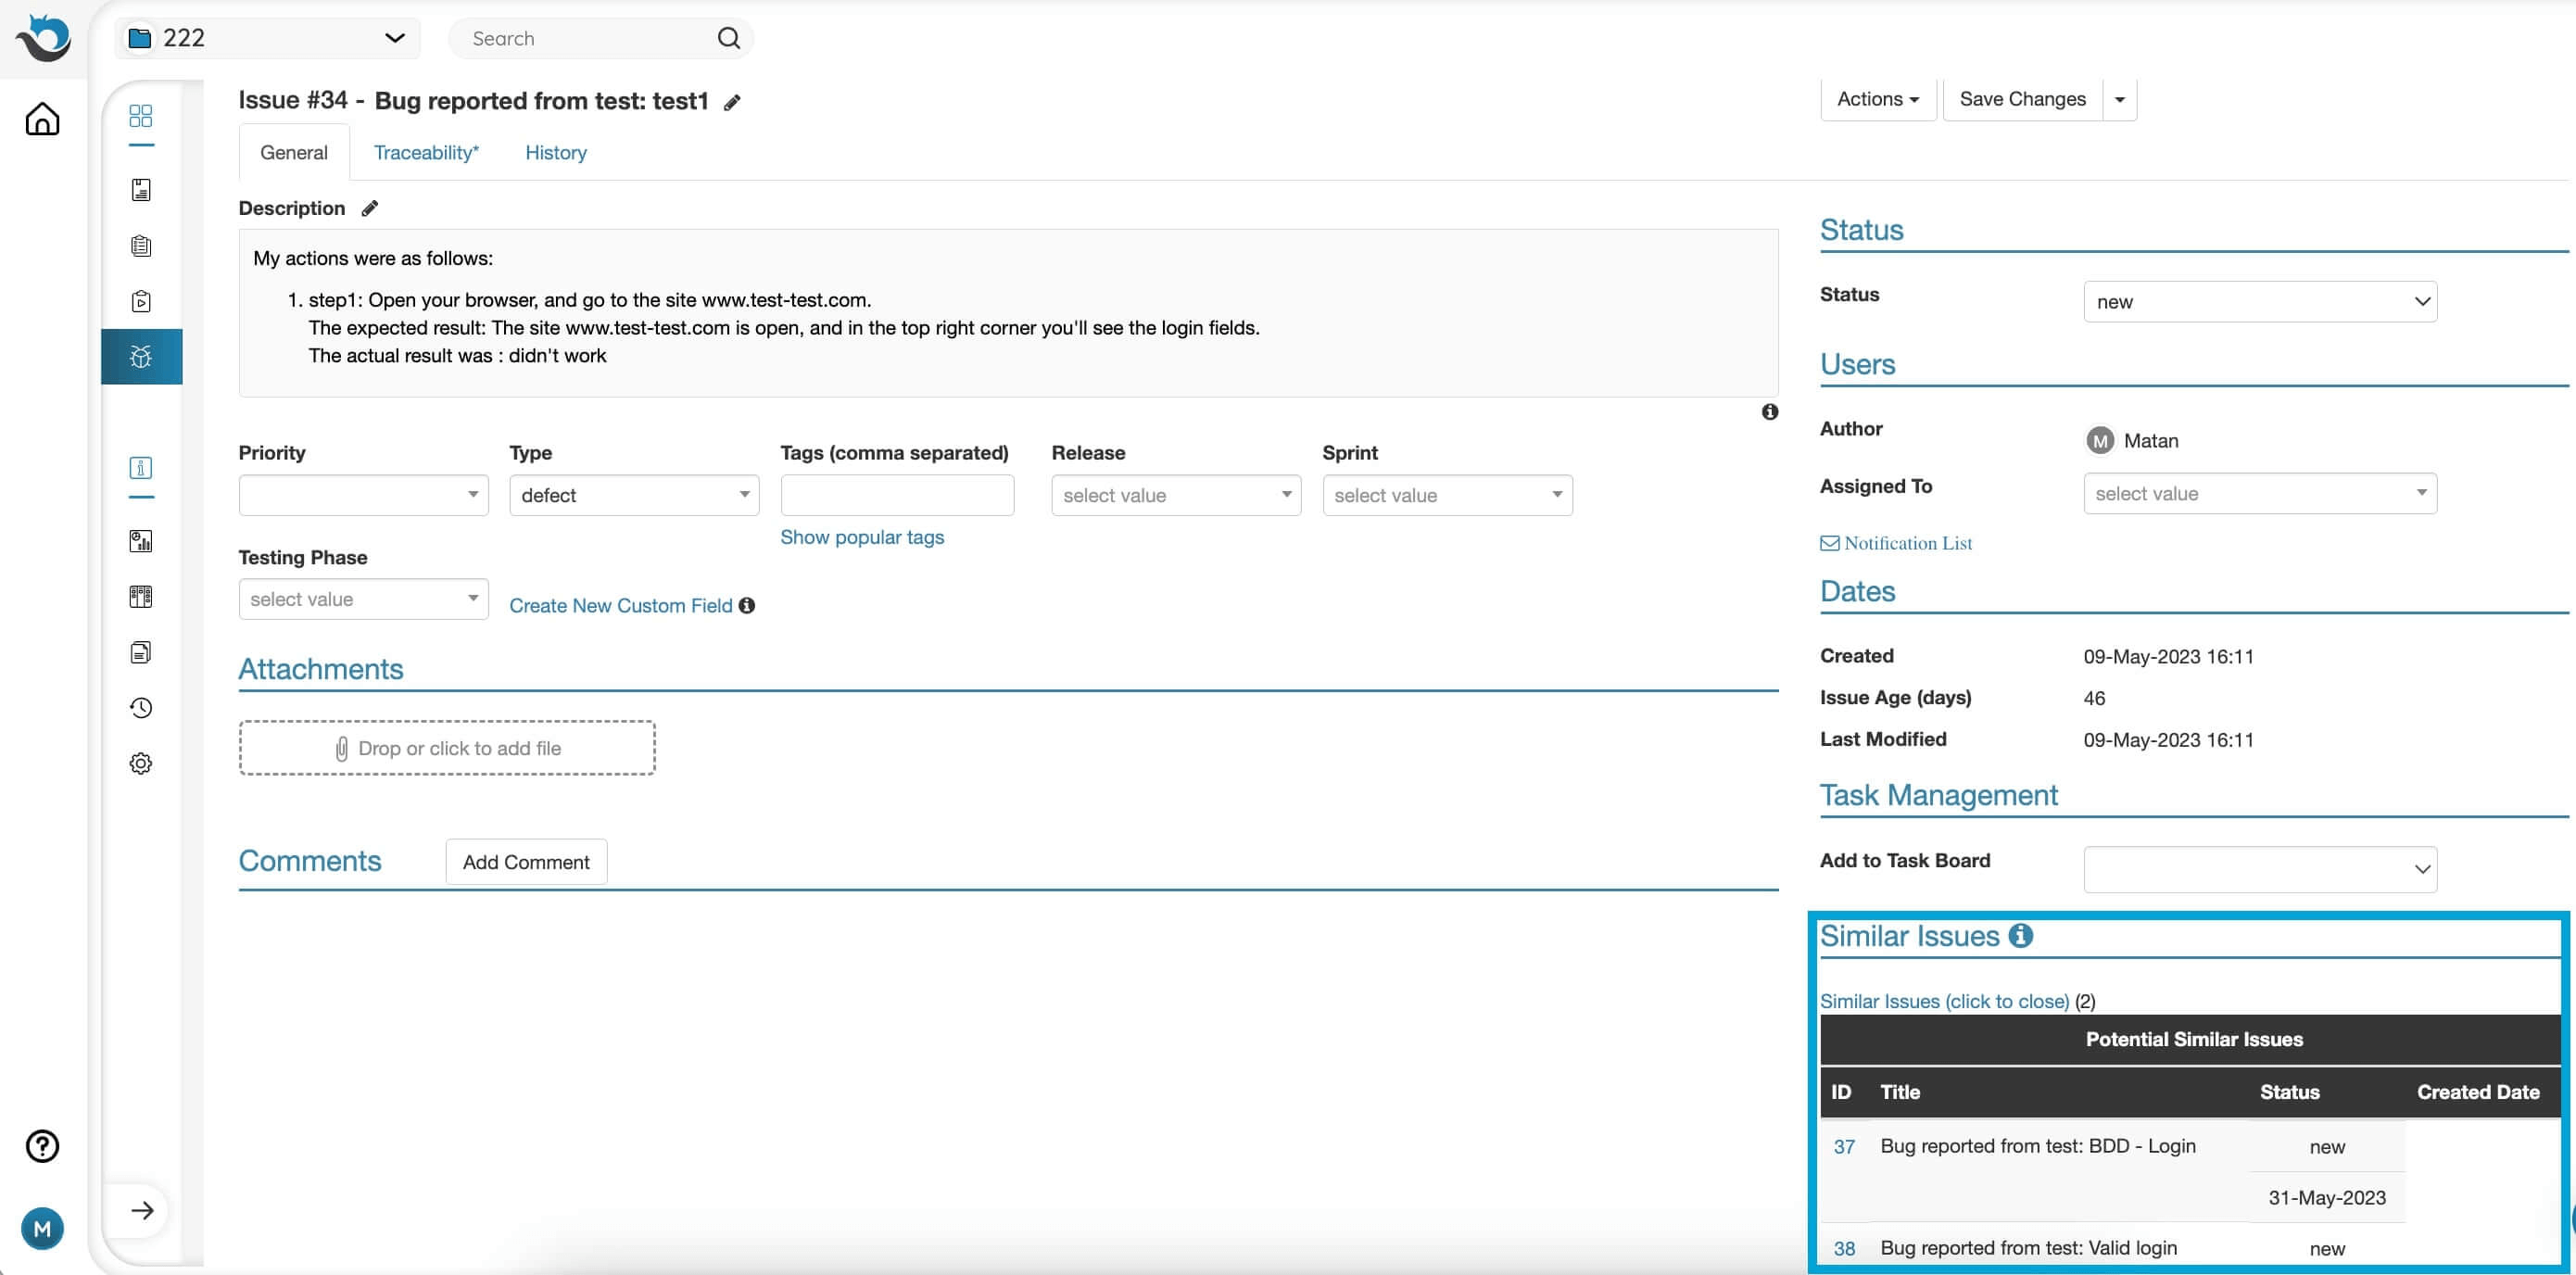
Duplicate bugs that are reported more than once in the system are a pain for every organization. The overhead and waste of time of looking for the original bug, defining it as a duplicate, and rejecting the new one is something we would all like to avoid.
What if you knew the bug you are writing right now is a duplicate of an existing bug?
PractiTest offers a built-in solution to the duplicate bug problem. The minute a bug is entered into the system, PractiTest instantly displays other potential similar bugs in the same project, enabling the user to decide whether this particular bug is a new one or a duplicate of another.
Importing Issues
Note: If you have integrated PractiTest with a bug-tracking tool, you can only sync issues from the integrated system (visit the dedicated help pages for details). With Jira and ClickUp integrations, an administrator has the option to allow PractiTest internal issues. If your administrator has enabled this function, then you can import issues into PractiTest as explained below.
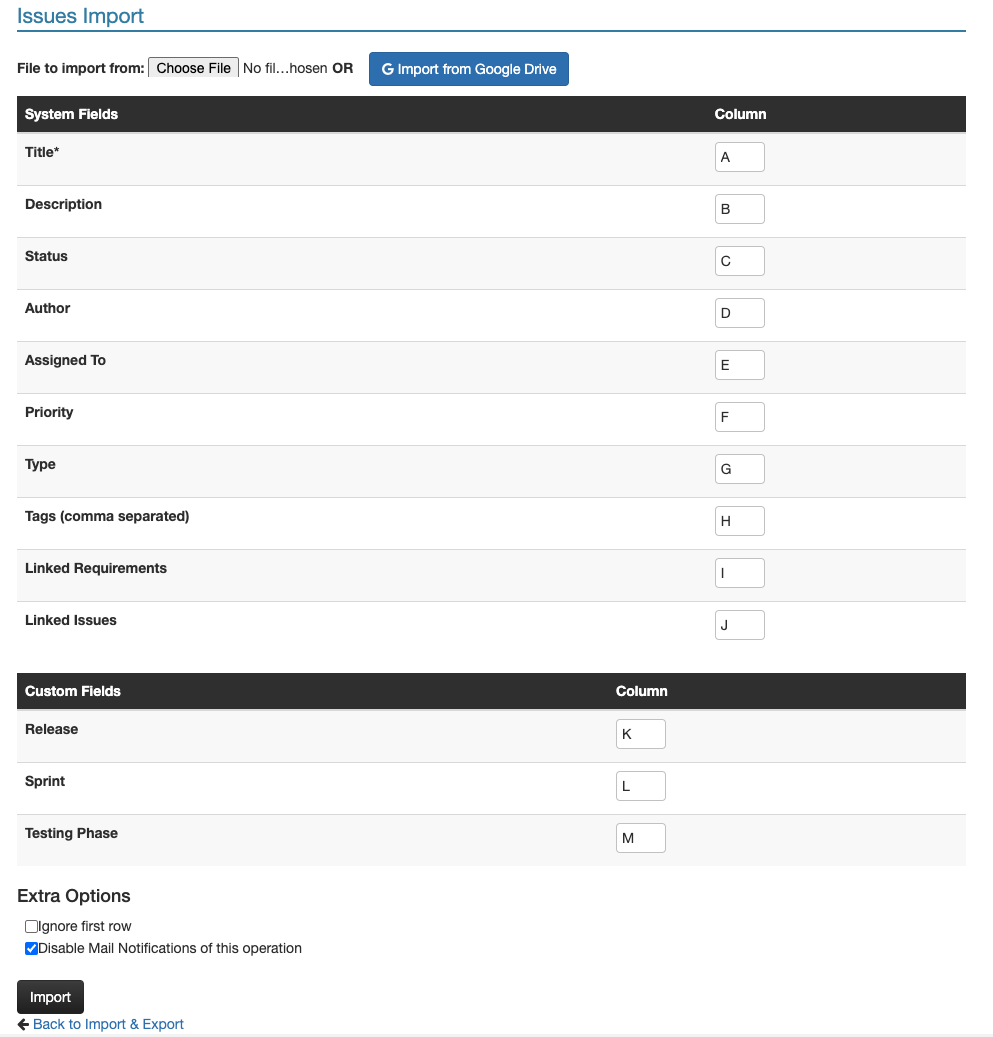
When importing issues into PractiTest, upload an XLSX-type file from your computer or open a Google Sheet from your Drive. (When uploading a CSV file into PractiTest, please make sure the CSV file is saved with the current encoding (UTF-8). For more information, please read here.)
For each field in PractiTest - including Custom Fields - specify (or map) a column in the Excel file.
Please pay close attention to these special fields:
- User Fields – Includes Author, Assigned-to, or User custom fields. The import engine requires the user’s exact email or display name. The users must be part of the project.
- Mandatory fields – There are mandatory system fields such as tests or requirement titles. A Custom Field can also be defined as mandatory. All mandatory fields are marked with an asterisk (*) and must be mapped during the import procedure or the import will fail.
- Linked Requirements and Linked Issues - If you want to import the traceability and links of your imported issues, add the linked requirements and issue IDs, separated by commas, to a mapped column. For example, see column I for Linked Requirements and column J for Linked Issues in the screenshot below.
After mapping the columns in your file to the fields in PractiTest and choosing the file to import, scroll down to Extra Options. If the first row is intended for column titles, select the box “Ignore first row”. You can also enable or disable email notifications of the imported entities to your users during the import process.
Note: When leaving the Author column empty, the user that imports the file will be set as the author of the imported entities. If you wish to change the author value, enter an email address or display name of one of the account’s users.
For more useful tips on importing, please visit this page.
Managing Issues
Issue Workflow
Project administrators can define the issue workflow through the project settings as explained here.
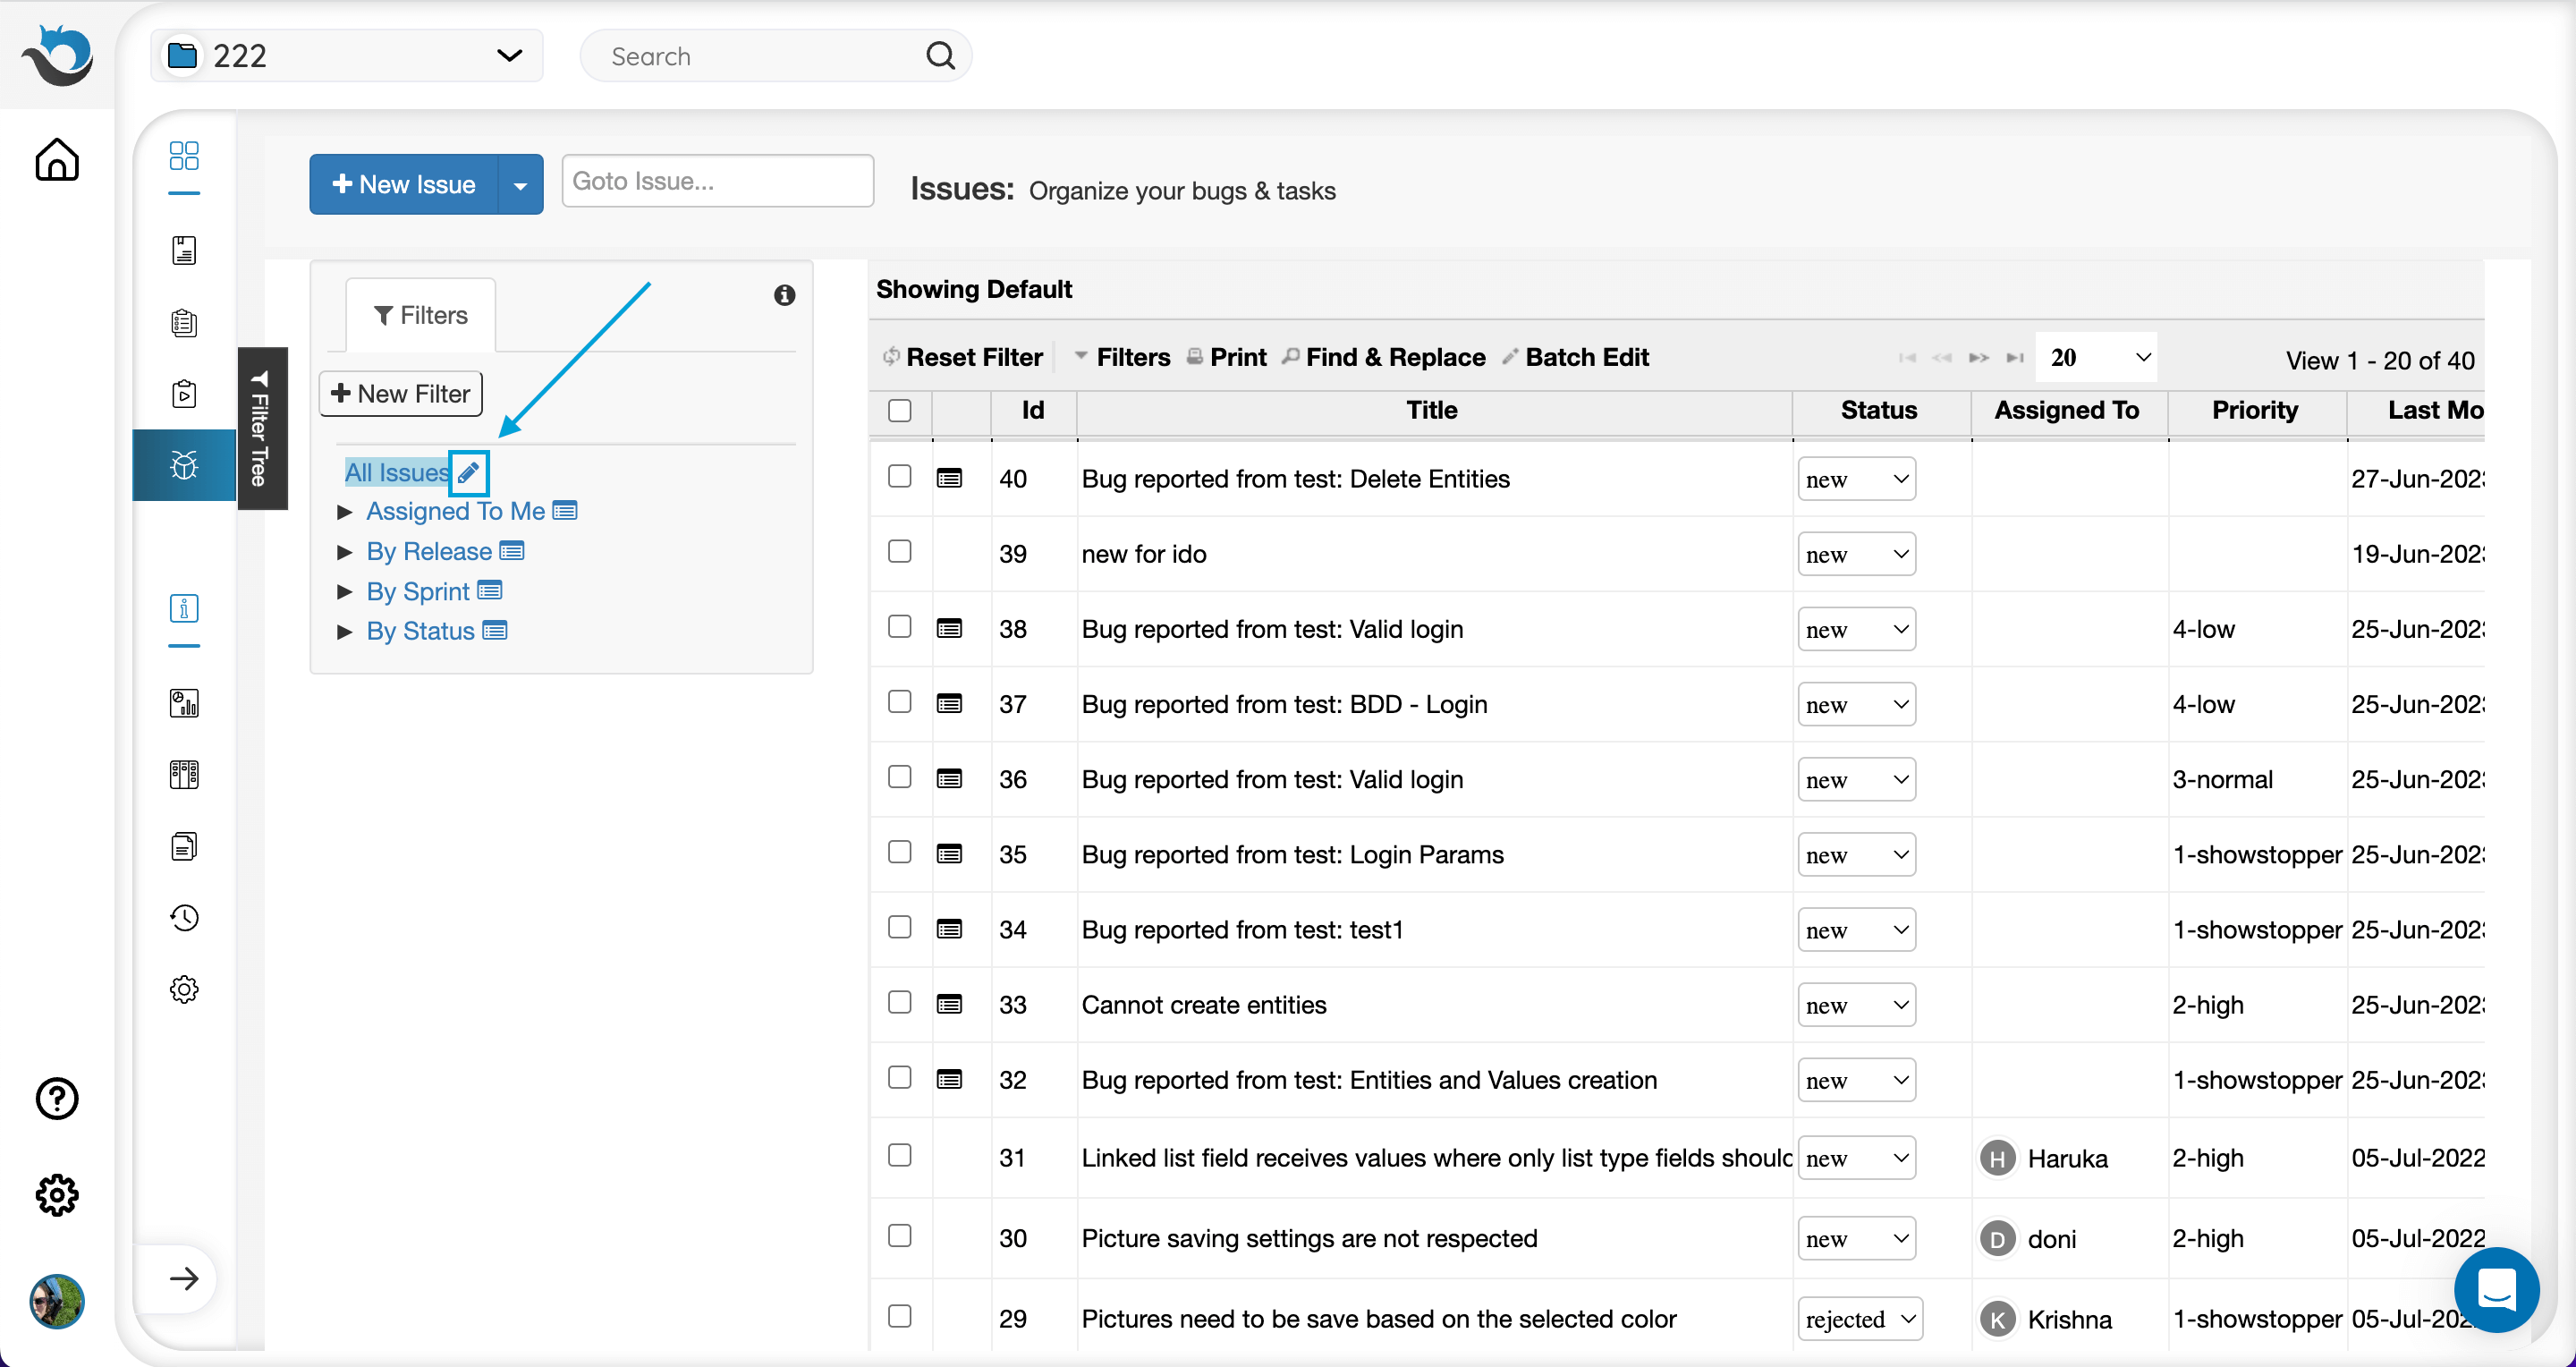
The Filters Tree
The filters tree allows you to organize issues by creating filters based on multiple parameters. You can read more about custom filters here.
To Adjust the columns of your main Issues view, press the pencil icon next to “All Issues” in the Filters window.
Fast Filters
The fast filters option allows you to further narrow down the Issues view using a parameter from fields which appear in your grid. For example, to view Issues that have 1-Showstopper priority, select the ‘Showstopper’ value as a filter for the ‘Priority’ field, then narrow down the results to display only issues that meet this criterion.
To access fast filters, click the ‘Filters’ button above the grid.
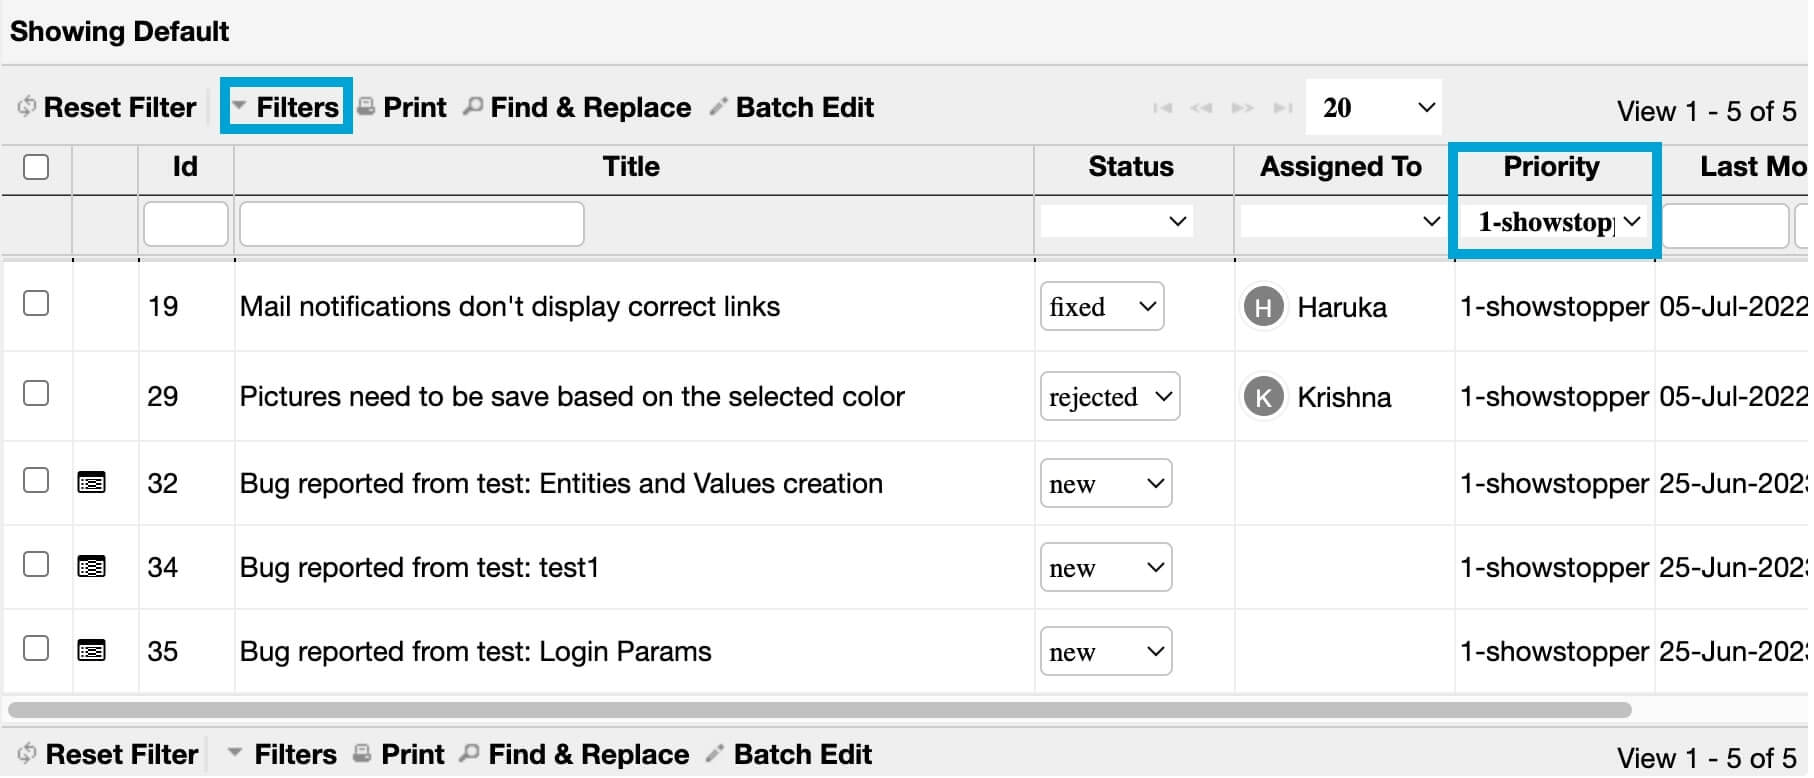
Click ‘Reset filter’ to disable the fast filter and display all results.
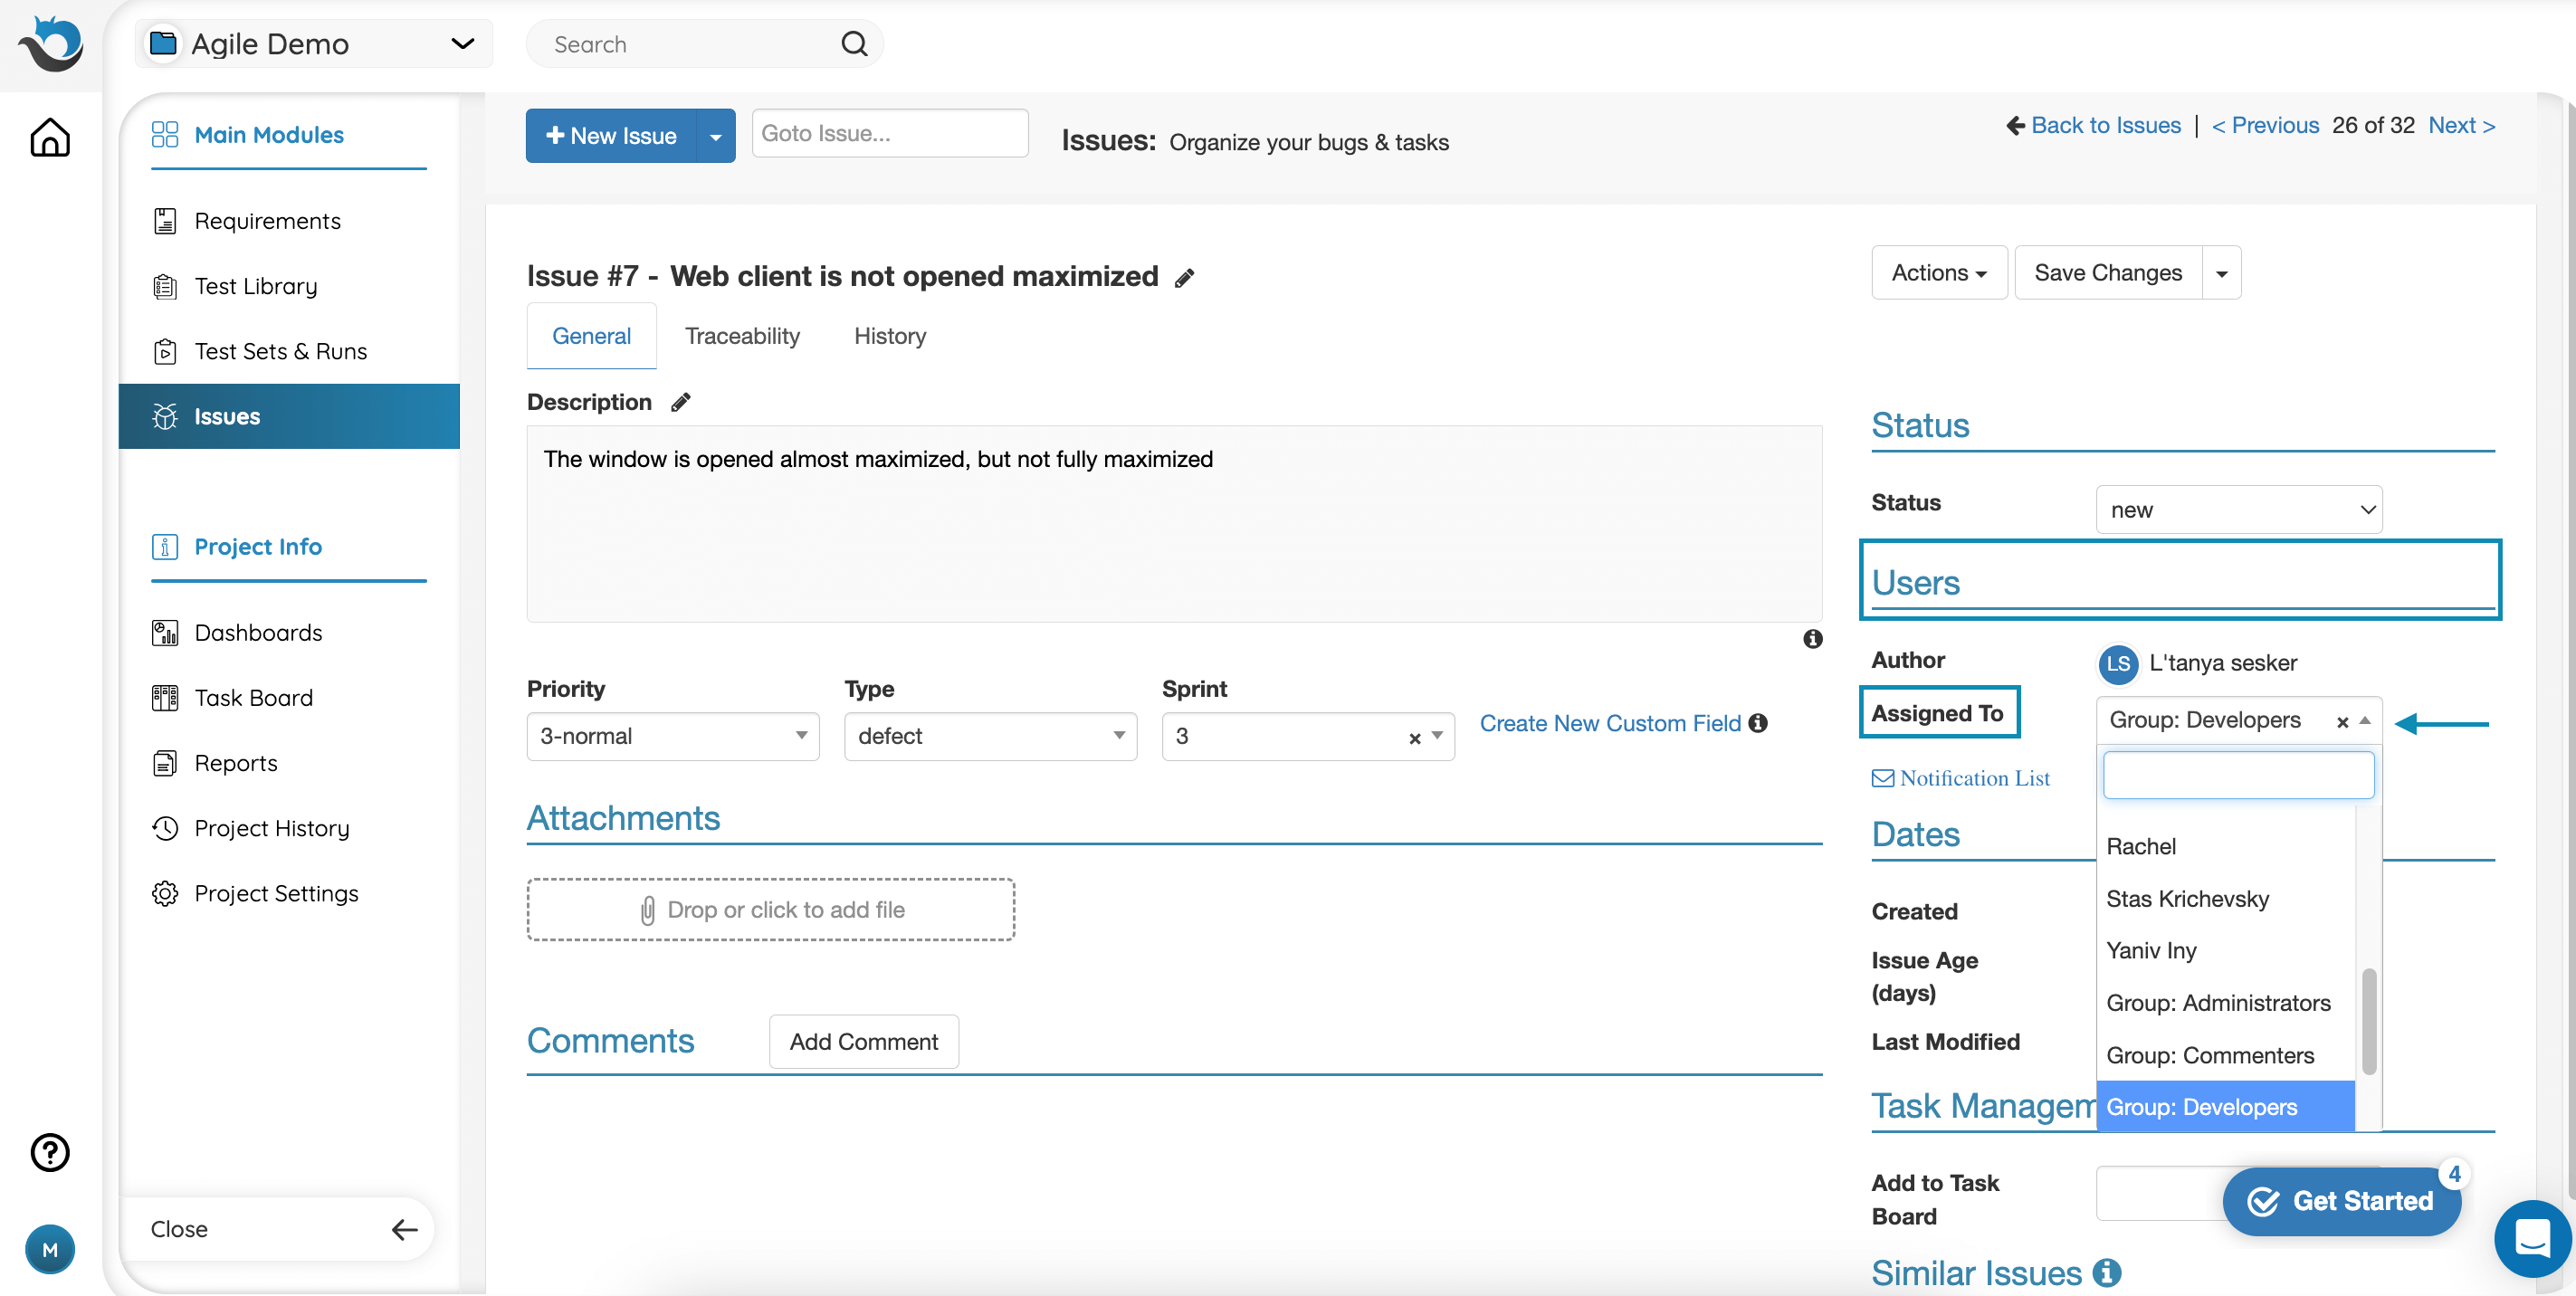
Assign an Issue to Users
In order to assign an issue to a specific user or a group of users, click on the desired issue to open the issue screen. On the right-hand side, you’ll see the ‘Users’ section with the ‘Assigned To’ field. Click on the pick list field to choose a user or group or search for a specific user to whom you want to assign this issue.
If you wish to add or edit users in groups, please read our Users Management help page.
To save or print a report for several selected issues, simply select issues using the checkboxes on the left side of the grid, then click on the “Print” icon. Note that these are different from the reports generated in the Report Center since you do not have to choose an entire view to print.
Batch Edit
To edit multiple issues simultaneously, select the issues you would like to edit using the checkboxes on the left side of the grid, then click the ‘Batch Edit’ button at the top of the grid. The changes you make will apply to all issues you have selected.

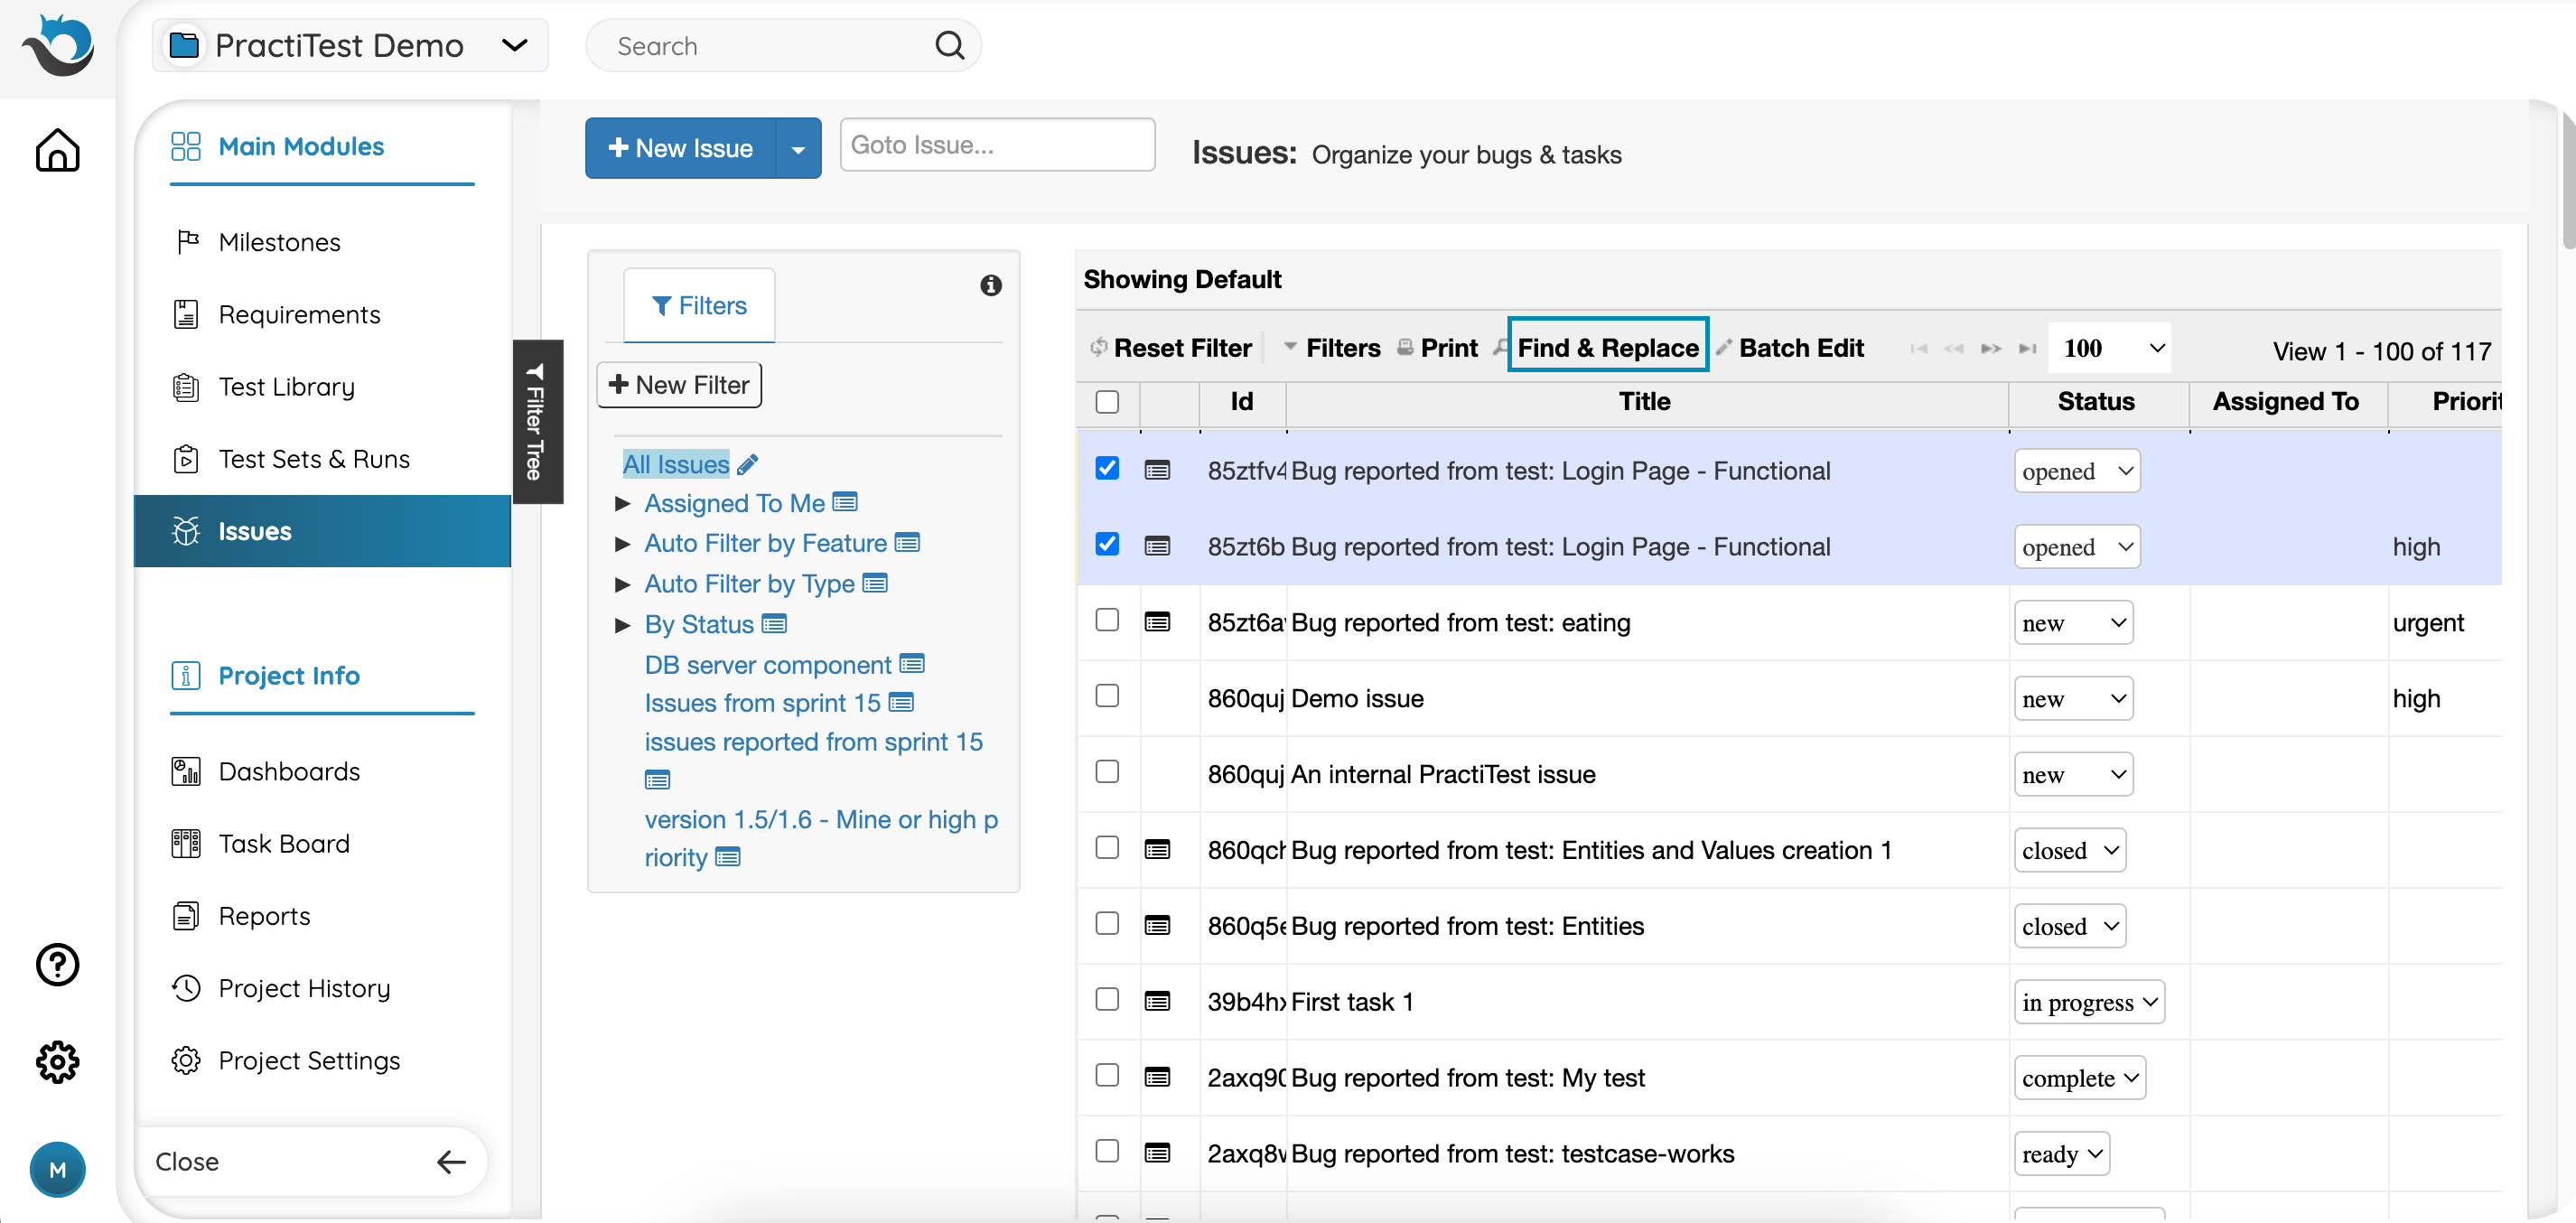
Find and Replace
To replace the same phrase in multiple entities in a single action, go to the grid, then choose the entities (tests, requirements, test sets, or issues) you want to perform the action on. Press the Find & Replace button.
Enter a phrase you want to replace in the ‘Find’ field, then enter the value you want to replace it with in the ‘Replace with’ field. Note: The ‘Find & Replace’ action is case-sensitive.
Choose the areas and fields you want to apply the search to - you can choose to replace it in all fields or select specific fields such as title fields, description fields, and so on.
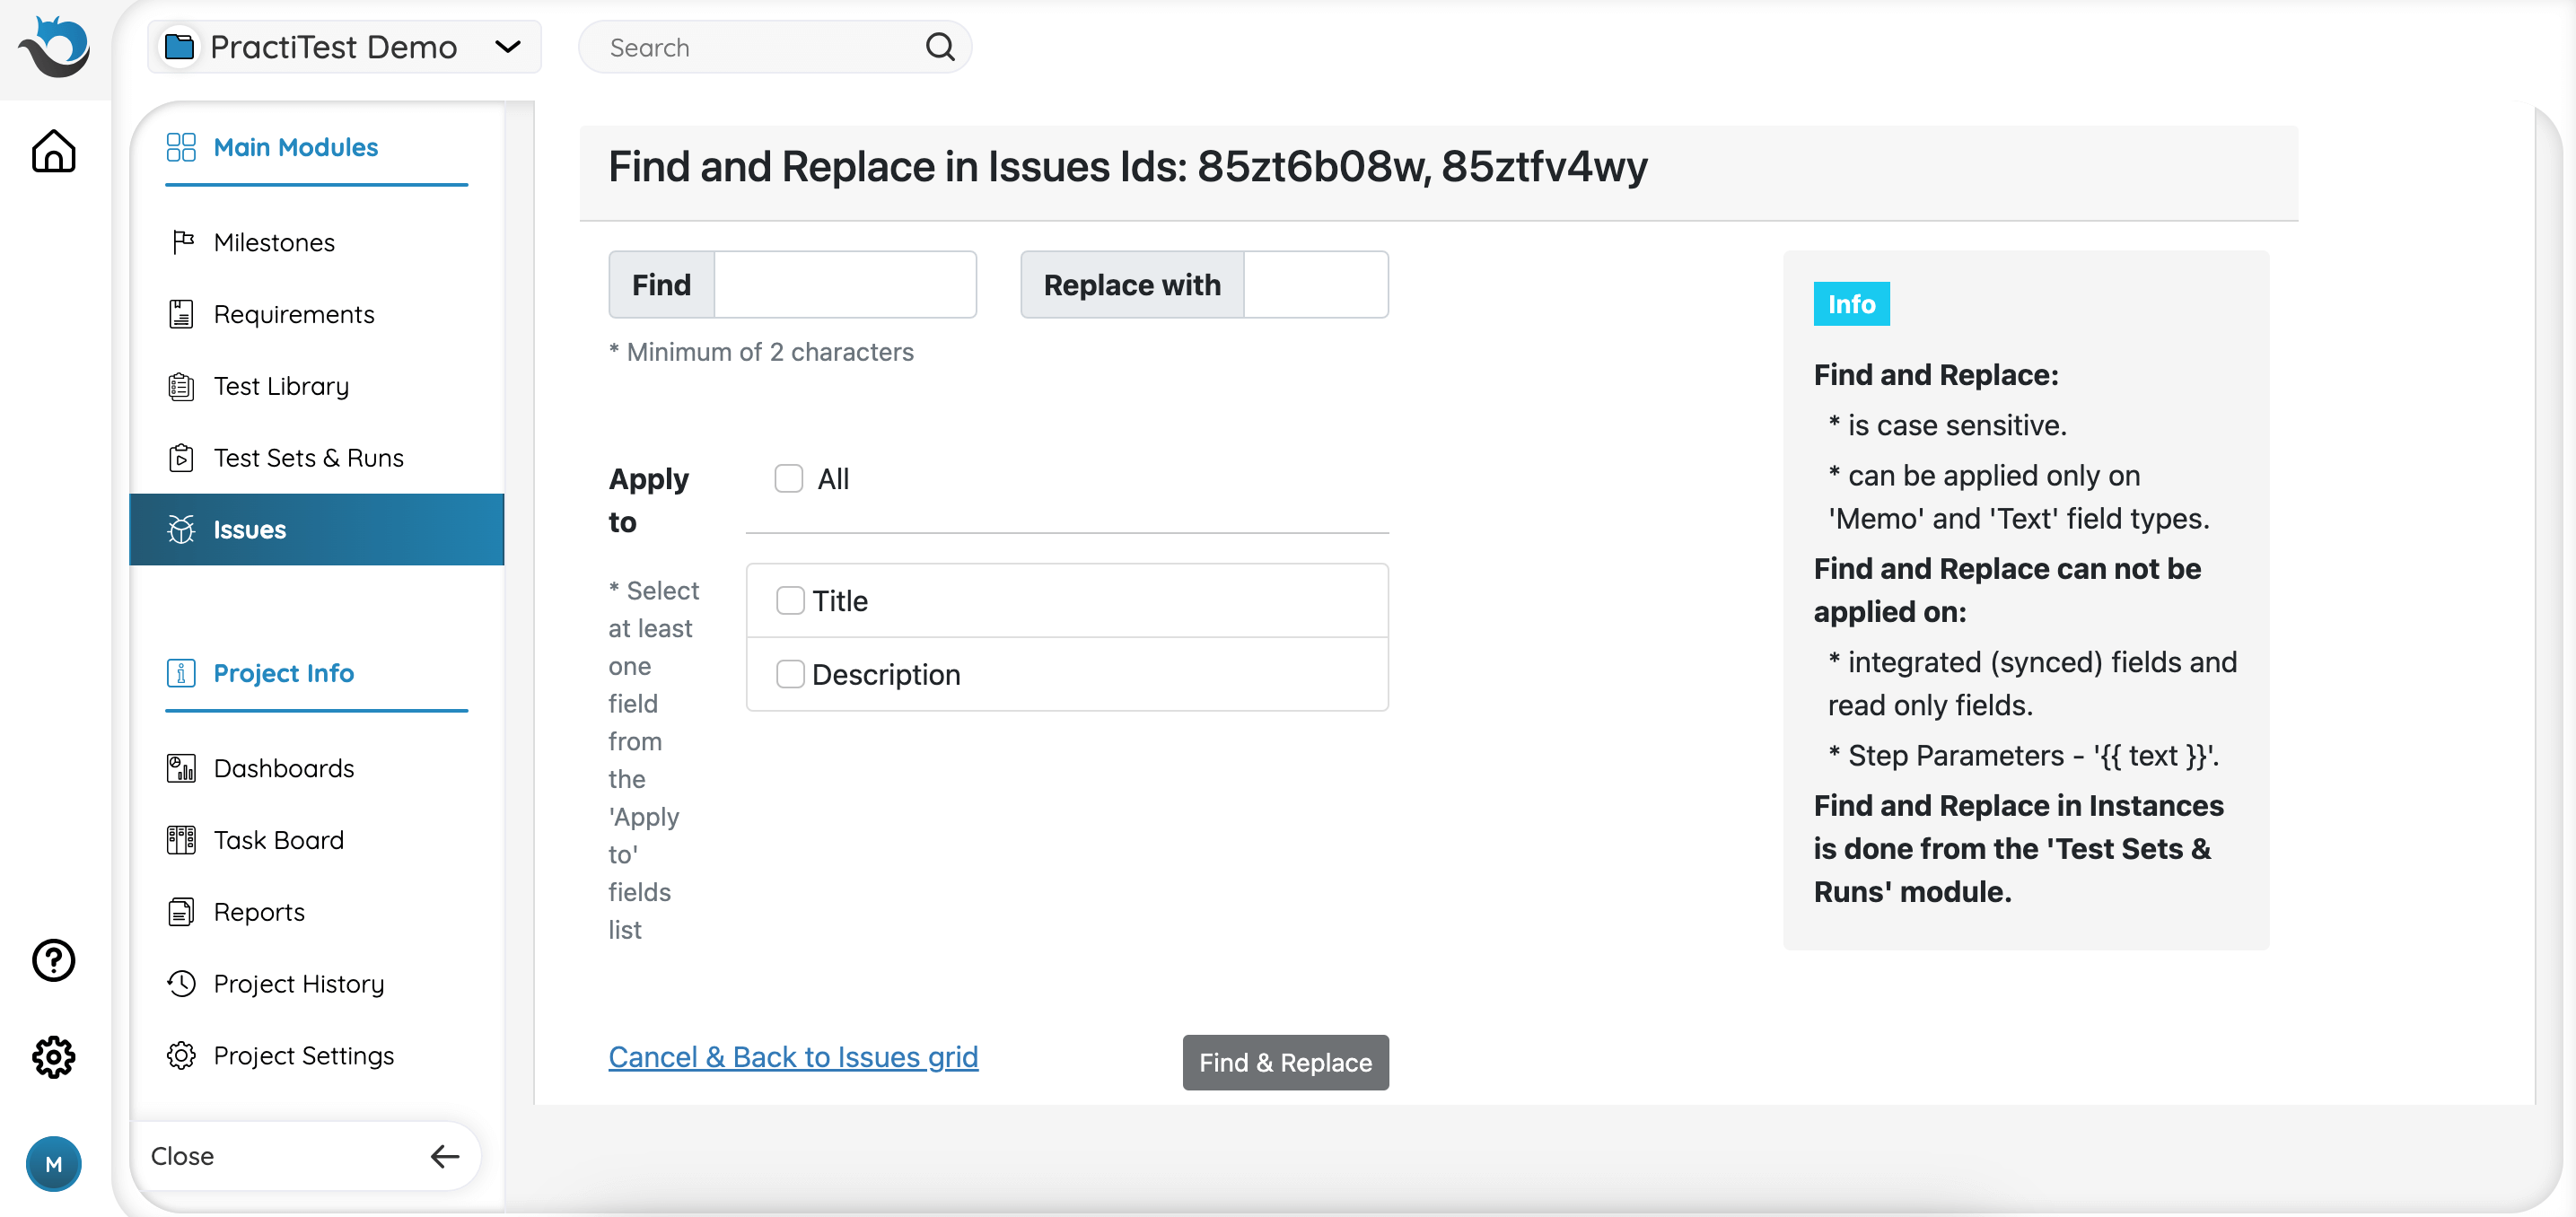
After pressing ‘Find & Replace’, you will see a message at the top of the screen confirming how many entities you are about to change. For example, if you choose 10 entities, but the word you want to replace appears only in 4, you will see 4 entities to be changed. After confirming the action, the phrase you entered will be automatically replaced.
Issues Deletion
Note: Only Account Owners can enable issue deletion.
In order to enable issues deletion, go to Account Settings – Projects Management. Click the ‘Edit’ icon near the project, check ‘Enable Issues Deletion’, then click Update.
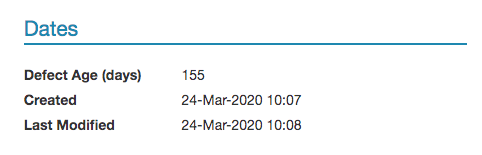
Issue Age
This system field shows the number of days from an issue’s ‘created date’ until ‘today’ or its closed date. This is an important detail for issue management and prioritization.
Additional Resources
For additional help, watch our webinar in which we cover PractiTest’s Issue Management functionalities as both a stand-alone solution and as an integrated solution. This can help you choose the best course of action for your QA projects.