The main advantage of the Jira Server/Data Center No Plugin integration option is that it allows you to integrate your Jira Server or Jira Data Center without any additional installations, and without using any plugins or add-ons. On the other hand, if you choose to use the no-plugin integration with Jira, PractiTest panels (Linked Results and Linked Tests) will be unavailable in your integrated Jira tickets.
- Configuring the Integration
- Using the Integration
- Syncing Information
- Reporting Jira Issues From a PractiTest Run
- Importing and Syncing Jira Tickets as PractiTest Requirements
- Importing and Syncing Jira Tickets as PractiTest Issues
- Editing Synced Field Values in PractiTest or Jira
- Creating New Issues in PractiTest
- Linking an Internal PractiTest Issue to Jira
- Linking Existing PractiTest Requirements With Jira Issues
- PractiTest Information Inside Jira
- Troubleshooting
- One-Way Integration
Configuring the Integration
Account Integration Settings
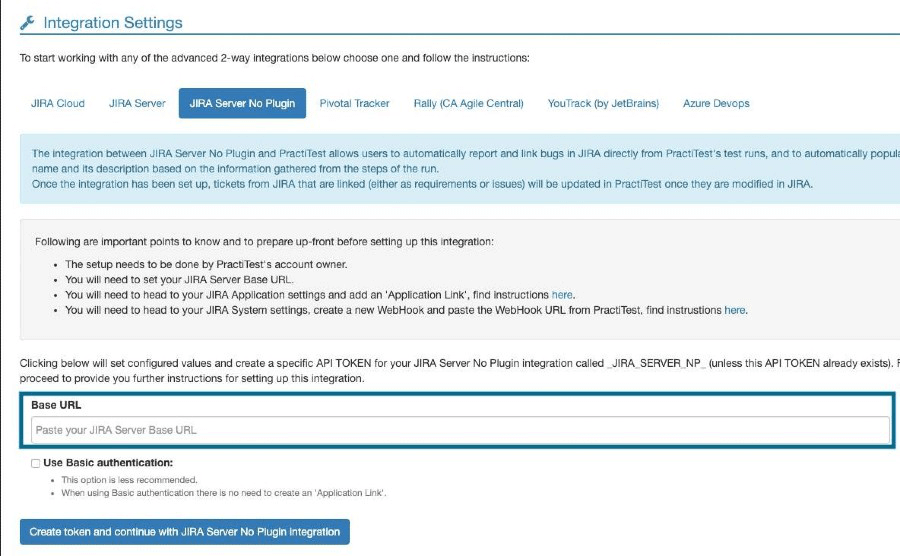
In PractiTest, create an integration with ‘Jira Server No Plugin’.
- Go to Account Settings - Integrations
- Select ‘Jira Server No Plugin’
Note: you cannot use the same PractiTest account Jira integration for more than one Jira server/DC. You can create multiple Jira integrations in your PractiTest account settings for the different Jira servers that are not part of the DC.
-
Paste your Jira Base URL:
-
Click the ‘Create token and continue with JIRA Server no plugin integration’ button. Note: If you would like to use the basic authentication method, check ‘Use Basic Authentication’ and enter username and password. This option is less recommended.
-
The following screen will appear:

Creating an Application Link in Your Jira Server / Data Center
- In Jira Administration Settings, Select Applications and then select application links.
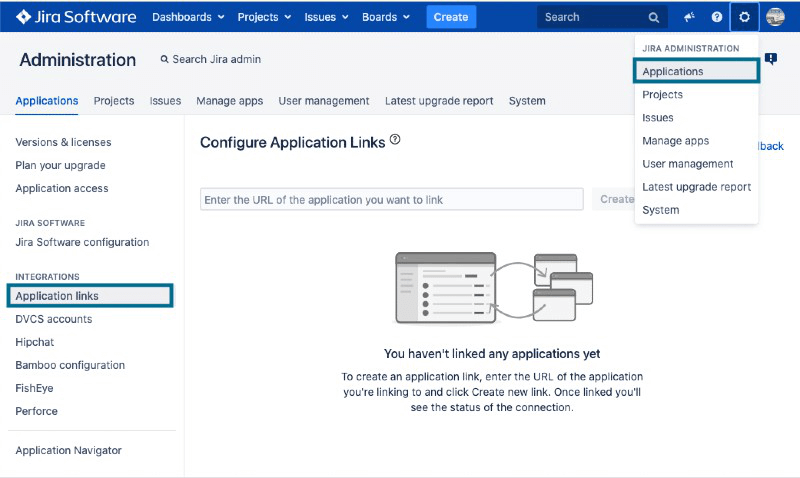
- In the ‘Enter the URL of the application you want to link’ field, enter the base URL for your PractiTest App. Your app base URL can be found in PractiTest under Account Settings - Integrations.
- Click ‘Create new link’
- Note: If you’re prompted with the following message: ‘The supplied Application URL has redirected once. Please check the redirected URL field to ensure this is a URL that you trust’, check the ‘Use this URL’ checkbox, click Continue and leave the new URL as is. Fill in the fields with the data below:
- Application Name box type: PractiTest
- Application Type: use the default value of Generic Application
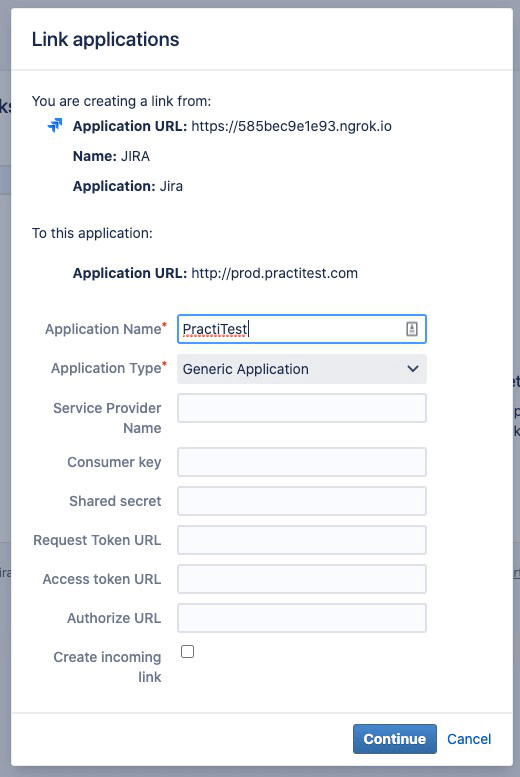
- Click Continue
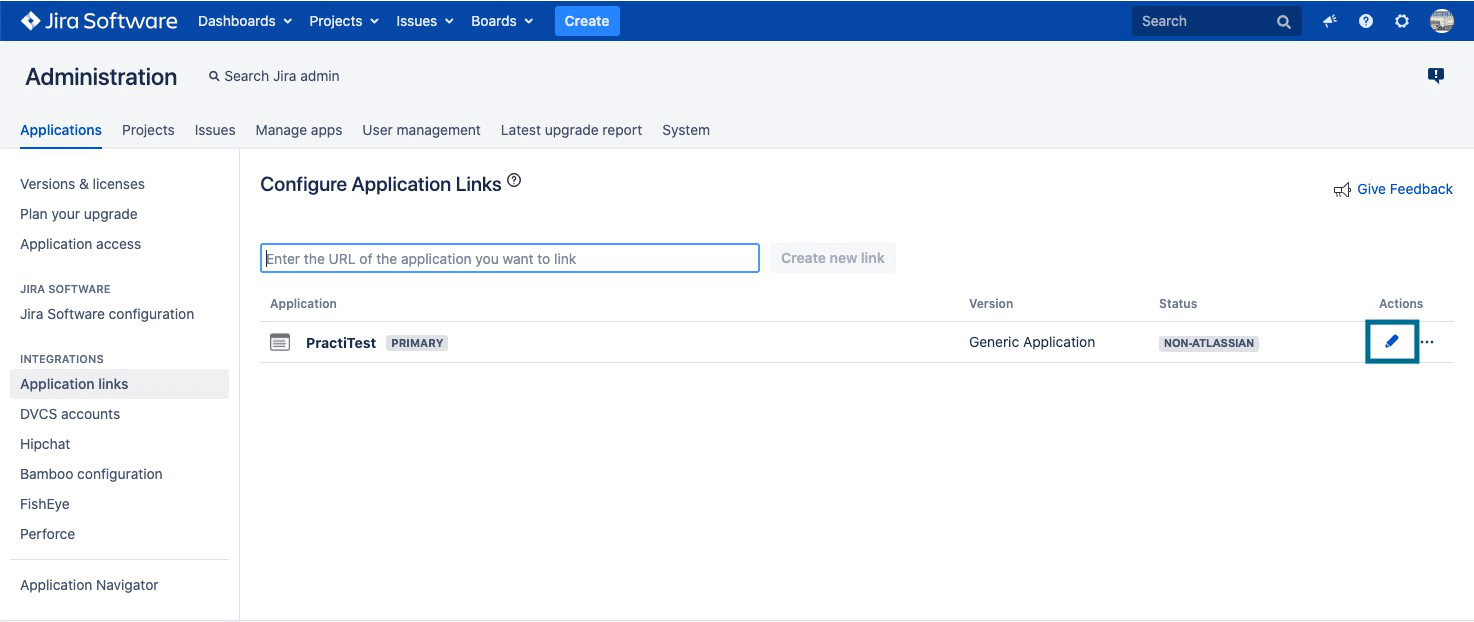
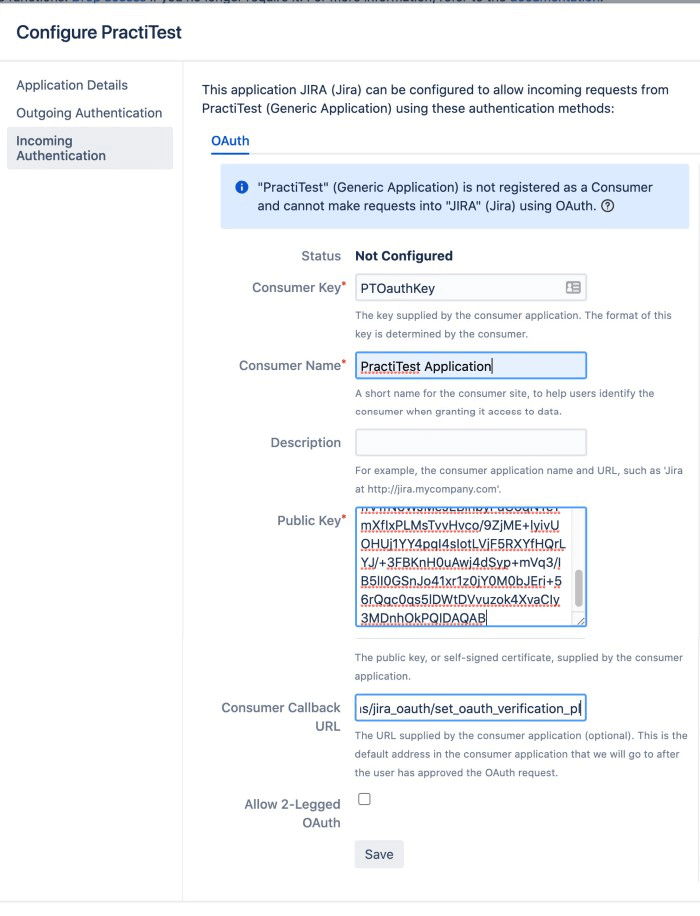
Configuring the Application Link in Jira
Note: You’ll need to have the Public key, Consumer key and Callback URL from the PractiTest integration settings page
- Locate the PractiTest Application Link that you created in the previous section and click the Edit (pencil) icon.
- In the Configure dialog box, click Incoming Authentication on the bottom-left and paste the following in the appropriate boxes:
- Consumer key: PTOauthKey
- Consumer Name: PractiTest Application
- Public Key: MIIBIjANBgkqhkiG9w0BAQEFAAOCAQ8AMIIBCgKCAQEAxi5O5khVZEpqaVUG13mQw2PM/SCAdx8b2IvkOIJIBGgQe1UBATCUnENlbfAmU1y5VmzzlLxtnHq4E6gTtwCNQjPzwLtFV60Ys4kQG73j78CHw+oRGuza+PQiHZb6exwbaZmaNXaDbV0TuZzO4J/A3Qxo5vFWKlG0VI4Q3xfrv1fN6WJMeJLBlhbyFuC6qNTcYmXfIxPLMsTvvHvco/9ZjME+lyivUOHUj1YY4pqI4sIotLVjF5RXYfHQrLYJ/+3FBKnH0uAwj4dSyp+mVq3/IB5lI0GSnJo41xr1z0jY0M0bJEri+56rQqc0qs5lDWtDVvuzok4XvaCIy3MDnhOkPQIDAQAB
- Consumer Callback URL: Please find your Consumer Callback URL in the PractiTest Account Integrations Settings window
- Click the Save button, and then click Close
 Note: In case you are not allowed to configure integrations by using application links, use the basic authentication method (less preferred) instead where username and password will be used.
Create a Webhook in Jira
- Go to Jira - Administration (Settings) - System. Scroll down to Webhook.
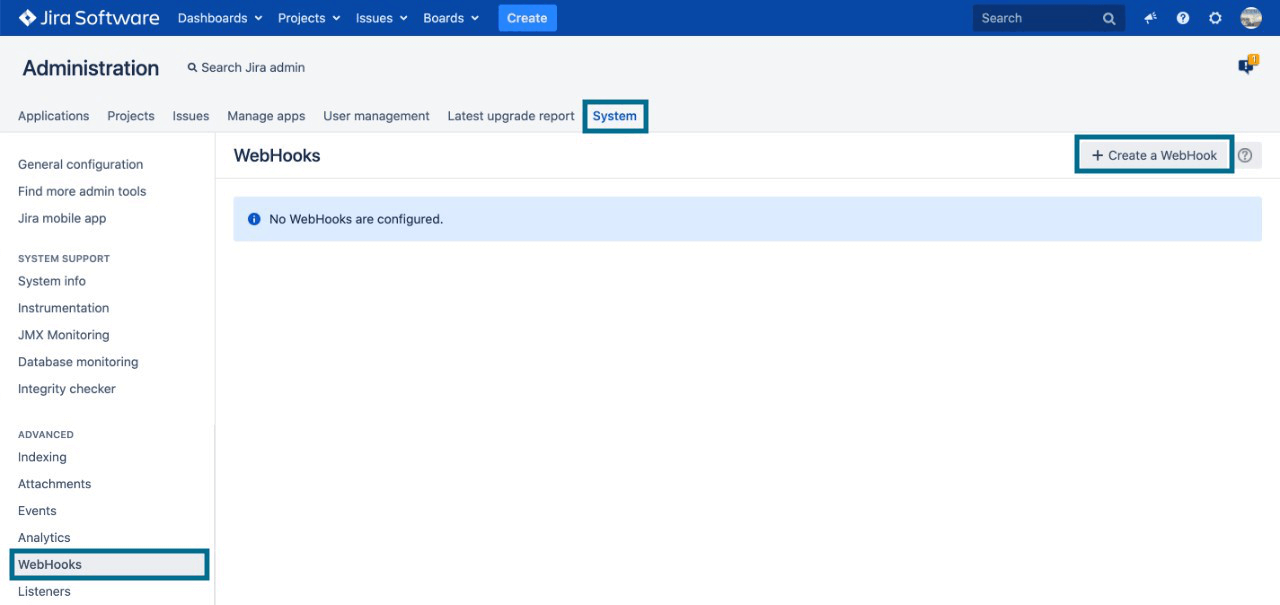
- Click ‘Create a Webhook’
- Paste the Webhook URL you received in the Integration Settings screen in PractiTest
- In the same window, scroll down to the Events section - Issue related events. In the JQL text box, insert: project in (“your integrated projects separated by commas”).
In the ‘Issue’ column underneath, check ‘updated’. In the ‘Issue Link’ column, check ‘Created’ and ‘Deleted’. In the ‘Comment’ column check ‘created’, ‘Updated’ and ‘Deleted’.
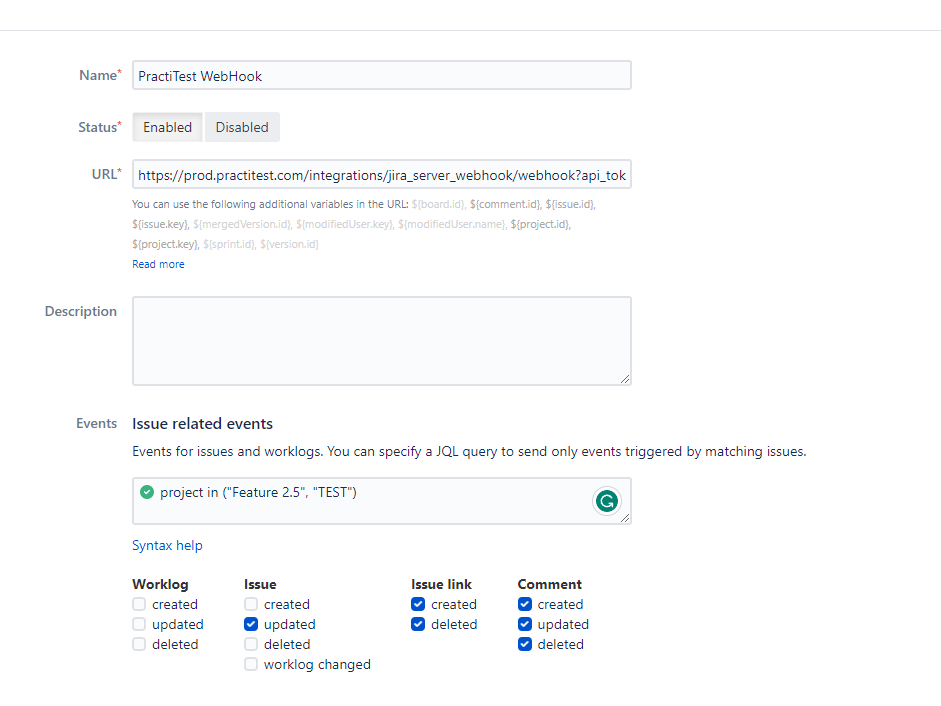
- Click ‘Create’
Project Integration Settings
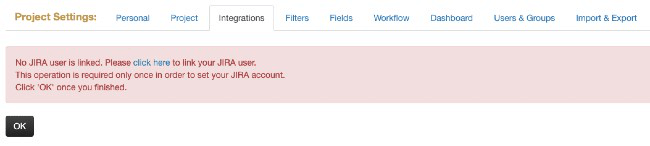
Project Admins: Connecting Your PractiTest and Jira Users
Go to Project - Integrations. There, you will see a system message for linking your user. Click this message and the link will automatically connect. From now on, any action you make using the integration will be recorded under your user on any side.
Once done, you can set the project level integration settings.
Note: This Jira user link is irrelevant when using the basic authentication method.
Project Mapping
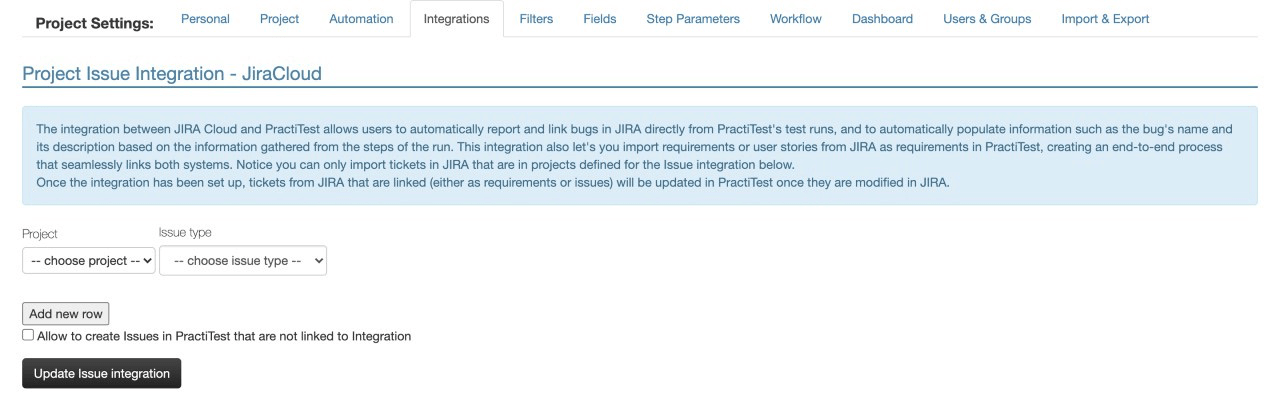
- In PractiTest, go to Project Settings - Integrations. Click ‘Activate’ on the issue integration section and then press ‘Activate’ again on the Jira integration configured in your account.
- Add a new row for each of the Jira projects you want to integrate with this PractiTest project, then select the relevant project and issue type. You can add as many rows as you want and map any Jira project with its relevant Jira issue types.
PractiTest Internal Issues
You can decide to create issues only in PractiTest’s internal issues module, alongside issues that are synced to Jira. These issues will not be synced to Jira. To enable this option, tick the ‘Allow to create Issues in PractiTest that are not linked to Integration’ box.
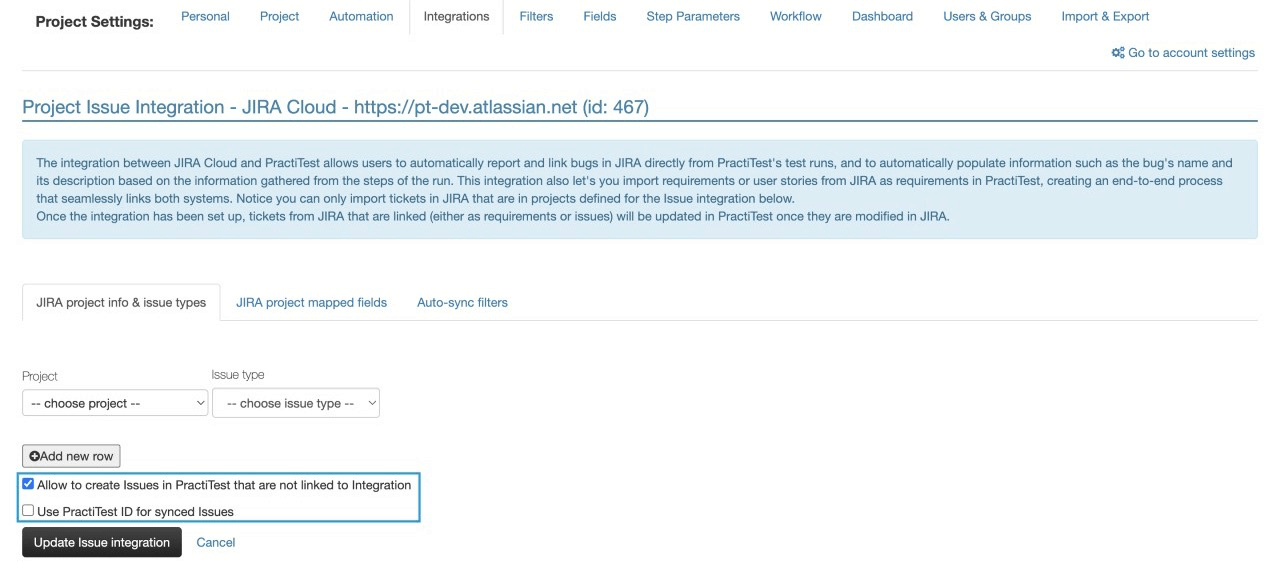
If you choose this option, you will have the choice to present the PractiTest ID for all issues including the Jira synced issues. If you do not choose to allow PractiTest to create internal issues, PractiTest will present the Jira ID for each issue.
Field Mapping
Note: Field sync needs to be configured for each PractiTest project separately. Note: Linked Issue field (for example “is blocked by” or “relates to”) will be automatically added to the “Fail & Issue” modal box when the project and issue type you choose contain it. In this case, you won’t need to map it here.
In the project Integration settings window, click settings and choose the ‘Jira project mapped fields’ tab.
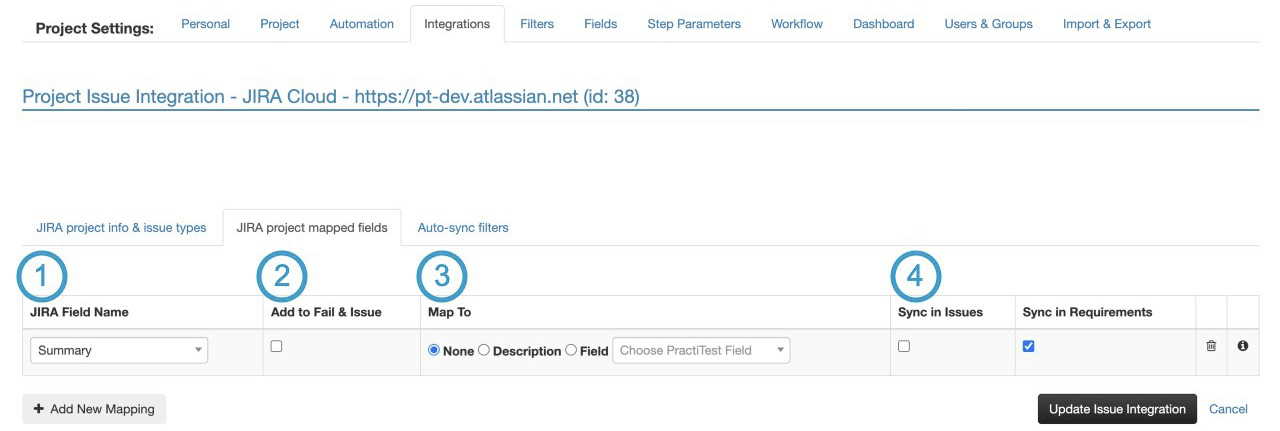
- Choose the Jira field you want to map. You can choose Text Fields, Single select lists (text, number, users), Multi-lists, Number, Date, or Sprint type fields.
- Tick the “Add to ‘Fail & Issue’” box if you want this field to appear when reporting an issue from PractiTest to Jira.
- Choose if and where you want to map this Jira field, for example, to a PractiTest dedicated field, or to the description of the PractiTest entity. Note: If you choose to map it to a field, the list of PractiTest fields that will appear will contain only custom fields that match the type of the Jira field you chose (ie. text-text, number-number, etc). Sprint fields can be mapped to list type fields in PractiTest and are also linked to either requirements or issues. If you choose the Jira Priority field, you will be able to map it to the PractiTest Priority system field. If you choose to map Jira fields to the description field of either requirements or issues, you will only be able to update the field on the Jira side.
- Once you choose to map to fields, you will need to choose whether to present the data in the issues field, the requirement field, or both. If the PractiTest field you choose is linked to only one of them, then you will have only that option to map to.
Continuous Filter Sync
To continuously sync a Jira filter into PractiTest including any issues, , go to your project integration settings and choose the “Auto-sync filters” tab.
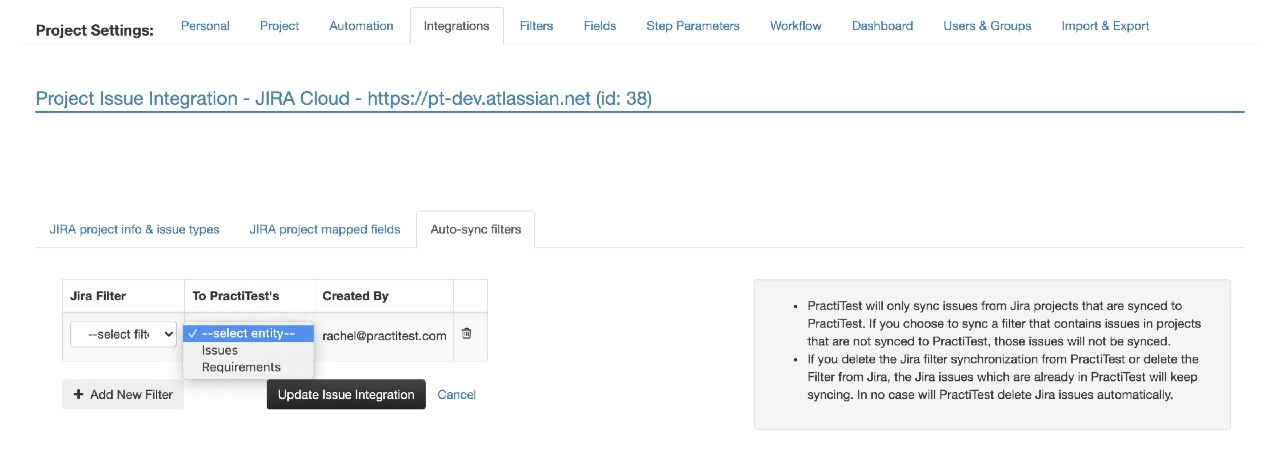
Choose the relevant Jira filter and the PractiTest entity you want to sync it to (ie. requirements or issues). Click “Update issue integration”. Every 4 hours, PractiTest will sync to all the issues in this filter. You can add as many filters as you like, but please note that if the filter contains issues from projects that are not integrated with PractiTest (as defined in the first tab “Jira Project info & issue type”), they will not be synced.
Using the Integration
Syncing Information
PractiTest issues or requirements which have been linked to a Jira issue will be updated when the value of the Jira issue status, name, description, comment, or any of your synchronized fields have been added or changed from within Jira. For more information about synching Jira fields, visit the help section here. You can also define fields to be edited in PractiTest and updated in Jira.
Basic Authentication Method Accounts Note: For accounts with basic authentication configured, there is no link between PractiTest and Jira users. For each interaction, the service account supplies, username and password will be used instead.
Note: The first time a user utilizes the integration, a message to ‘click here to link your Jira User’ will appear. Project admins can connect PractiTest and Jira users here. After clicking on the message, the link between the PractiTest and Jira user will be established (according to the GDPR).
Reporting Jira Issues From a PractiTest Run
- Run your tests normally.
- When encountering an issue, click the ‘Fail & Issue’ icon, or prior to that, save the ‘Step’s Actual Results’.
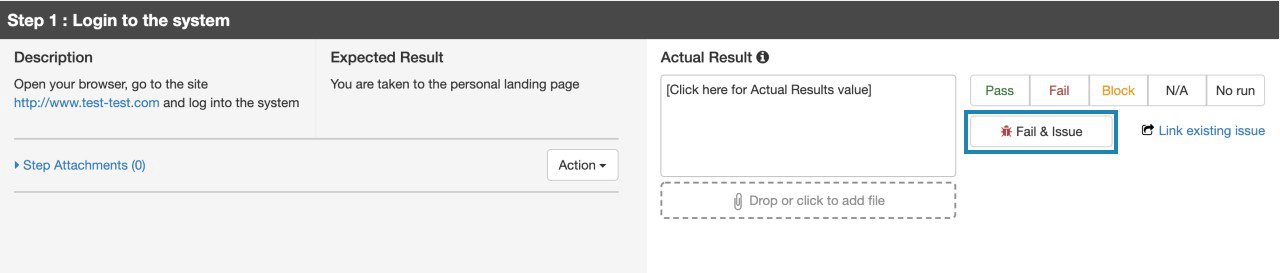
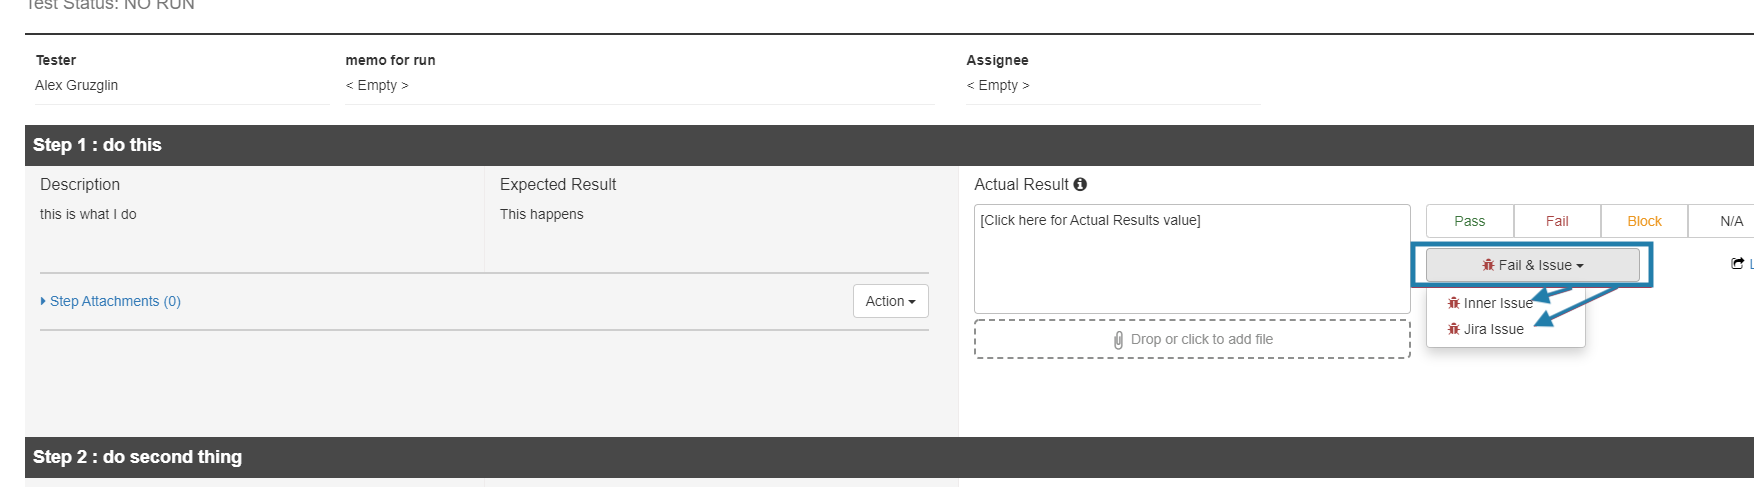
- If you have not enabled internal PractiTest issue creation in Jira (more details on this can be found here), then the “Fail & Issue” button will open two options. The first will create the issue in PractiTest, and the second will create the ticket in Jira.
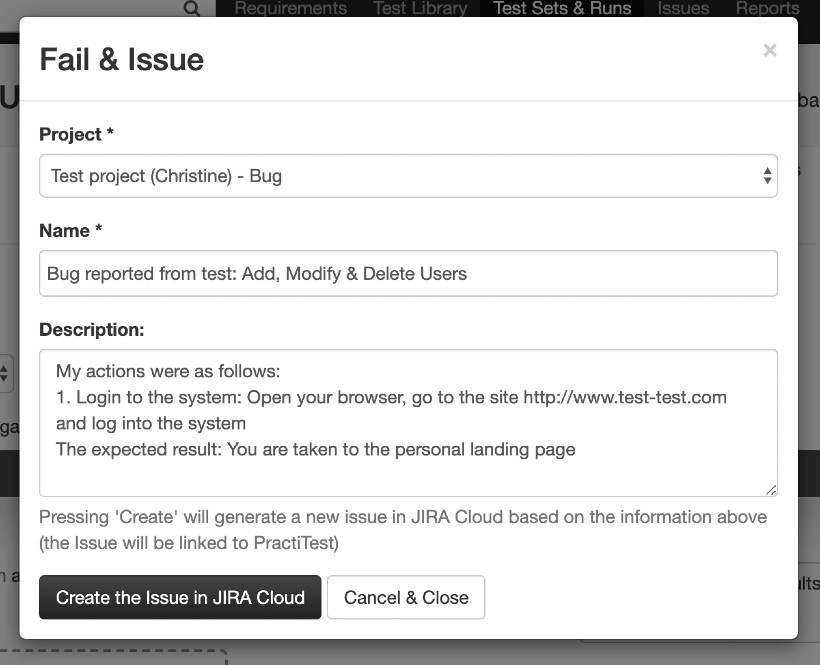
- Click the dropdown ‘Project’ list in the modal box. Note: this dropdown is customized according to your project integration settings. Next, select the relevant Jira project and issue type from the list.
- The test data will be pre-entered and include the summary and description pre-filled with steps you’ve executed and the failed “Step’s Actual Results”, if this information was entered in PractiTest.
- More details may be added to the issue.
- At the bottom of the modal box you will see:
- Jira fields that were mapped to PractiTest in the project integration settings (read how to map Jira fields here)
- Fields that were made required in your integrated Jira projects
- Linked Issues field, for instances when the Jira project you are reporting to and the issue type you chose have the linked issues field
- Attachments that have been added and will be synced
- Click the button to create the issue in Jira.
- If you have not enabled internal PractiTest issue creation in Jira (more details on this can be found here), then the “Fail & Issue” button will open two options. The first will create the issue in PractiTest, and the second will create the ticket in Jira.
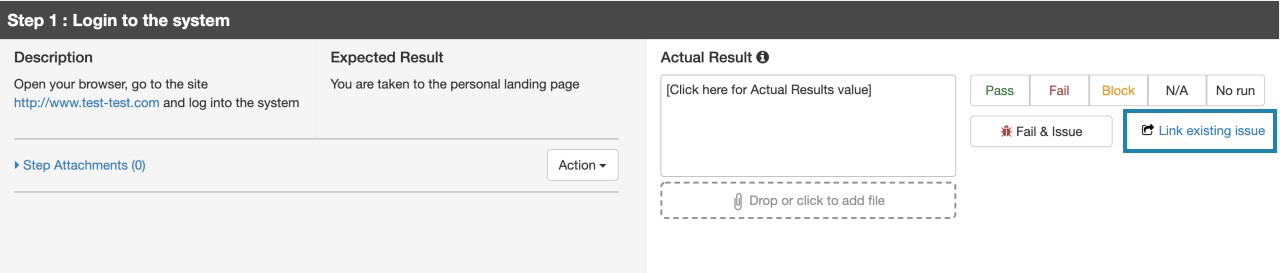
- Existing issues may be linked to step runs. This option allows you to link a failing test step to an existing Jira ticket. You can link to multiple issues at the same time by using commas between each issue IDs.
- After creating the Issue, the plugin is activated and will continuously sync the issue and test step.
- When changing the value of synchronized fields or adding a comment, PractiTest will continue updating Jira. Additional details about synching Jira fields can be found here.
- All Issues connected to Jira can be viewed in PractiTest and automatically synced when changes are made to the name, description, status, synced fields, or comments in Jira.
Importing and Syncing Jira Tickets as PractiTest Requirements
There are three ways to import & sync Jira tickets as requirements into PractiTest:
-
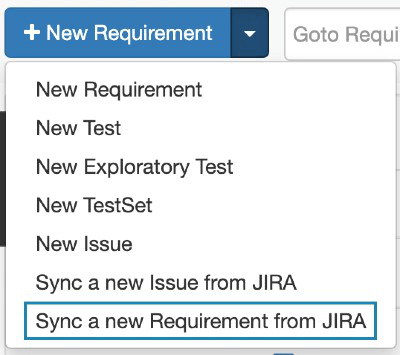
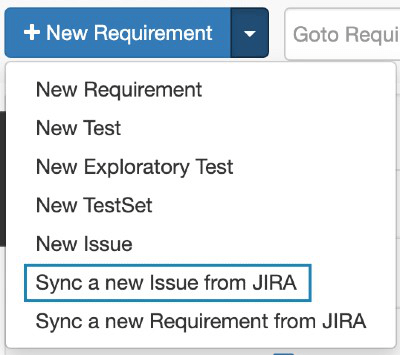
By ticket IDs: Click on the down arrow next to the “New Requirement” button and select “Sync a New Requirement from Jira”.
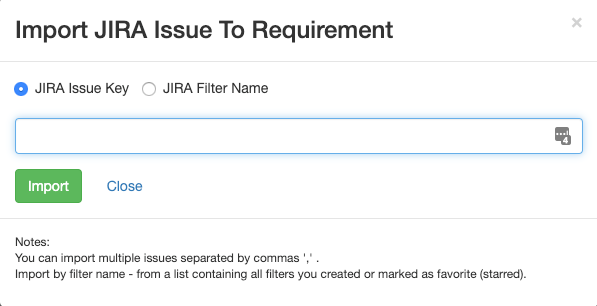
 In the requirements import modal box, choose import by ticket IDs. You can import either an individual ticket or multiple tickets separated by commas.
-
By Jira filters: This will sync the current issues in the selected filter into PractiTest. However, if changes are made (such as new issues), it will not continue to sync the filter.
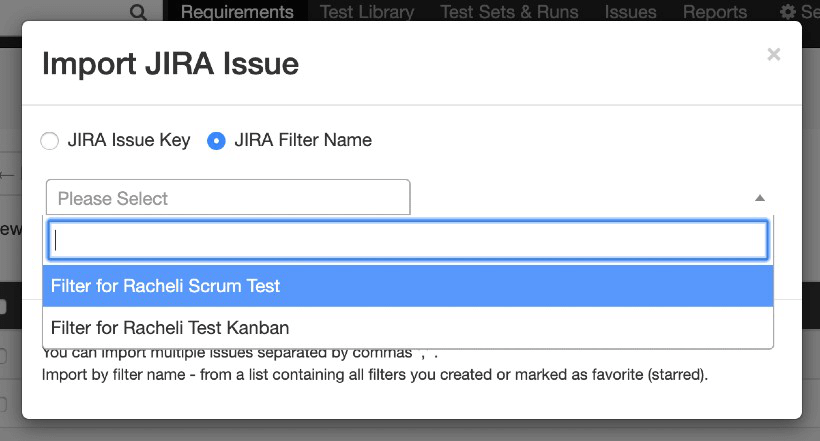
Find the “New Requirement” button, click on the down arrow next to it, then choose “Sync a new Requirement from Jira”. In the requirements import modal box, choose ‘Jira Filter Name’ followed by the name of the relevant Jira filter to import. The dropdown list of filters that in the modal box contains a list of filters that you have either created or starred.
Note: If those filters have tickets from projects that are not integrated with PractiTest, they will not be included in the import.
-
Sync PractiTest with a Jira filter to continuously update PractiTest with its issues: To keep syncing a Jira filter into PractiTest, go to the project integration settings, select the “Auto-sync filters” tab, and follow the instructions here.
Importing and Syncing Jira Tickets as PractiTest Issues
There are three ways to import existing tickets from Jira as Issues into PractiTest
-
Import by IDs: Paste the ID of your Jira ticket. Issues may be synced in bulk. To ensure a smooth process, make sure to separate them by commas.
-
Import by Jira filters: This will sync the current issues in the chosen filter into PractiTest. Note: if any changes are made to it, the filter will not continue syncing. Check the ‘Jira Filter Name’ on the import modal box and then choose the name of the relevant Jira filter to import. You will see the filters that you created or starred displayed in the dropdown list:
-
Import by Jira filters and continue updating PractiTest with relevant issues: To sync a Jira filter into PractiTest and keep syncing its issues into PractiTest, go to the project integration settings, find the “Auto-sync filters” tab and follow the instructions here.
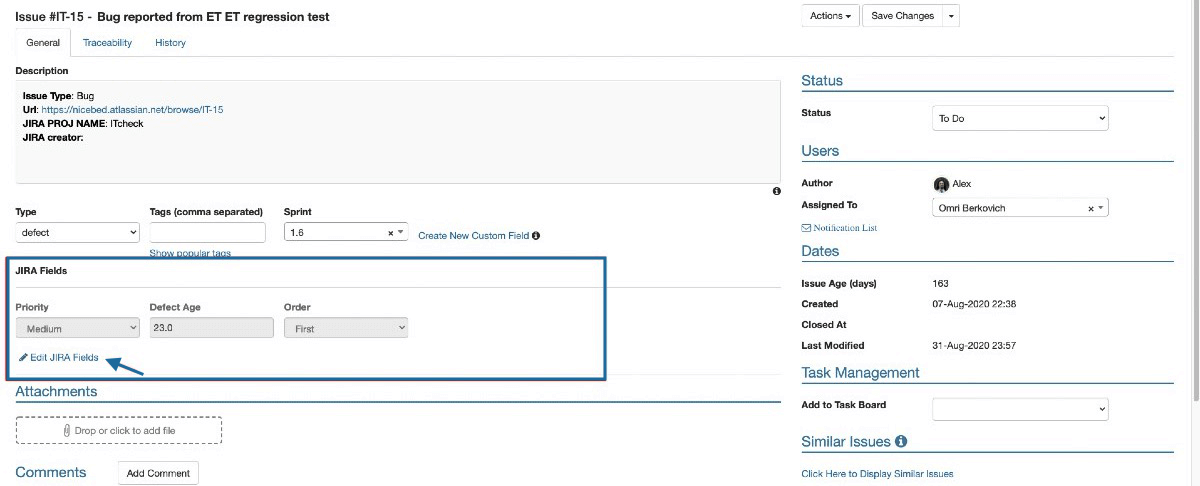
Editing Synced Field Values in PractiTest or Jira
To configure the mapping of Jira fields to PractiTest fields, follow these configuration instructions.
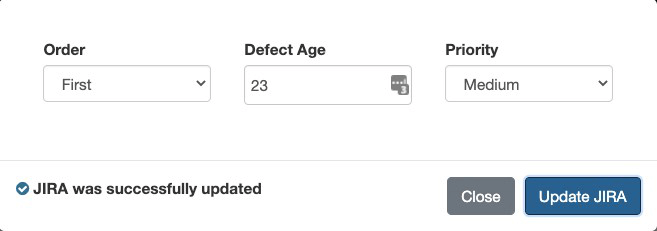
Working with mapped fields allows you to choose where to update your fields from - either in PractiTest or Jira. When editing a field in a PractiTest Requirement or Issue, the field value will automatically display in the synced Jira ticket. When updating from Jira, the change will be shown in PractiTest. In PractiTest, once the mapping is configured in both fields, a new section will appear in requirements and issues. To edit the field values, click on ‘Edit Jira Fields’, enter the values, then click ‘Update Jira’. The value change will be updated in both PractiTest and the relevant Jira ticket.
Creating New Issues in PractiTest
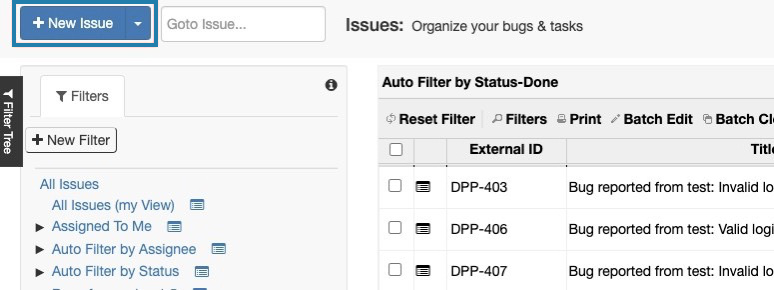
Once you have enabled creating issues in PractiTest which are not linked to the integration, you can create new issues in the PractiTest issues module. This is done without syncing to Jira, using the ‘New Issue’ button on the top left-hand side of the screen. You can also do this from within a run.
To report a bug to Jira or to PractiTest only, click the ‘Fail & Issue’ button inside the run window.
Linking an Internal PractiTest Issue to Jira
To link an issue created in the PractiTest issues module to Jira at a later date, go to the ‘Actions’ section of the issue and select the dropdown.
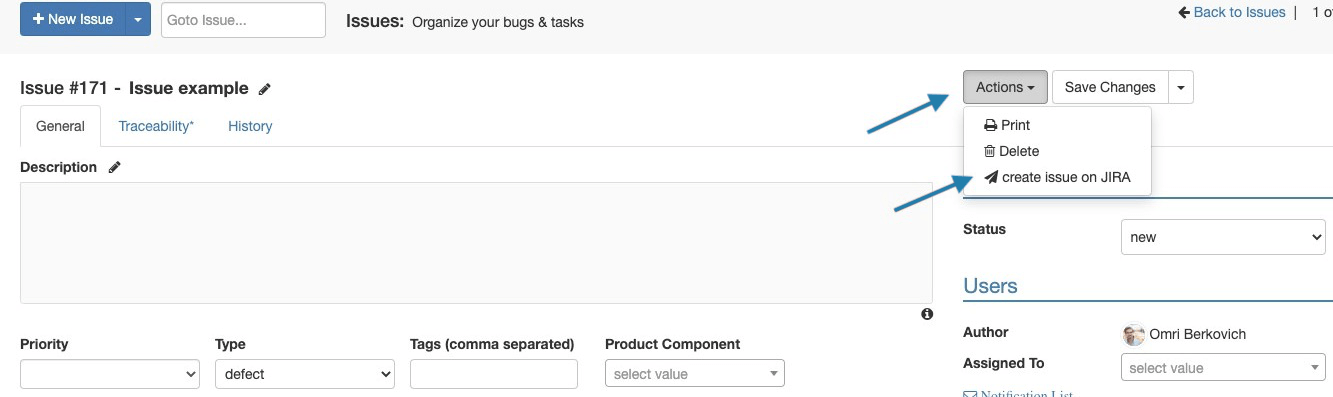
Click on ‘Create issue on Jira’. A new modal window will appear. Fill in the issue details, then click ‘Create the issue in Jira’.
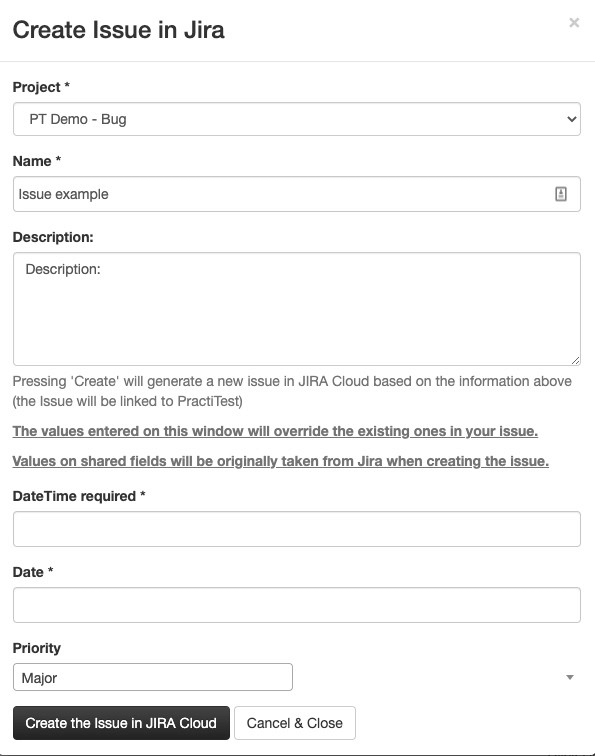
The issue will appear in your Jira project and will be linked with the issue that was created in PractiTest.
Note: the information you input into the modal window will override previous information that was in the internal issue fields.
Linking Existing PractiTest Requirements With Jira Issues
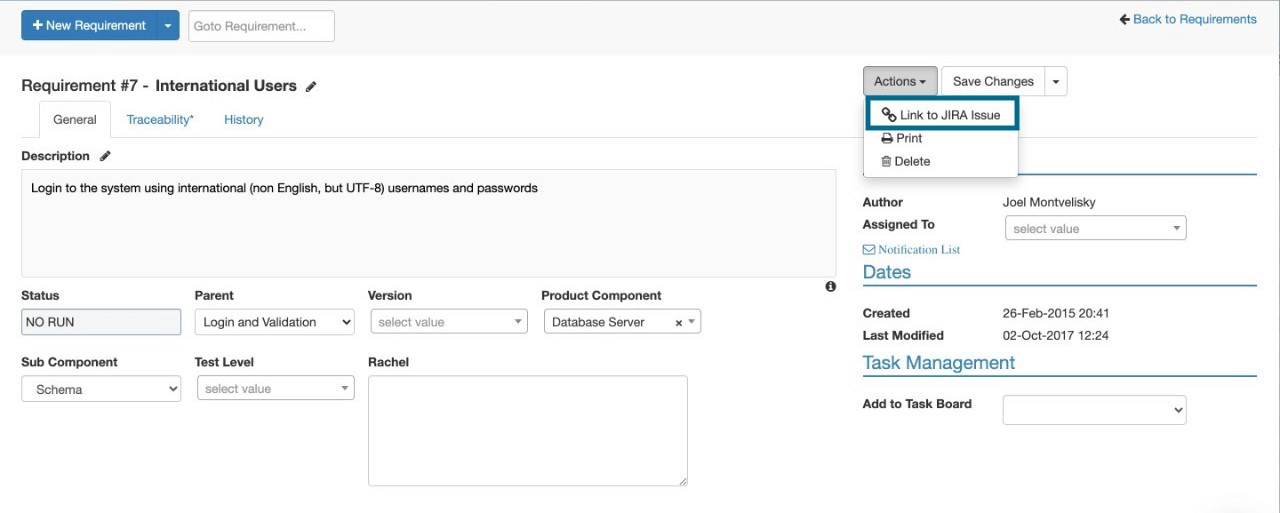
- Choose an existing requirement in PractiTest.
- Click on ‘Actions’, then click on ‘Link to Jira issue’ in the top-right corner.
- Enter the Jira Issue key. *You can choose to unlink or link back a requirement at any point.
PractiTest Information Inside Jira
Jira no plugin users can view a link to PractiTest inside the Jira ticket description.
Viewing Comments
Comments from the synced PractiTest issue/requirement will appear in Jira. This includes changes made to a PractiTest comment.
Troubleshooting
Before checking specific issues, please make sure you are not using the same PractiTest integration (configured in the Account Settings) for more than one Jira server/DC. If you are unsure about this, please contact our support team for assistance.
- Receiving an error when reporting an issue from PractiTest to Jira
- Required fields in Jira do not appear in PractiTest modal box when reporting an issue, and an error message appears
- Permission error occurred in Jira when clicking on ‘Fail and Issue’ in PractiTest
- Issue/Requirement is not synced with Jira
- Unable to sync new issue or sync new requirement
- Jira fields aren’t updated in PractiTest
Receiving an error when reporting an issue from PractiTest to Jira
The problem might be in Jira and not in the integration. To check this, create an issue in your Jira project. If you are unable to do so, please contact your Jira admin. If you are able to successfully create an issue inside Jira, look for your specific issue in the following items.
Required fields in Jira do not appear in PractiTest modal box when reporting an issue, and an error message appears
There may be several different scenarios that could cause this, which are based on the Jira configuration. A common problem is that the required field in Jira has not been defined for the user’s Jira project. This means that you will receive the same error message in Jira when attempting to create an issue for the same project.
To resolve this issue, go to Jira settings (in Jira itself, not in PractiTest), then Issues field configuration - default field configuration. Find the field that is causing this issue. Your project will not appear with all screens of the field. Click ‘Screens’, then tick the relevant screens which are related to your project. Refresh the screens. The error message should disappear.
If the problem persists, please contact PractiTest Support.
Permission error occurred in Jira when clicking on ‘Fail and Issue’ in PractiTest
If you receive this error when reporting a bug in Jira: “Permission error occurred in Jira. Please validate that your Jira user has the right permissions.”, this means that the Jira user associated with your PractiTest user doesn’t have permission to create an issue in Jira.
To resolve this issue, try one or both of these options:
- Contact your Jira admin and have them verify that your user has the following permissions:
- In the Project level permissions (in Jira go to Project Settings → Permissions): Browse Project, Create Issue, Edit Issue
- In the Global Permissions (in Jira Settings → System → Global Permissions): Browse Users
- Connect your PractiTest user with a different Jira user: Go to Project → Personal Settings → “Click here to change your personal information” → “Click here to login to JIRA as a different user”. We will review our logs and check if there were any denied calls made to our servers.
Issue/Requirement is not synced with Jira
Please check if your Webhook is configured properly.
Unable to sync new issue or requirement
Go to your PractiTest account settings and test the connection. If it does not work, check the Application link to verify it was created correctly with the PTOauthKey, Public Key, and Consumer Callback URL. You can find more information about configuring application links here.
If you checked all the above and the issue persists, please contact PractiTest Support.
Jira fields aren’t updated in PractiTest
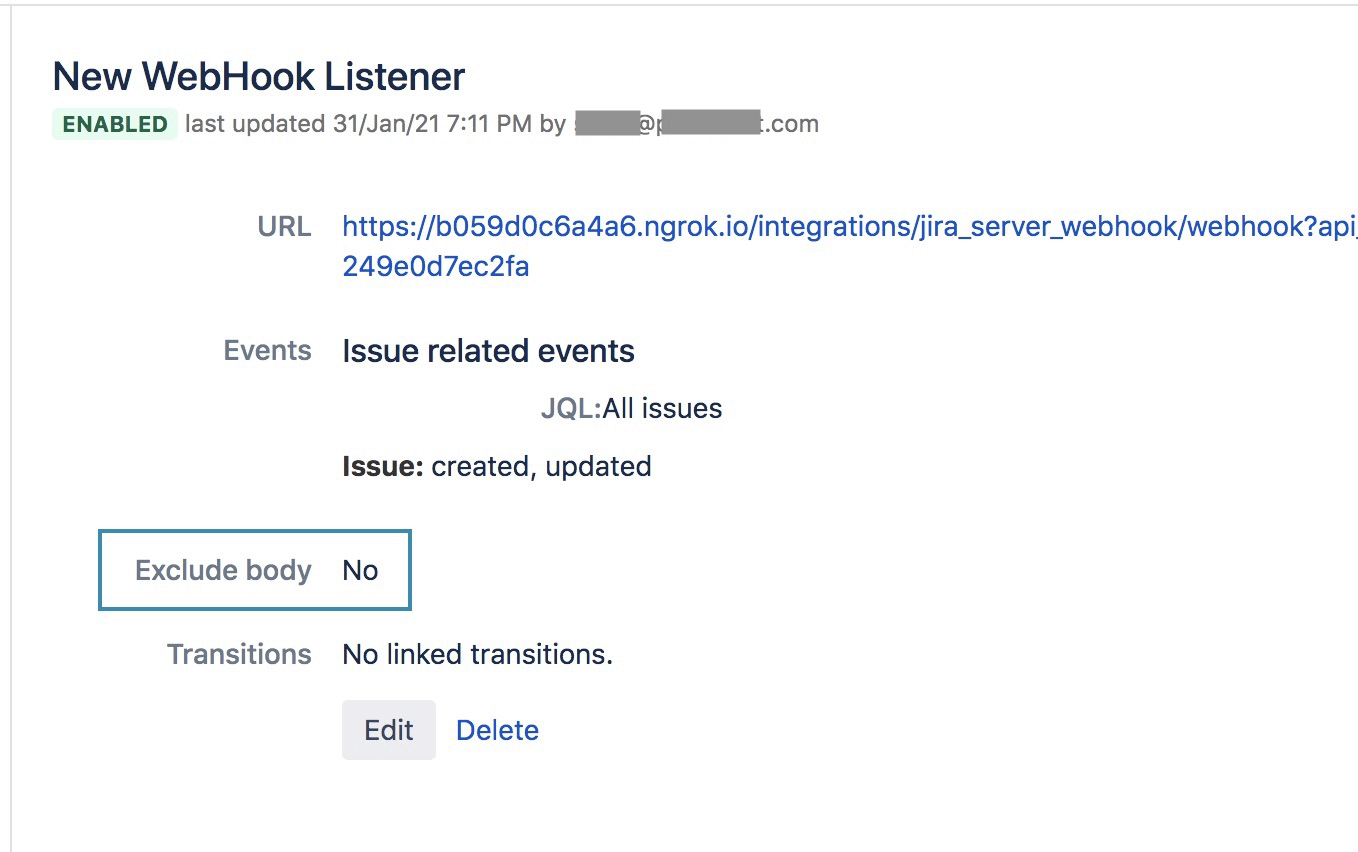
If Jira fields in PractiTest are not reflecting the changes made in Jira, go to Jira system → Webhooks → PractiTest webhook. Verify that the Exclude Body checkbox is unchecked (this is the default setting).
One-Way Integration
To enable one-way integration, please visit this help page.