Tests
Managing and running tests is the core of your testing process. In order to work efficiently, it is critical that your tests are properly organized and defined.
One of PractiTest’s main benefits is the ability to manage the entire QA process from requirements through tests to issues, all on one centralized platform. For example, PractiTest can automatically show you which requirements are not covered by tests, and which customer features are either more or less stable than others. It can give your developers insight into the exact tests where the bugs were detected with the ability to manage the entire development lifecycle in one place.
Test Types
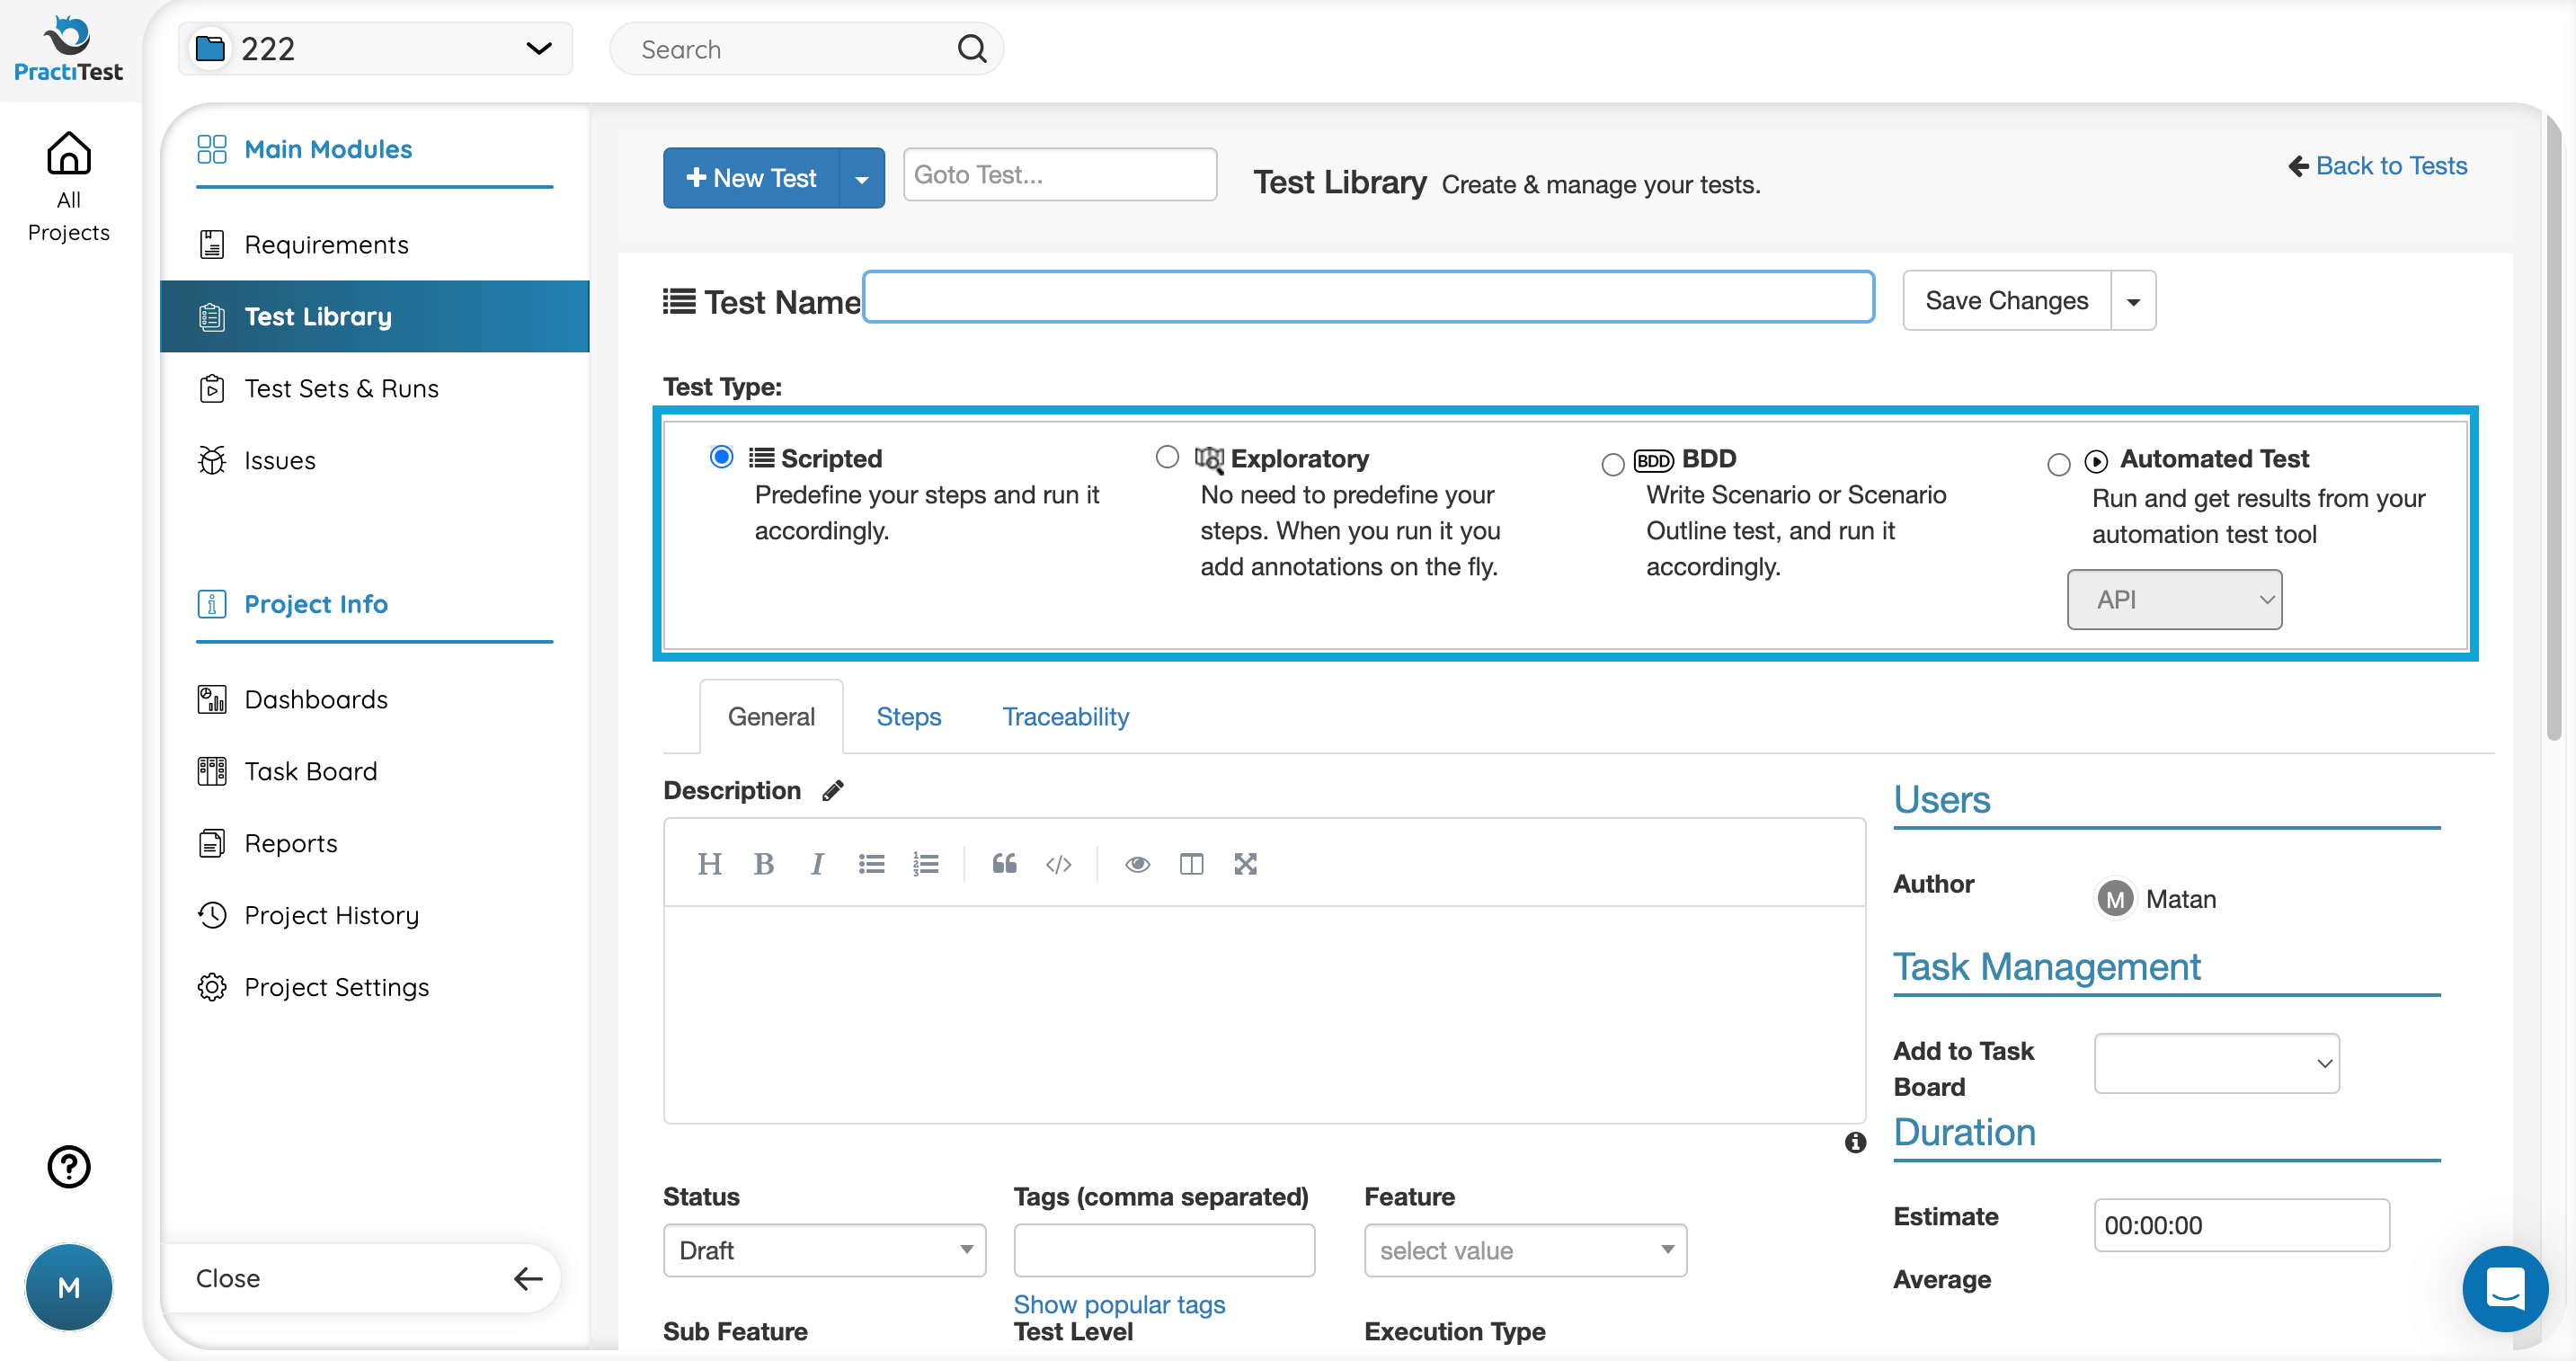
There are four types of tests:
-
Scripted: test cases where users predefine steps. When choosing a scripted test, you can add the description in the general tab and a “Steps” tab will appear where you can define the steps. Read more about Scripted Tests here.
-
Exploratory: tests without predefined steps where users add annotations “on the fly”. When choosing an Exploratory test, you will find fields for Test Charters and Guide Points instead of a description. Read more about Exploratory tests here.
-
BDD: a test which is written as a scenario or as a scenario outline. When choosing BDD tests, you can use the common Gherkin syntax in the added Scenario field. Each Gherkin row you add will become a step when you run it. If you use Scenario Outline, each example will be added to the test set as a separate instance. Read more about BDD tests here.
-
Automated: tests which run automatically and update PractiTest using one of the following tools:
- API tests: reporting automation results using the REST API
- FireCracker Tests: automatically converts XML results files received from CI/CD tools to PractiTest tests and runs
- xBot: an internal automation framework to run, schedule, and execute tests. When choosing any of the automation-type tests, you can add the description in the general tab and an “Automation Info” tab will appear where you can write down your Automated Test Design and the Script Repository. Read more about automated test options here.

Each test type has its own icon to help differentiate the different tests in the grid easily. In the test library grid, you can sort or filter the tests by their types as described below.
Test Structure
Fields and Test Run Status
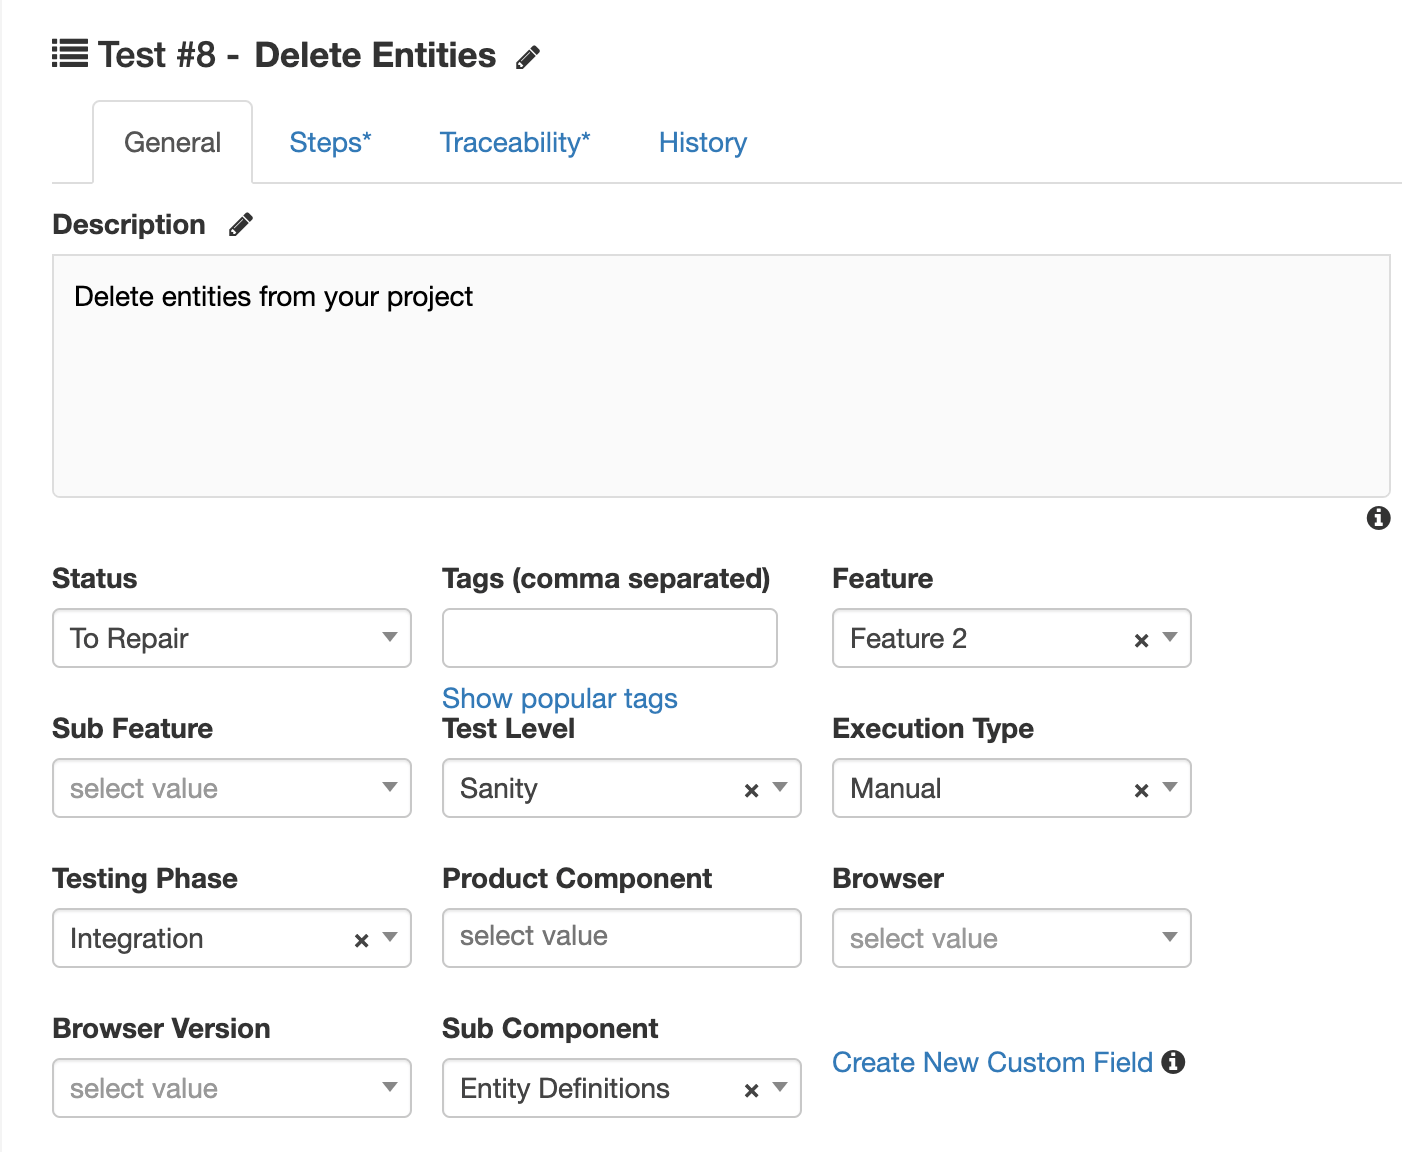
Each test has its own metadata as defined by both its system fields and custom fields. You can customize tests by adding as many fields as your product and process require.
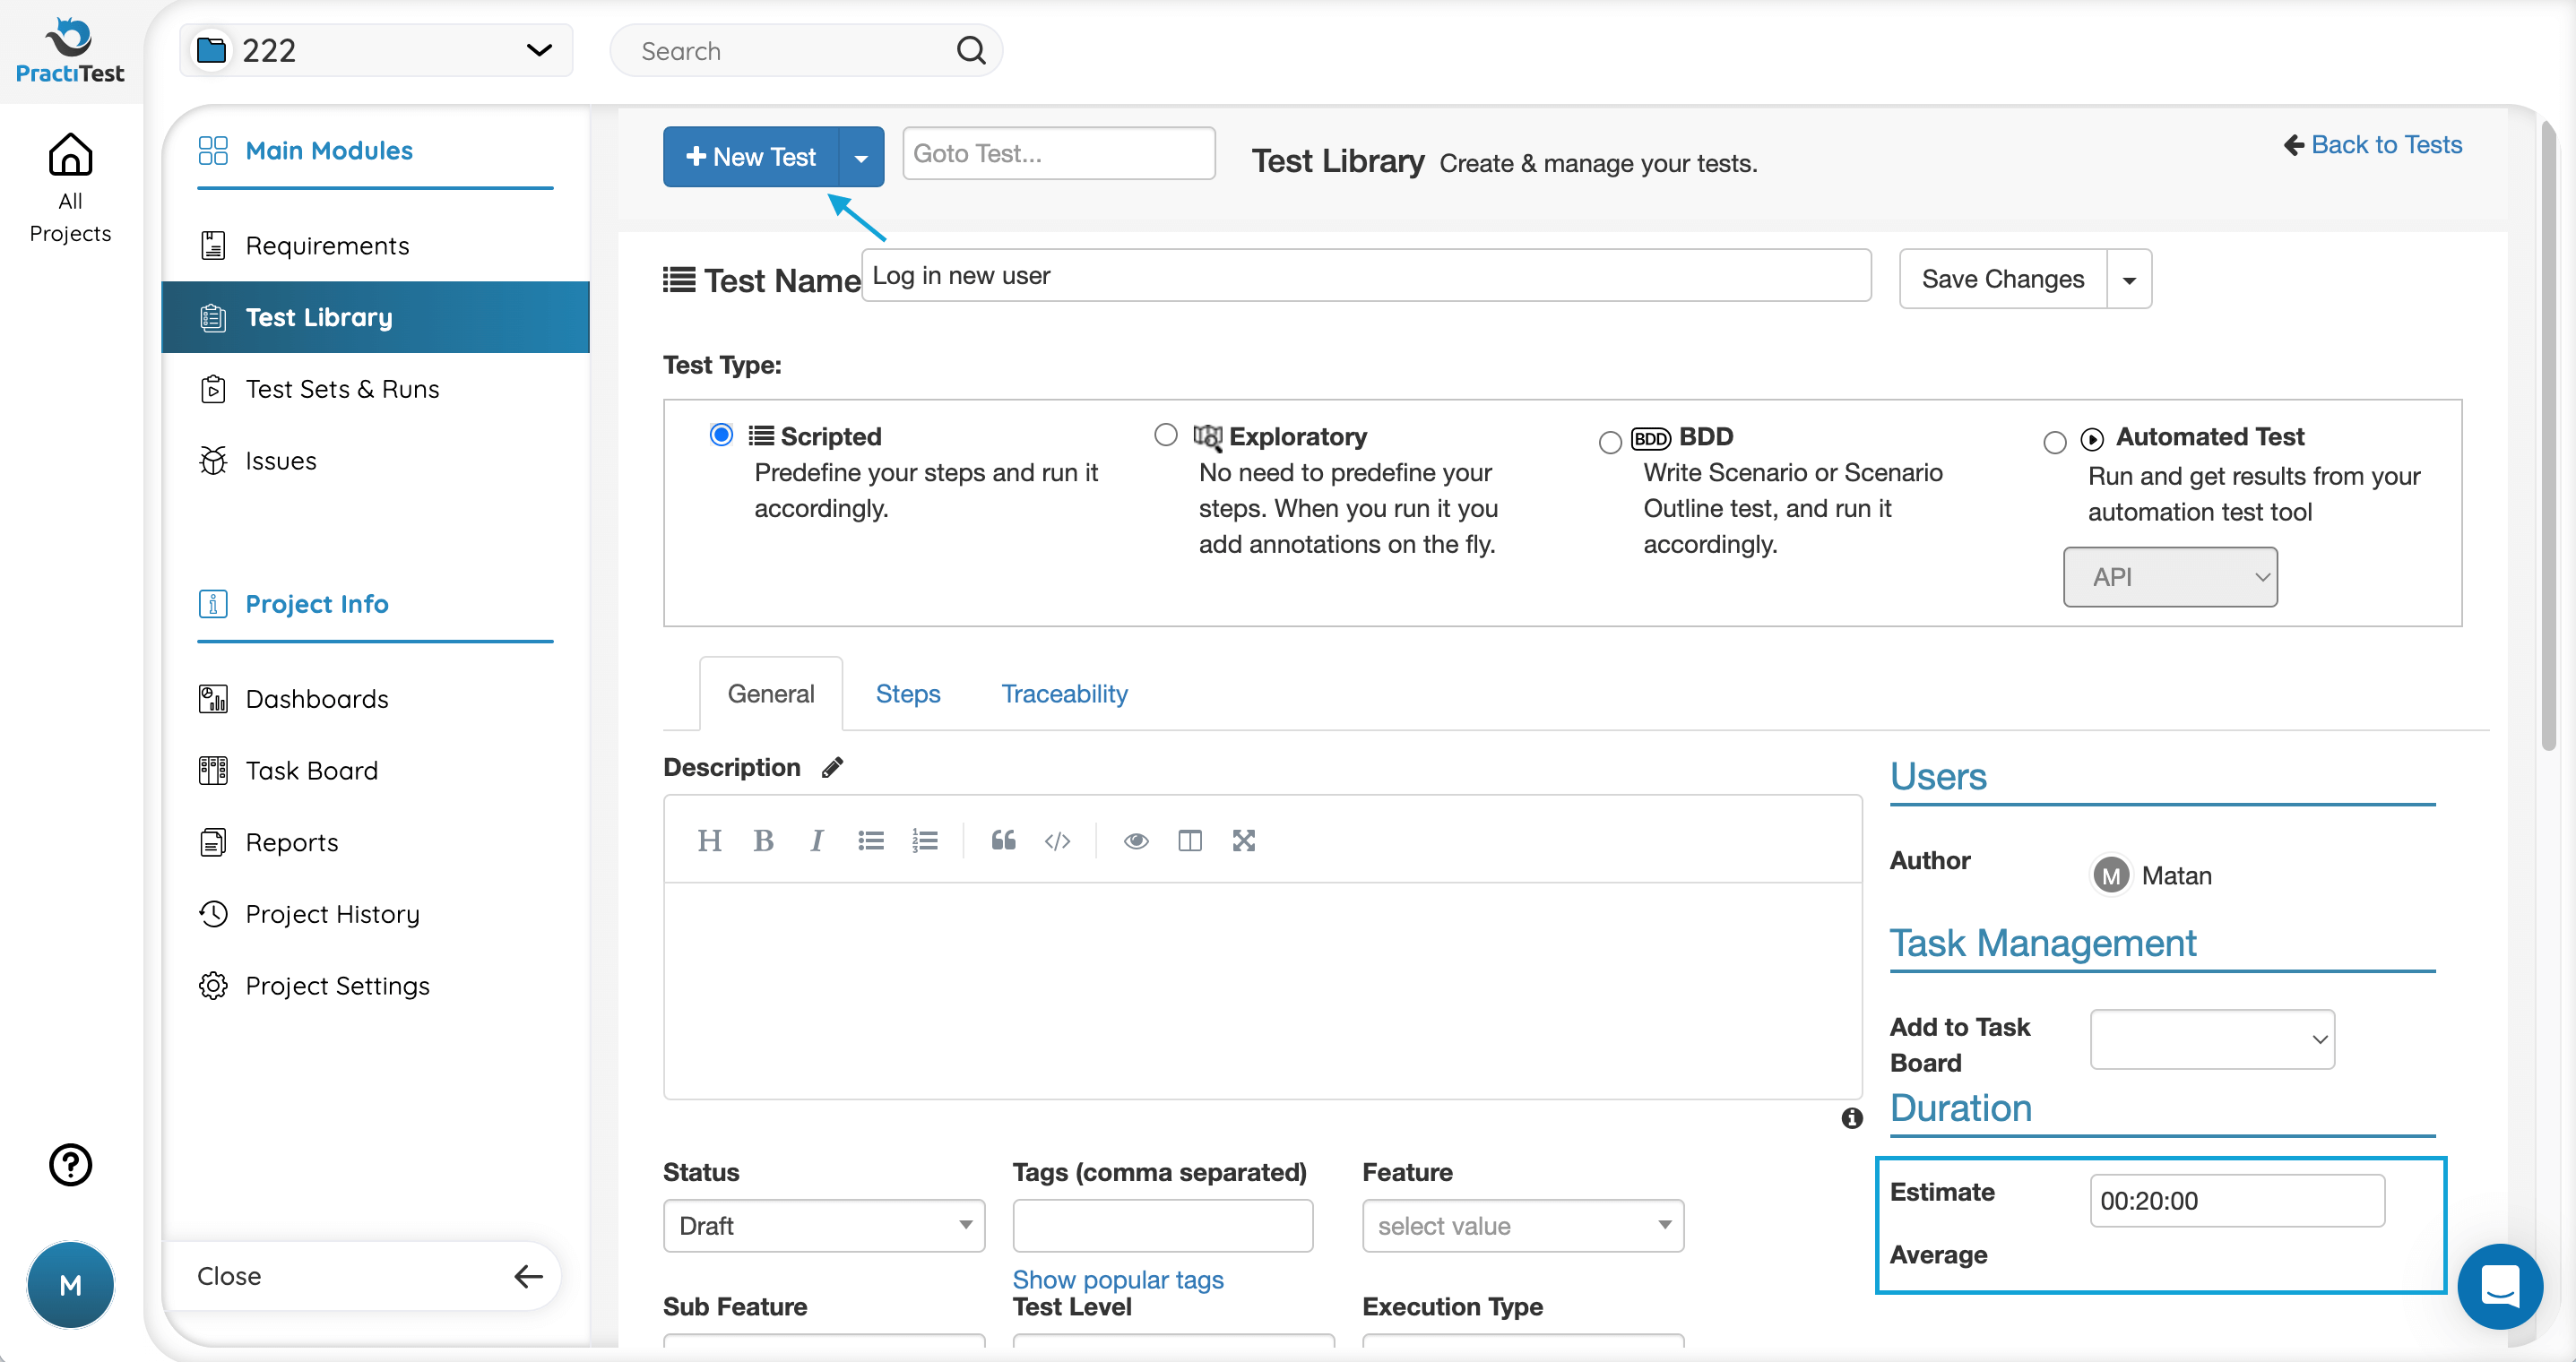
If you want to use the time management feature, enter an estimated duration time. Note: the project administrator will need to enable this feature in project settings.
Use this as a set point for later comparison with the actual duration time which the time management feature will update once the test is run.
The test run status that appears in the test library reflects the status of the last time that test was run on any test set.
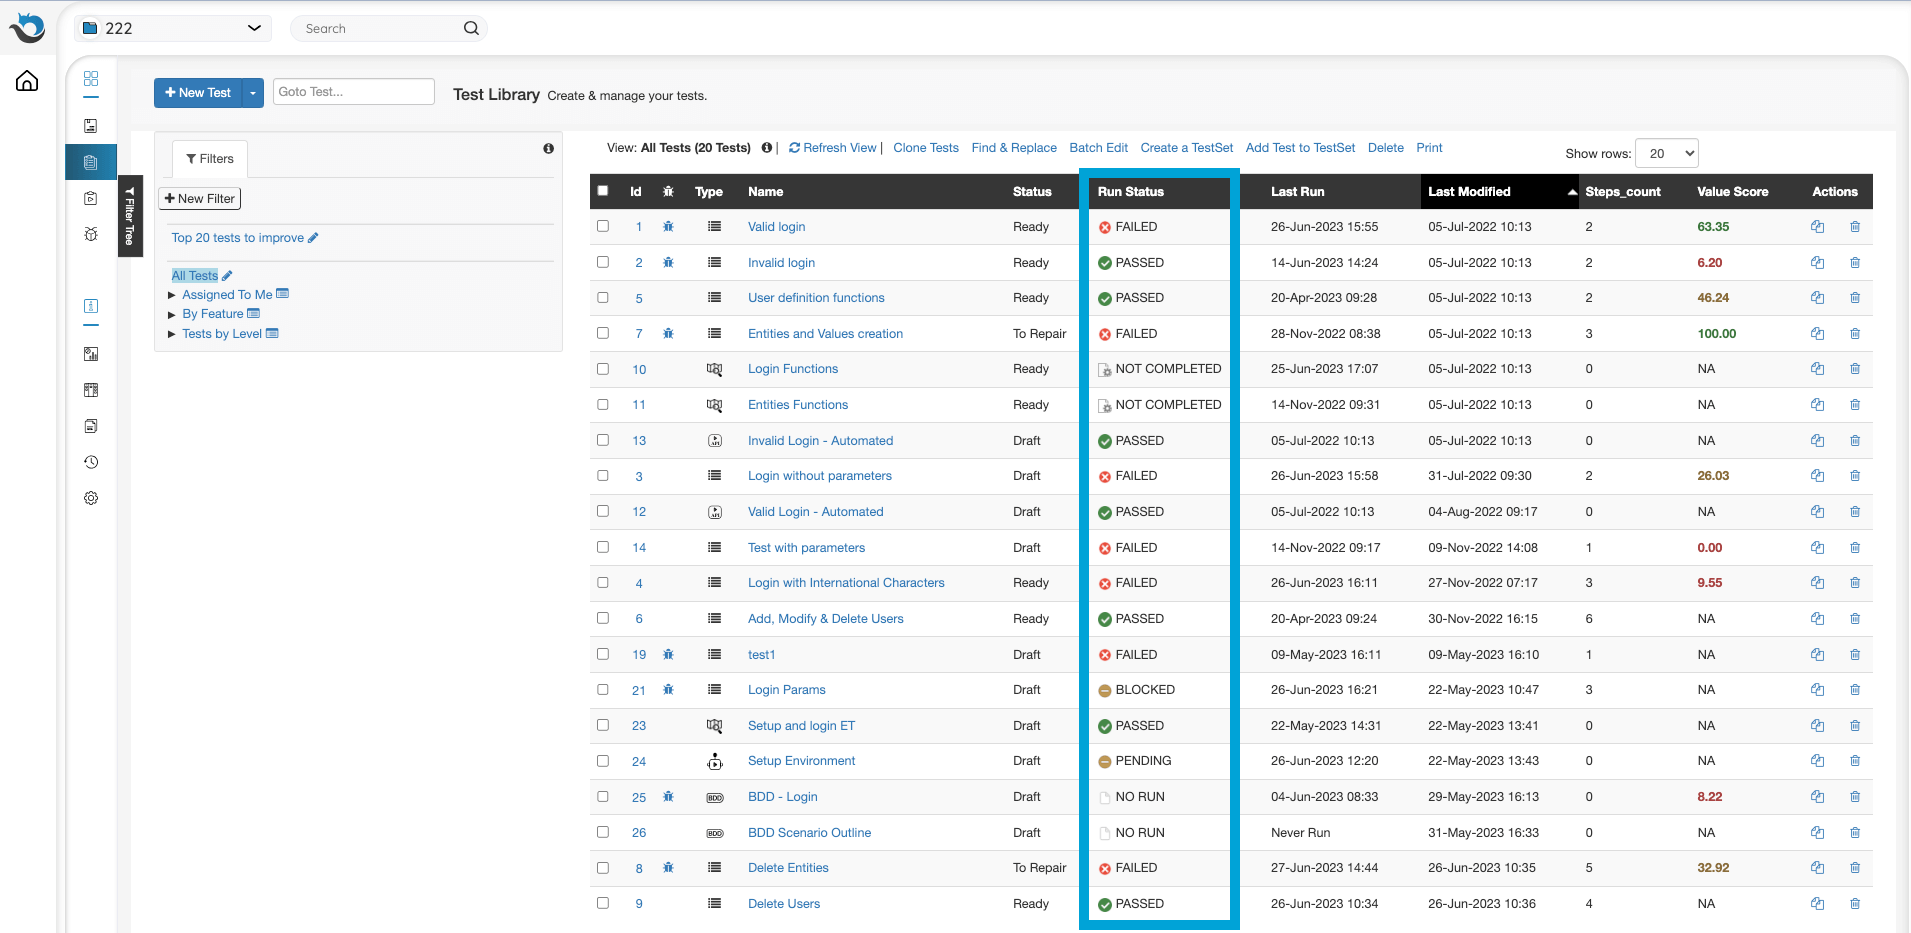
To understand the run status rules, please visit this page.
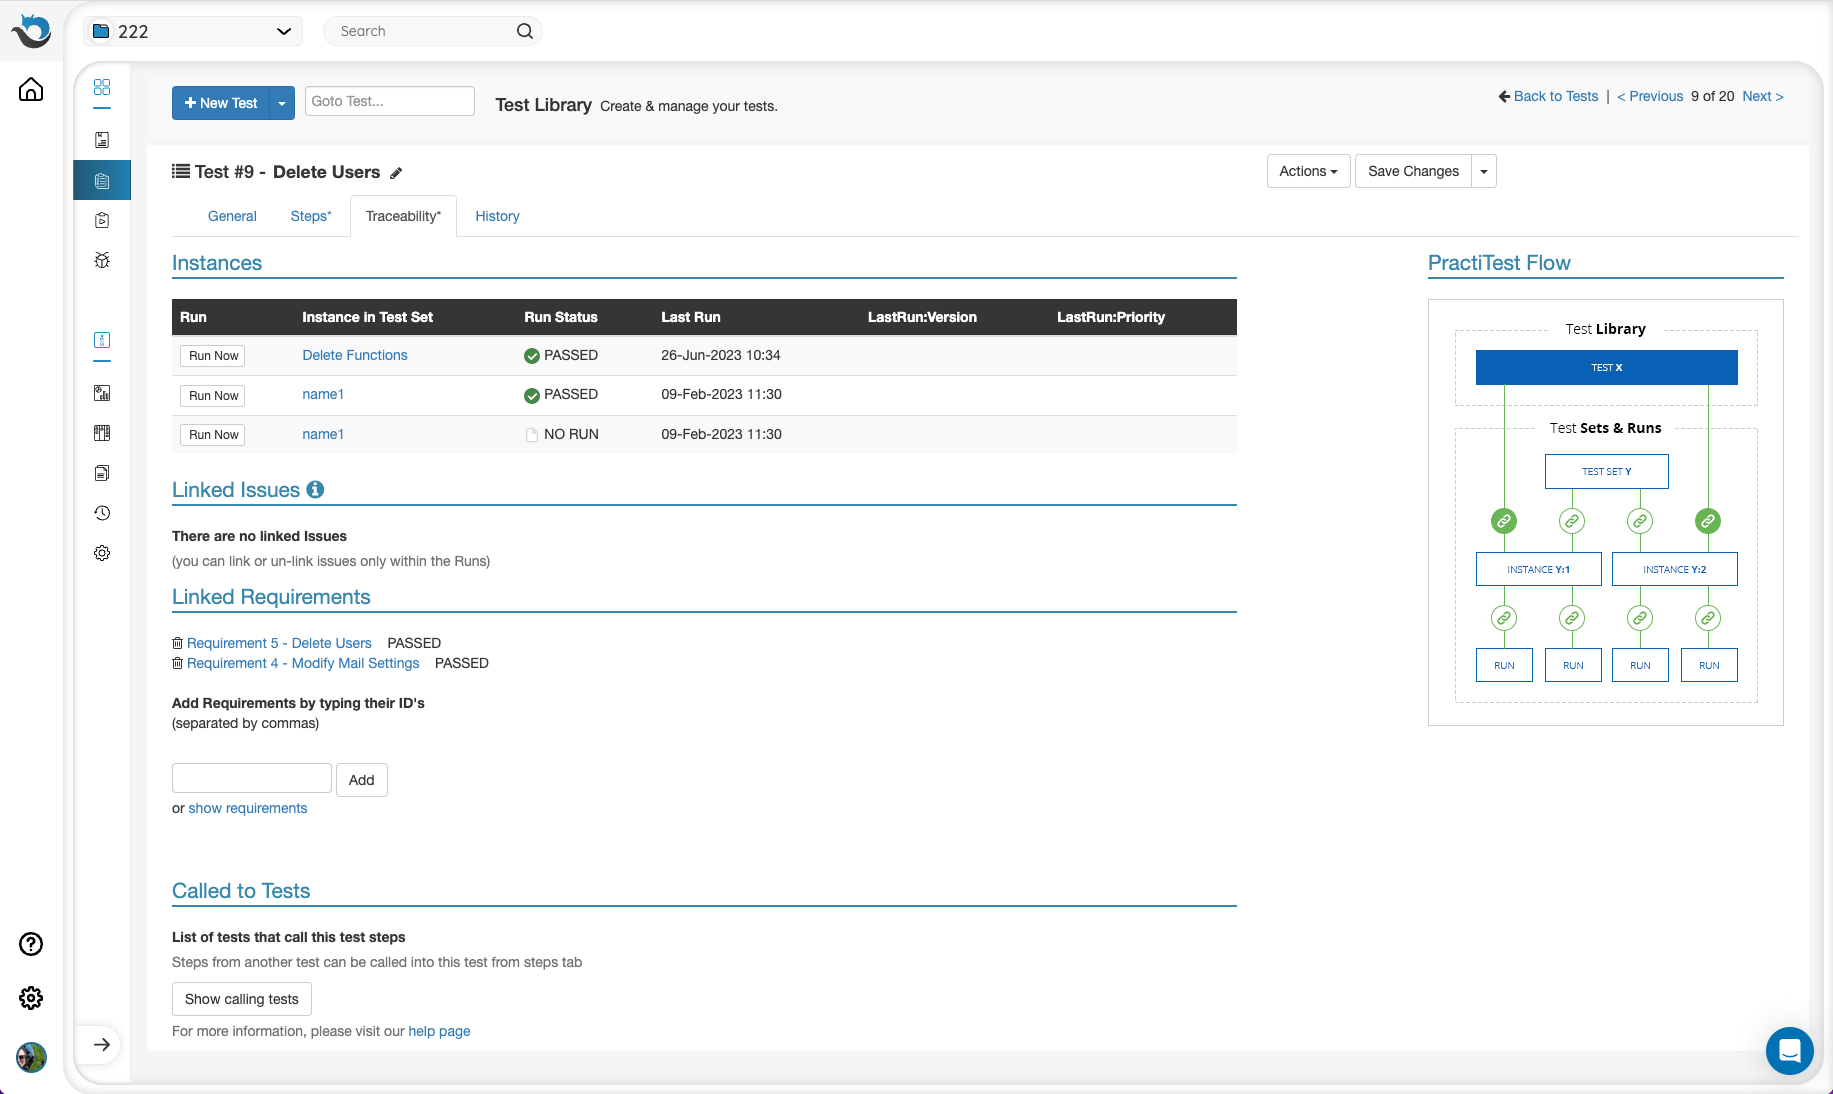
The Traceability Tab
Under the traceability tab, you can view:
- The test instances in the Test Sets that this test was added to
- The issues that were found using this test
- Which requirements this test is covering
- The tests that are calling this test
- A cloned test will have a Cloning section
Creating a Test
The Test Library module is where your tests are created and stored.
Tests can also be created from inside a test set in the Test Sets & Runs module. This automatically adds them to the test set from where they were created. Any new test created from a test set will also be added to the test library.
When clicking ‘New Test’, the ‘Scripted’ test type is selected by default, but can be manually changed.
Scripted, Exploratory, and Automated tests can be converted into different types of tests after saving. Use the actions button on the top-right side of each test. These tests can later be run as part of your Test Sets.
Importing Tests, Steps and Traceability
When importing tests into PractiTest, upload an XLSX-type file from your computer or open a Google Sheet from your Drive. When uploading a CSV file into PractiTest, please make sure the CSV file is saved with the current encoding (UTF-8). For more information, please read here.
There are two ways of importing tests and steps into PractiTest. You can import them together in one file, or you can choose to first import tests and then import the steps separately.
To import a BDD test, check the “Support Scenario Field to create BDD test“ checkbox at the bottom of the table. You will see a new scenario field in the table. Include a field named ‘Scenario’ in your file. If the Scenario field has a value, PractiTest will import it as a BDD type test. If the Scenario field is empty, PractiTest will import it as a manual scripted test.
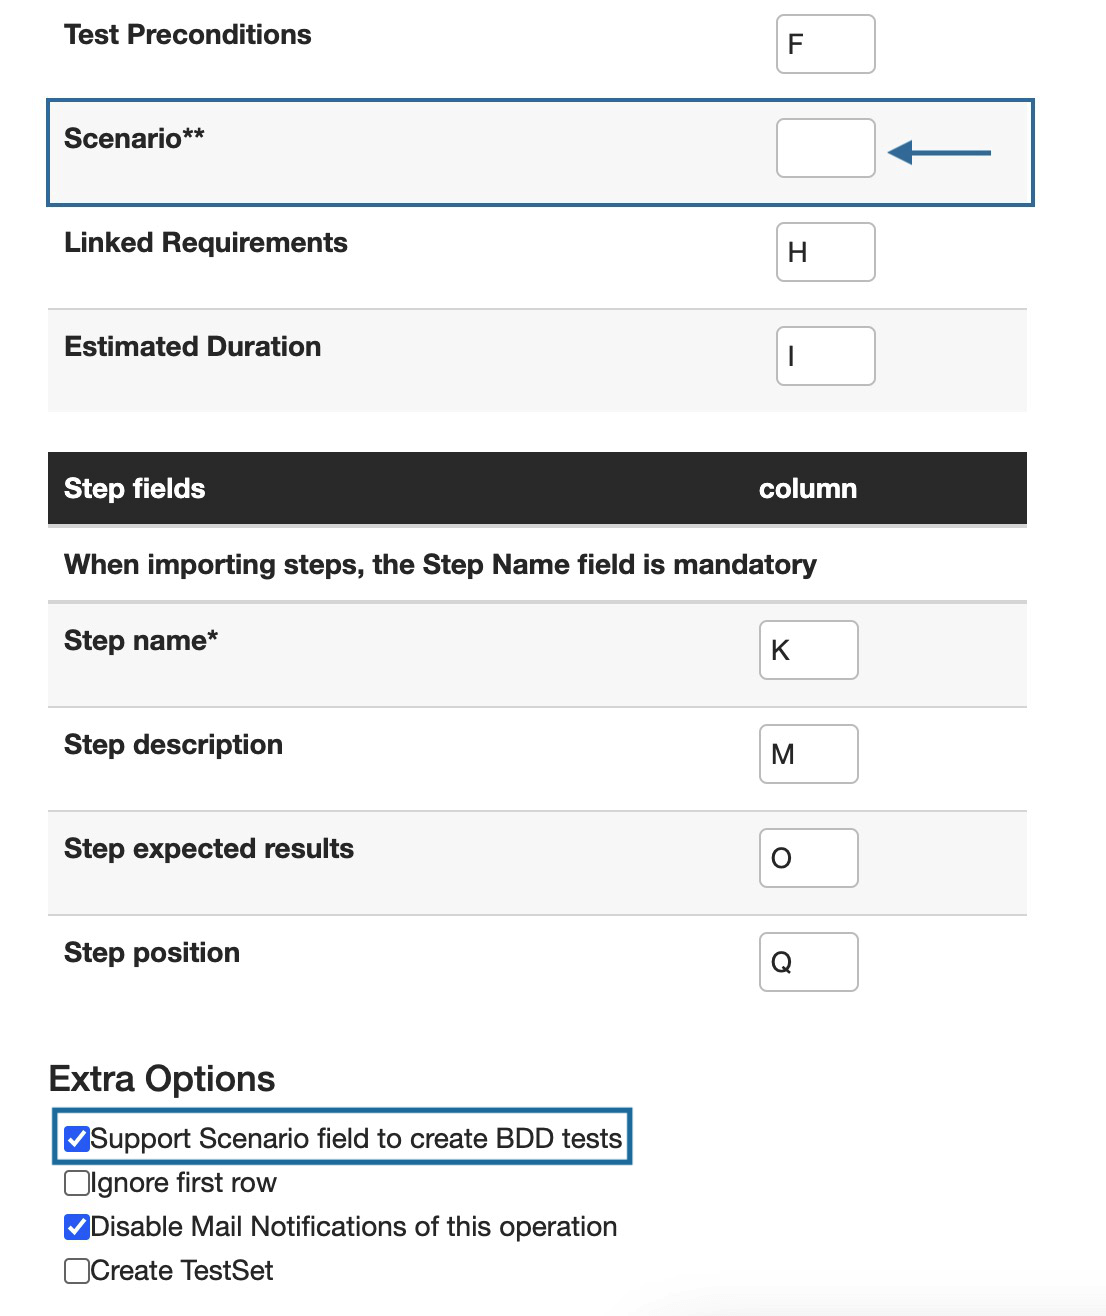
To import traceability details, use the Linked Requirements field and map it to a column where you have all the linked test IDs separated by commas.
Note: When leaving the author column empty, the user that imports the file will be set as the author of the imported entities. If you want to change the author value, state an email address or display name of one of the account’s users.
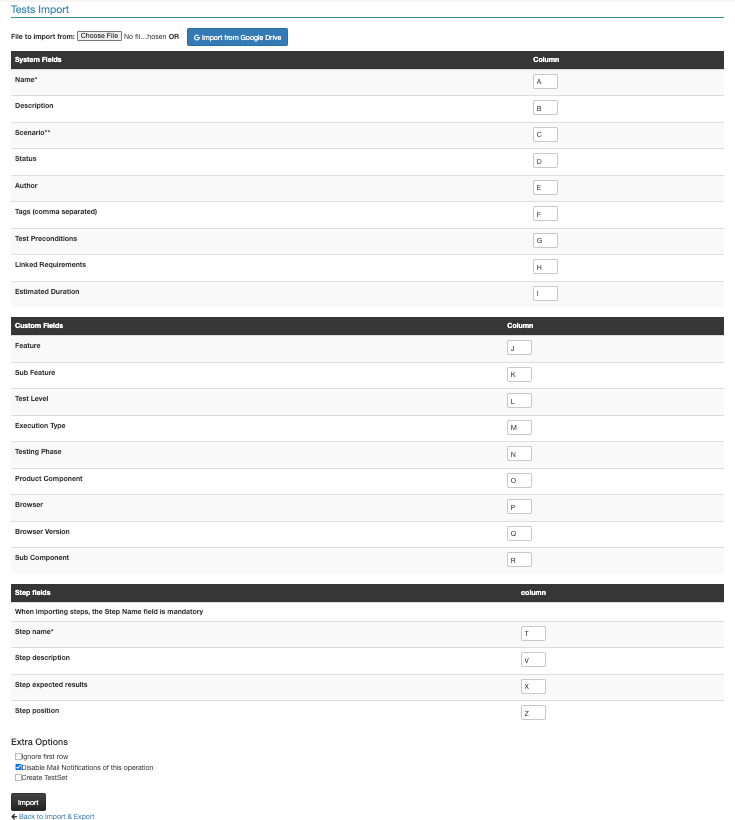
Importing Tests and Steps in One Operation
To import tests and steps in one operation, first make sure that your XLSX or Google Sheets file is organized in a way that will allow PractiTest to recognize and import the data correctly.
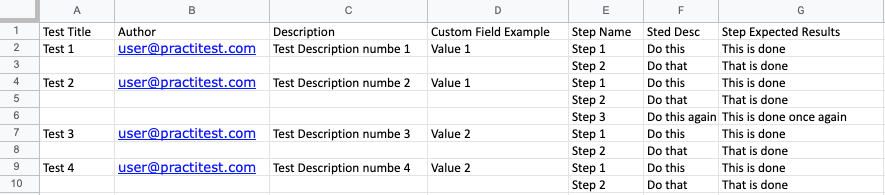
The image above shows a file structure that can be used to import Tests and Steps into PractiTest. In this file, both tests and steps are listed together. To use this file as a template, simply click on the link here.
The first row for each test will include all the information with your test data, including custom fields as well as the first step of this test. Additional steps for this test will be shown in subsequent rows. Do not add the information for your test on these additional rows.
After the last step, place the information on your next test - including the first step - followed by separate rows for each step.
Test and Step information should be mapped in a similar way to how you mapped the information for your Issues or Requirements (see above) in the following form:
Note: the system field “Name” can include a maximum of 250 characters.
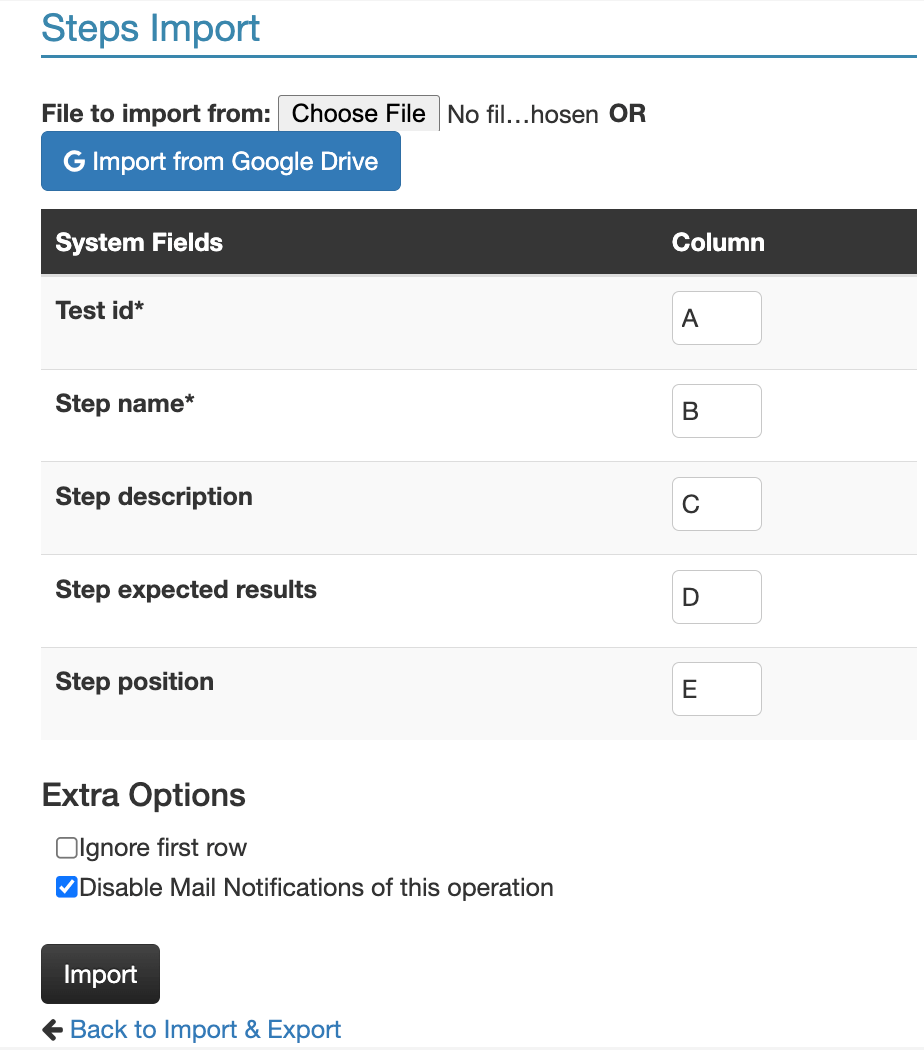
Importing Tests and Steps in Two Operations
First tests, then steps
Operation 1 – Import your tests Use the form for importing tests and steps to import only tests. To do this, map the information for tests only, leaving all steps-related fields empty. The tests will then be imported into PractiTest and each one will receive a unique test ID.
Operation 2 – Import your steps To import the steps, you must provide the Test ID field for each step. Add a new column to the field that contains your steps and write the PractiTest Test ID that each test received when they were imported. Map the Test ID column in the import file to the Test ID field in PractiTest.
You can reorder the steps within your tests using the Step Position field. Set the position by numbering your steps sequentially, starting from number 1. If this field is left empty, the steps will be added in the order they appear in the file.
 For more useful tips on importing, please visit this page.
How Do I Run My Tests?
Before running a test, it must be added to a Test Set. Test Sets use copies of the tests in the test library called Test Instances. This allows you to make changes to a single Test Instance without altering the original test. For example, if you delete a step in a Test Instance, the original test in the test library will remain unchanged. Each test can be added to as many Test Sets as needed.
When viewing a test in the test library, open the traceability tab to see the instances of this test and in which test sets it is being used.
For information on creating Test Sets and running tests, visit the Test Sets & Runs page.
Managing Tests in the Test Library
The Test Library grid is initially displayed with the default view, which shows all tests and some default fields in the columns.
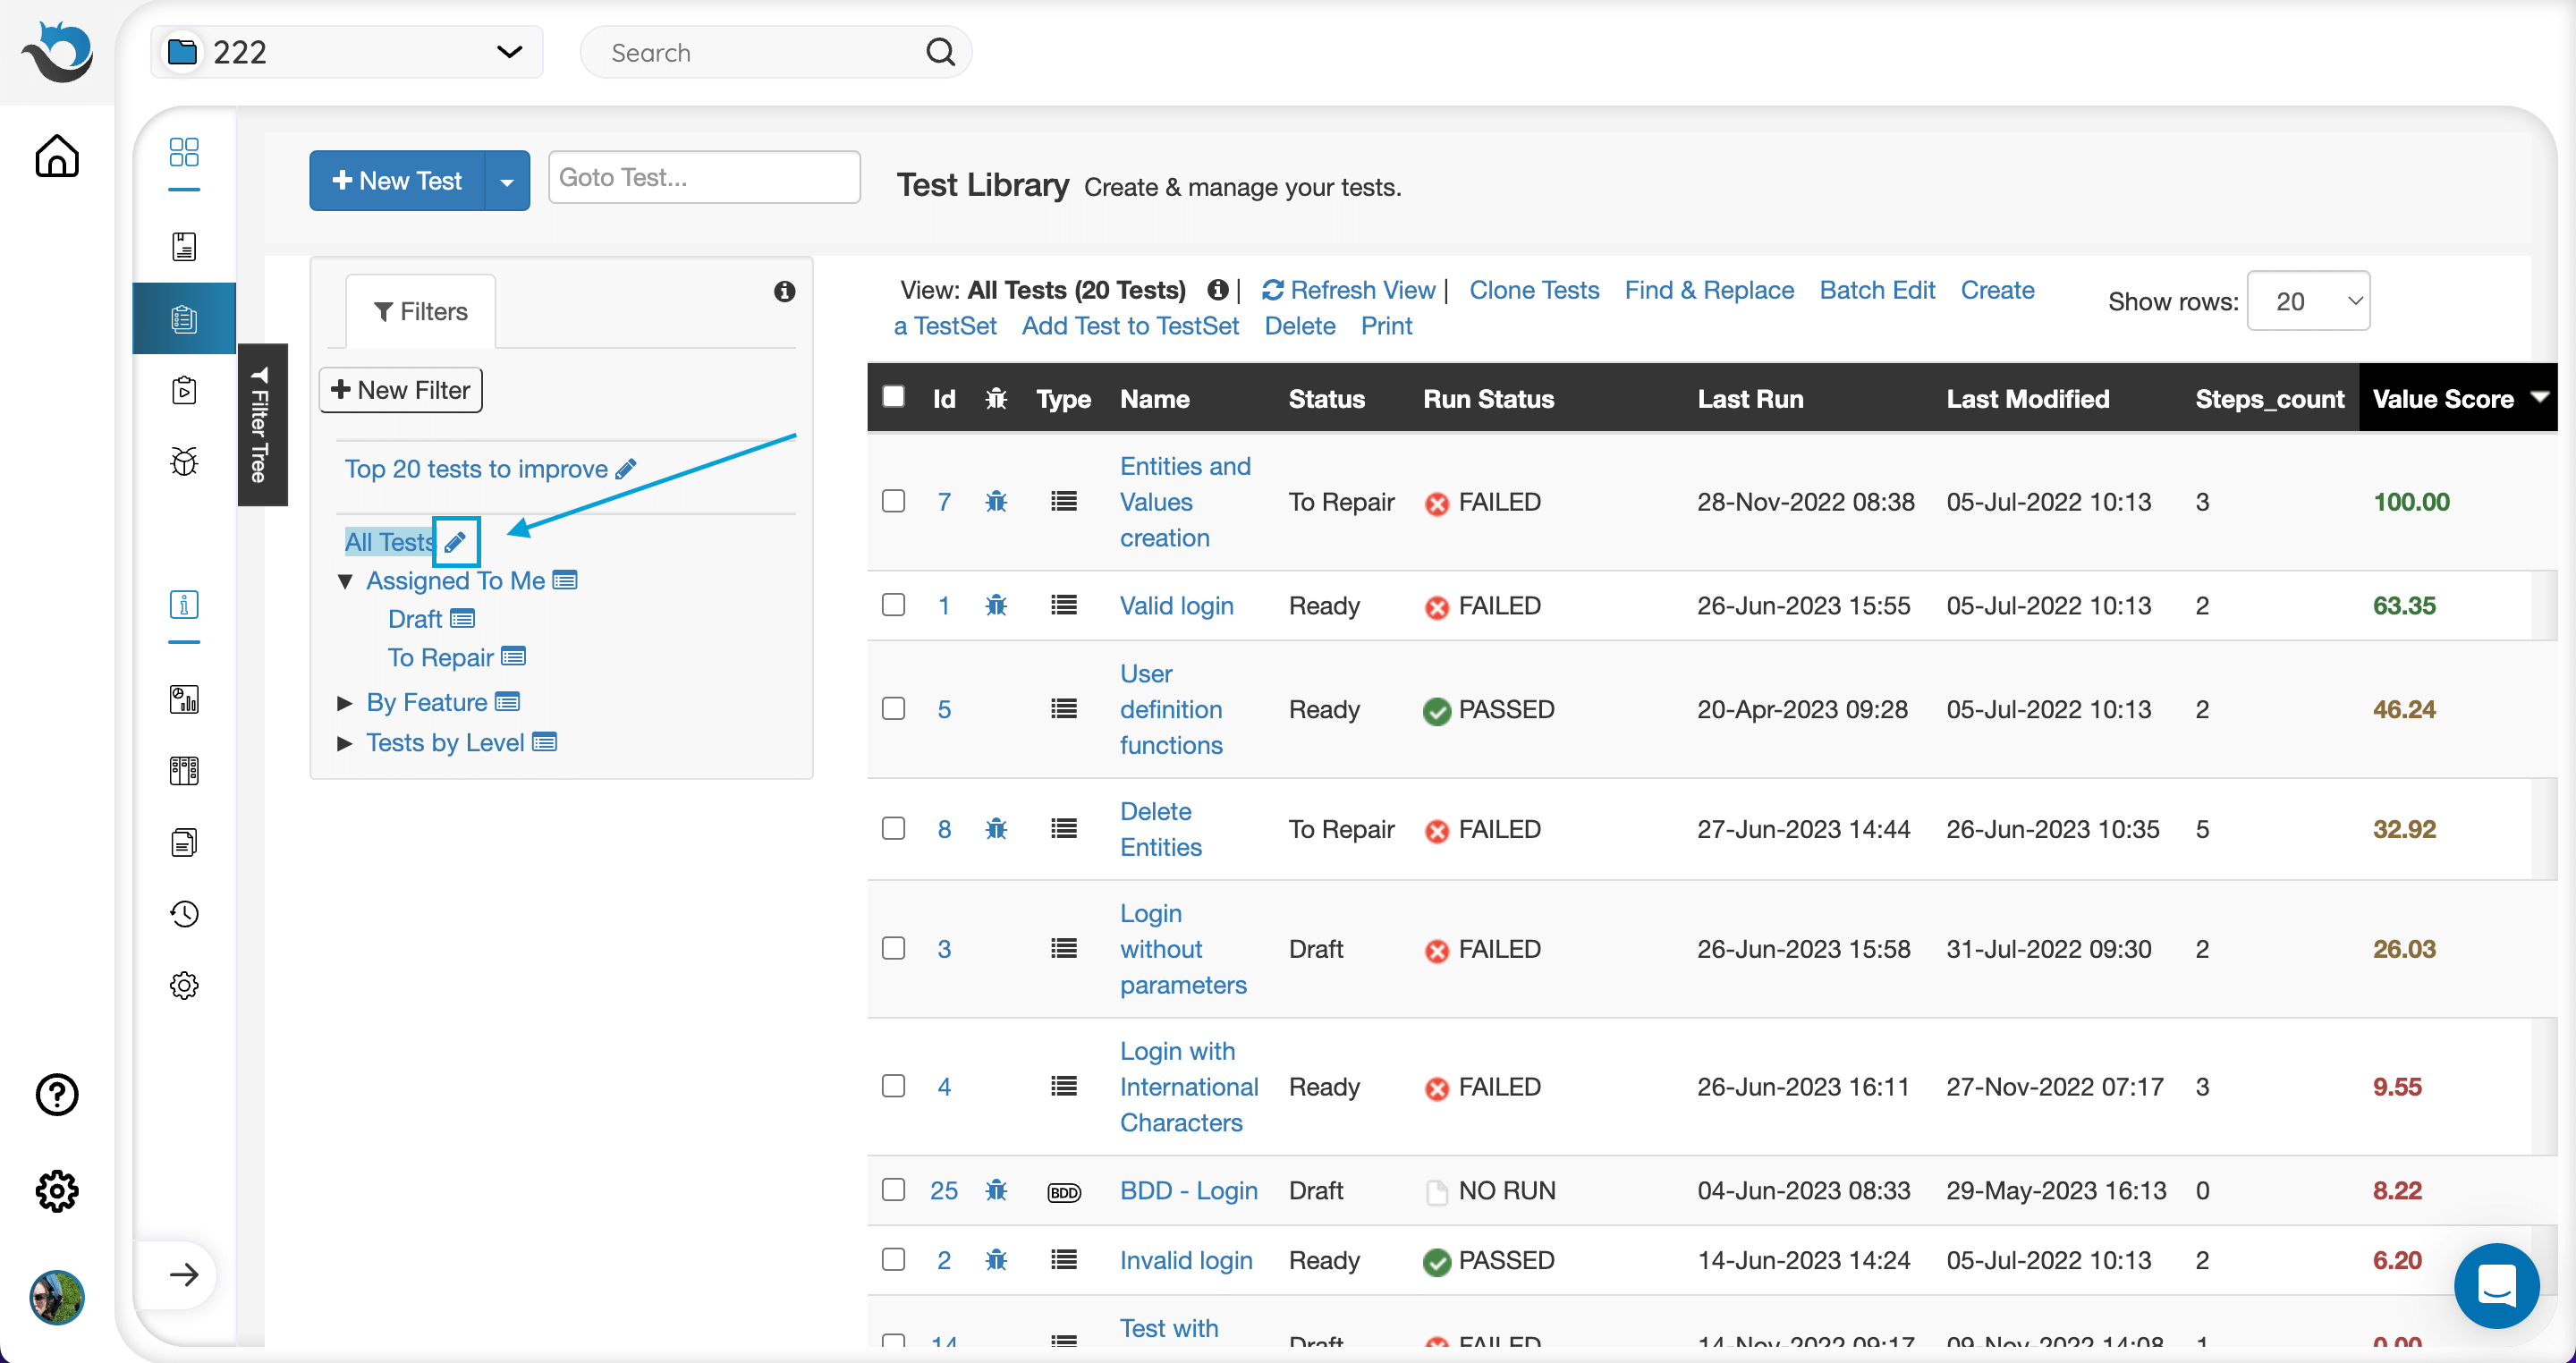
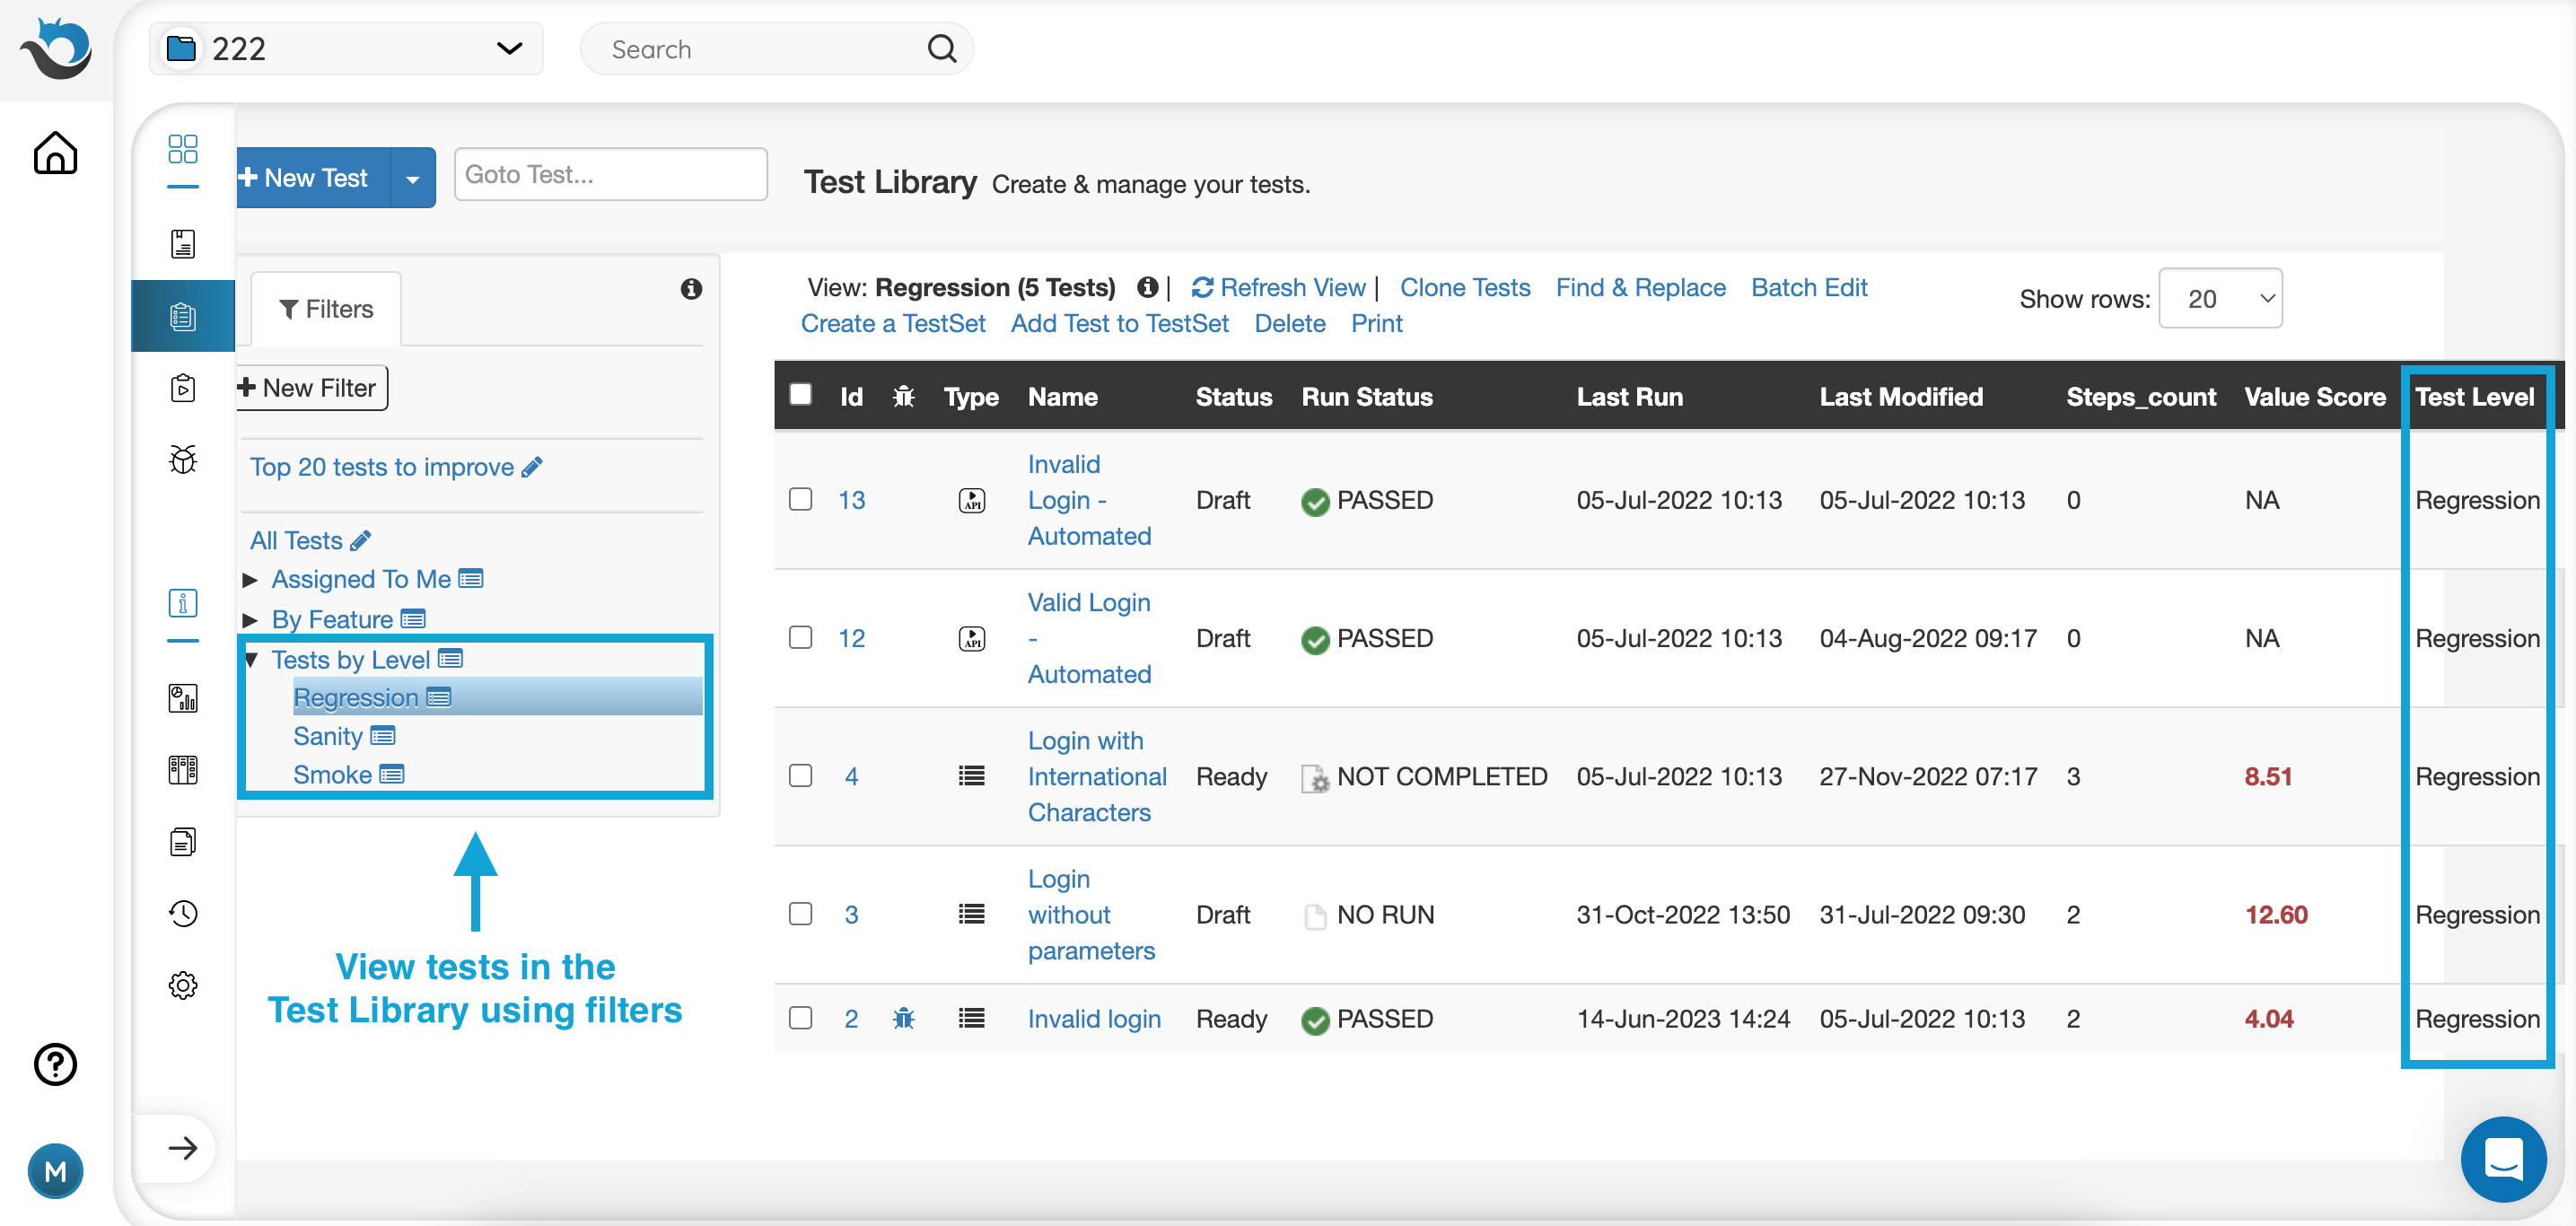
You can choose to display only tests that fall under certain criteria based on your filters. Filters can be created from the grid itself or from the project system panel. When defining filters, base the criteria on the test field value. You can also configure the fields to display under each filter in the grid. Read more about the filters display here.
To adjust the columns of your main Tests view, click the pencil icon next to “All Tests” in the Filters window.
Using the ‘Type’ column, users can sort test cases by type:
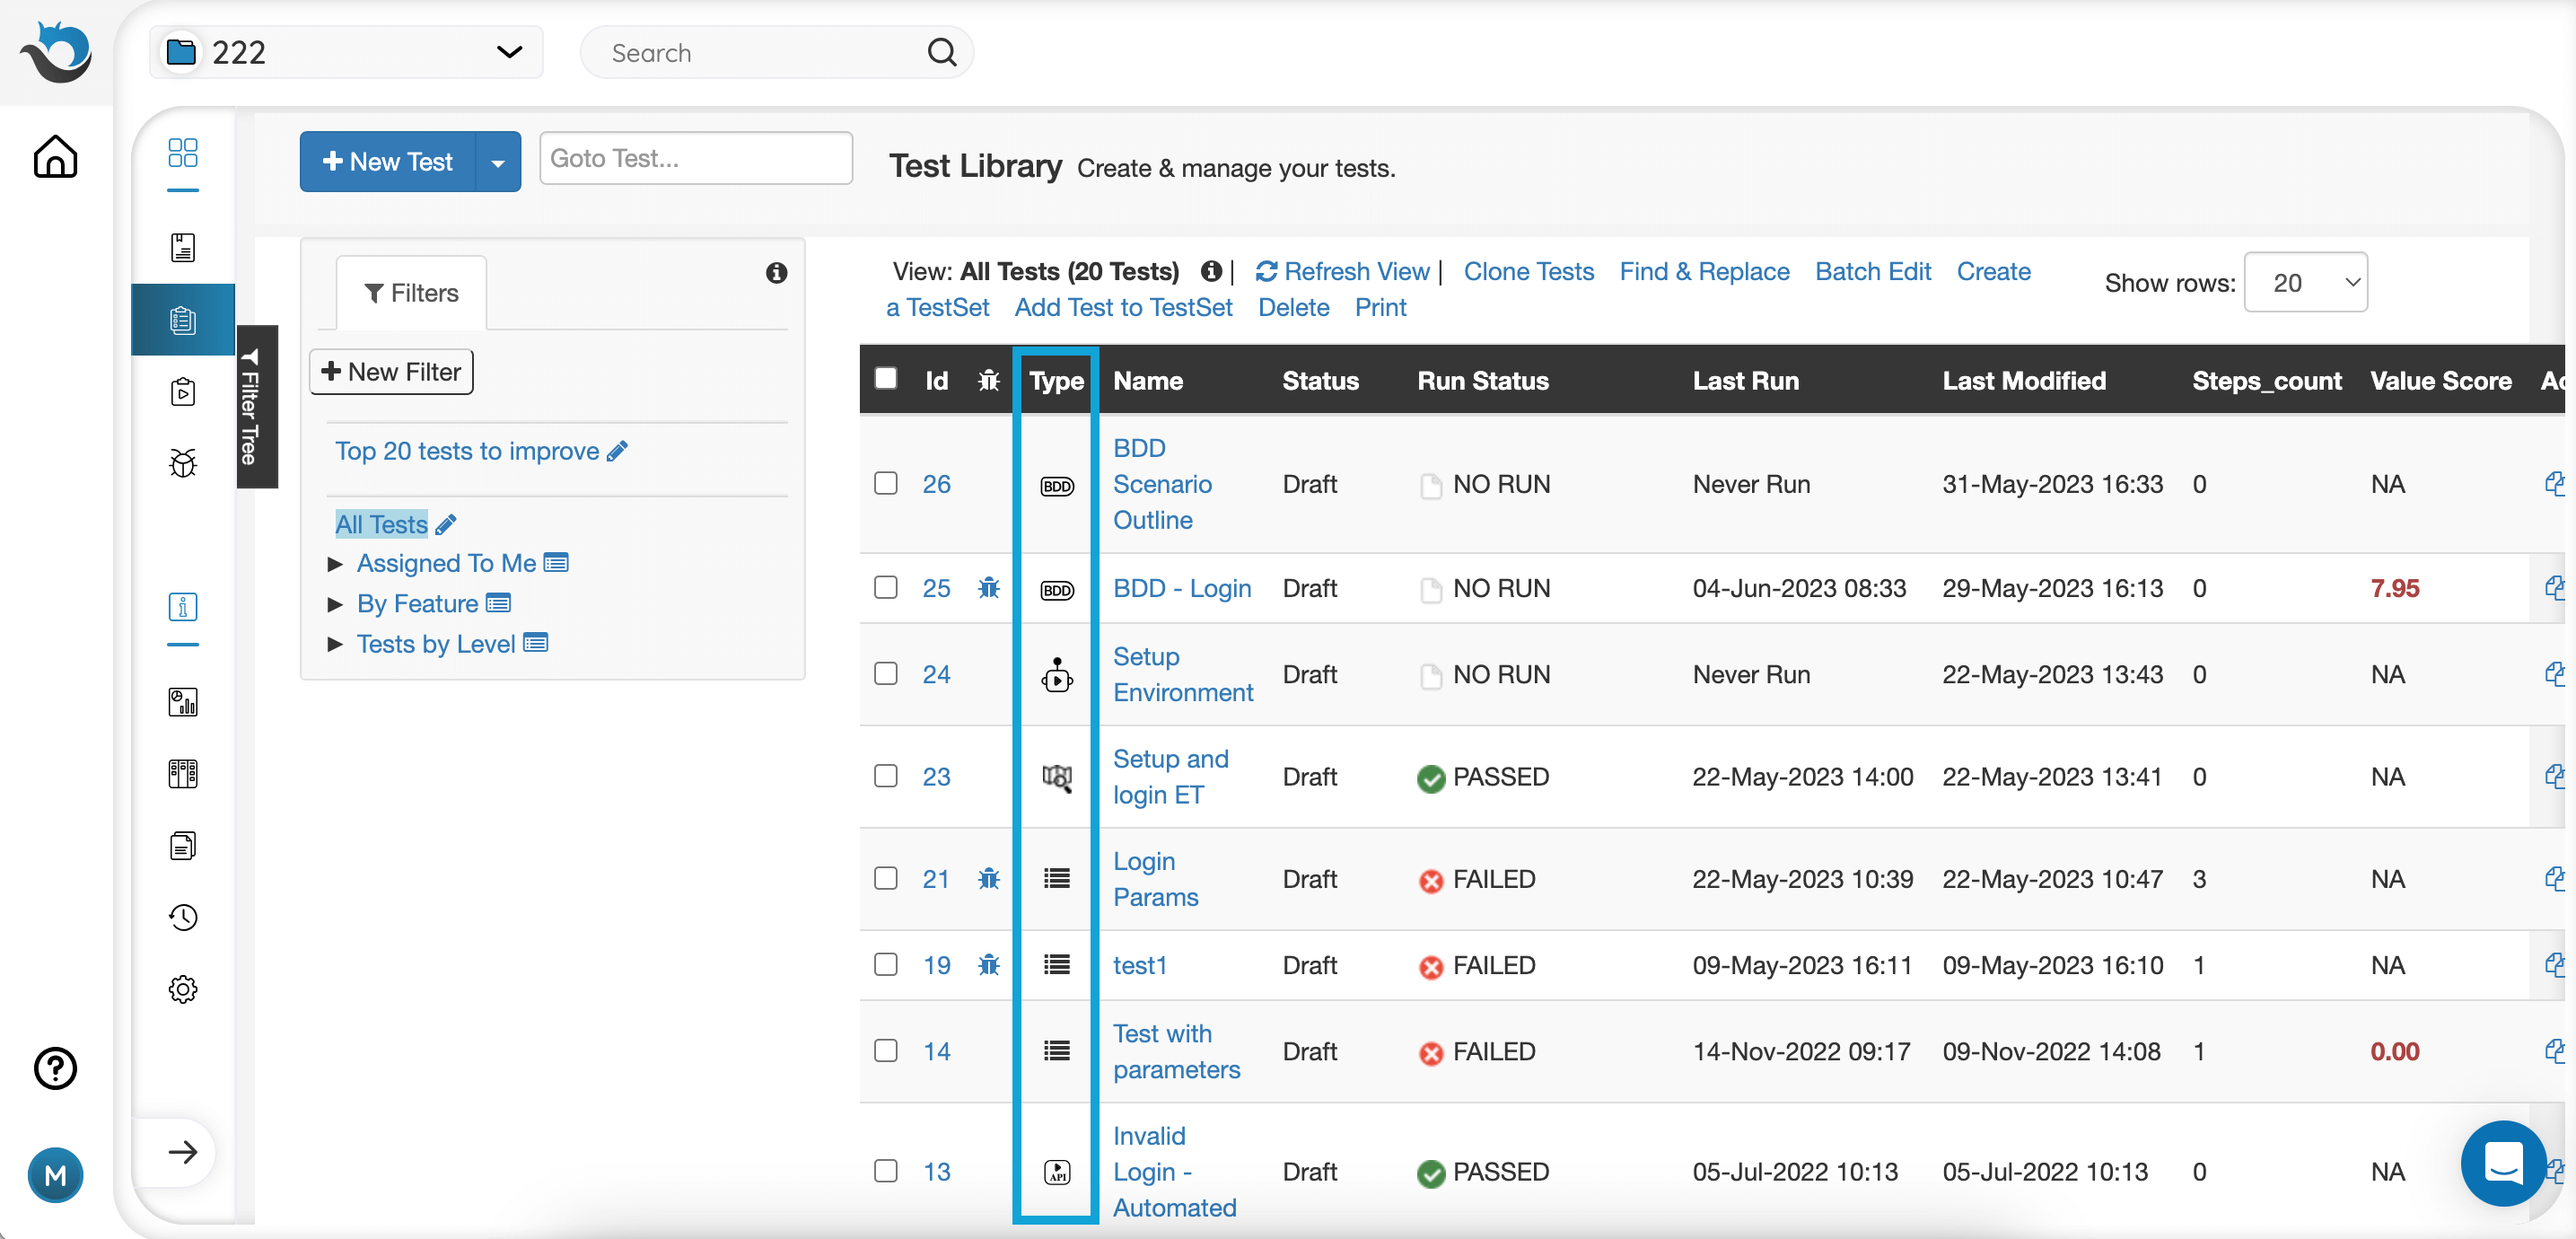
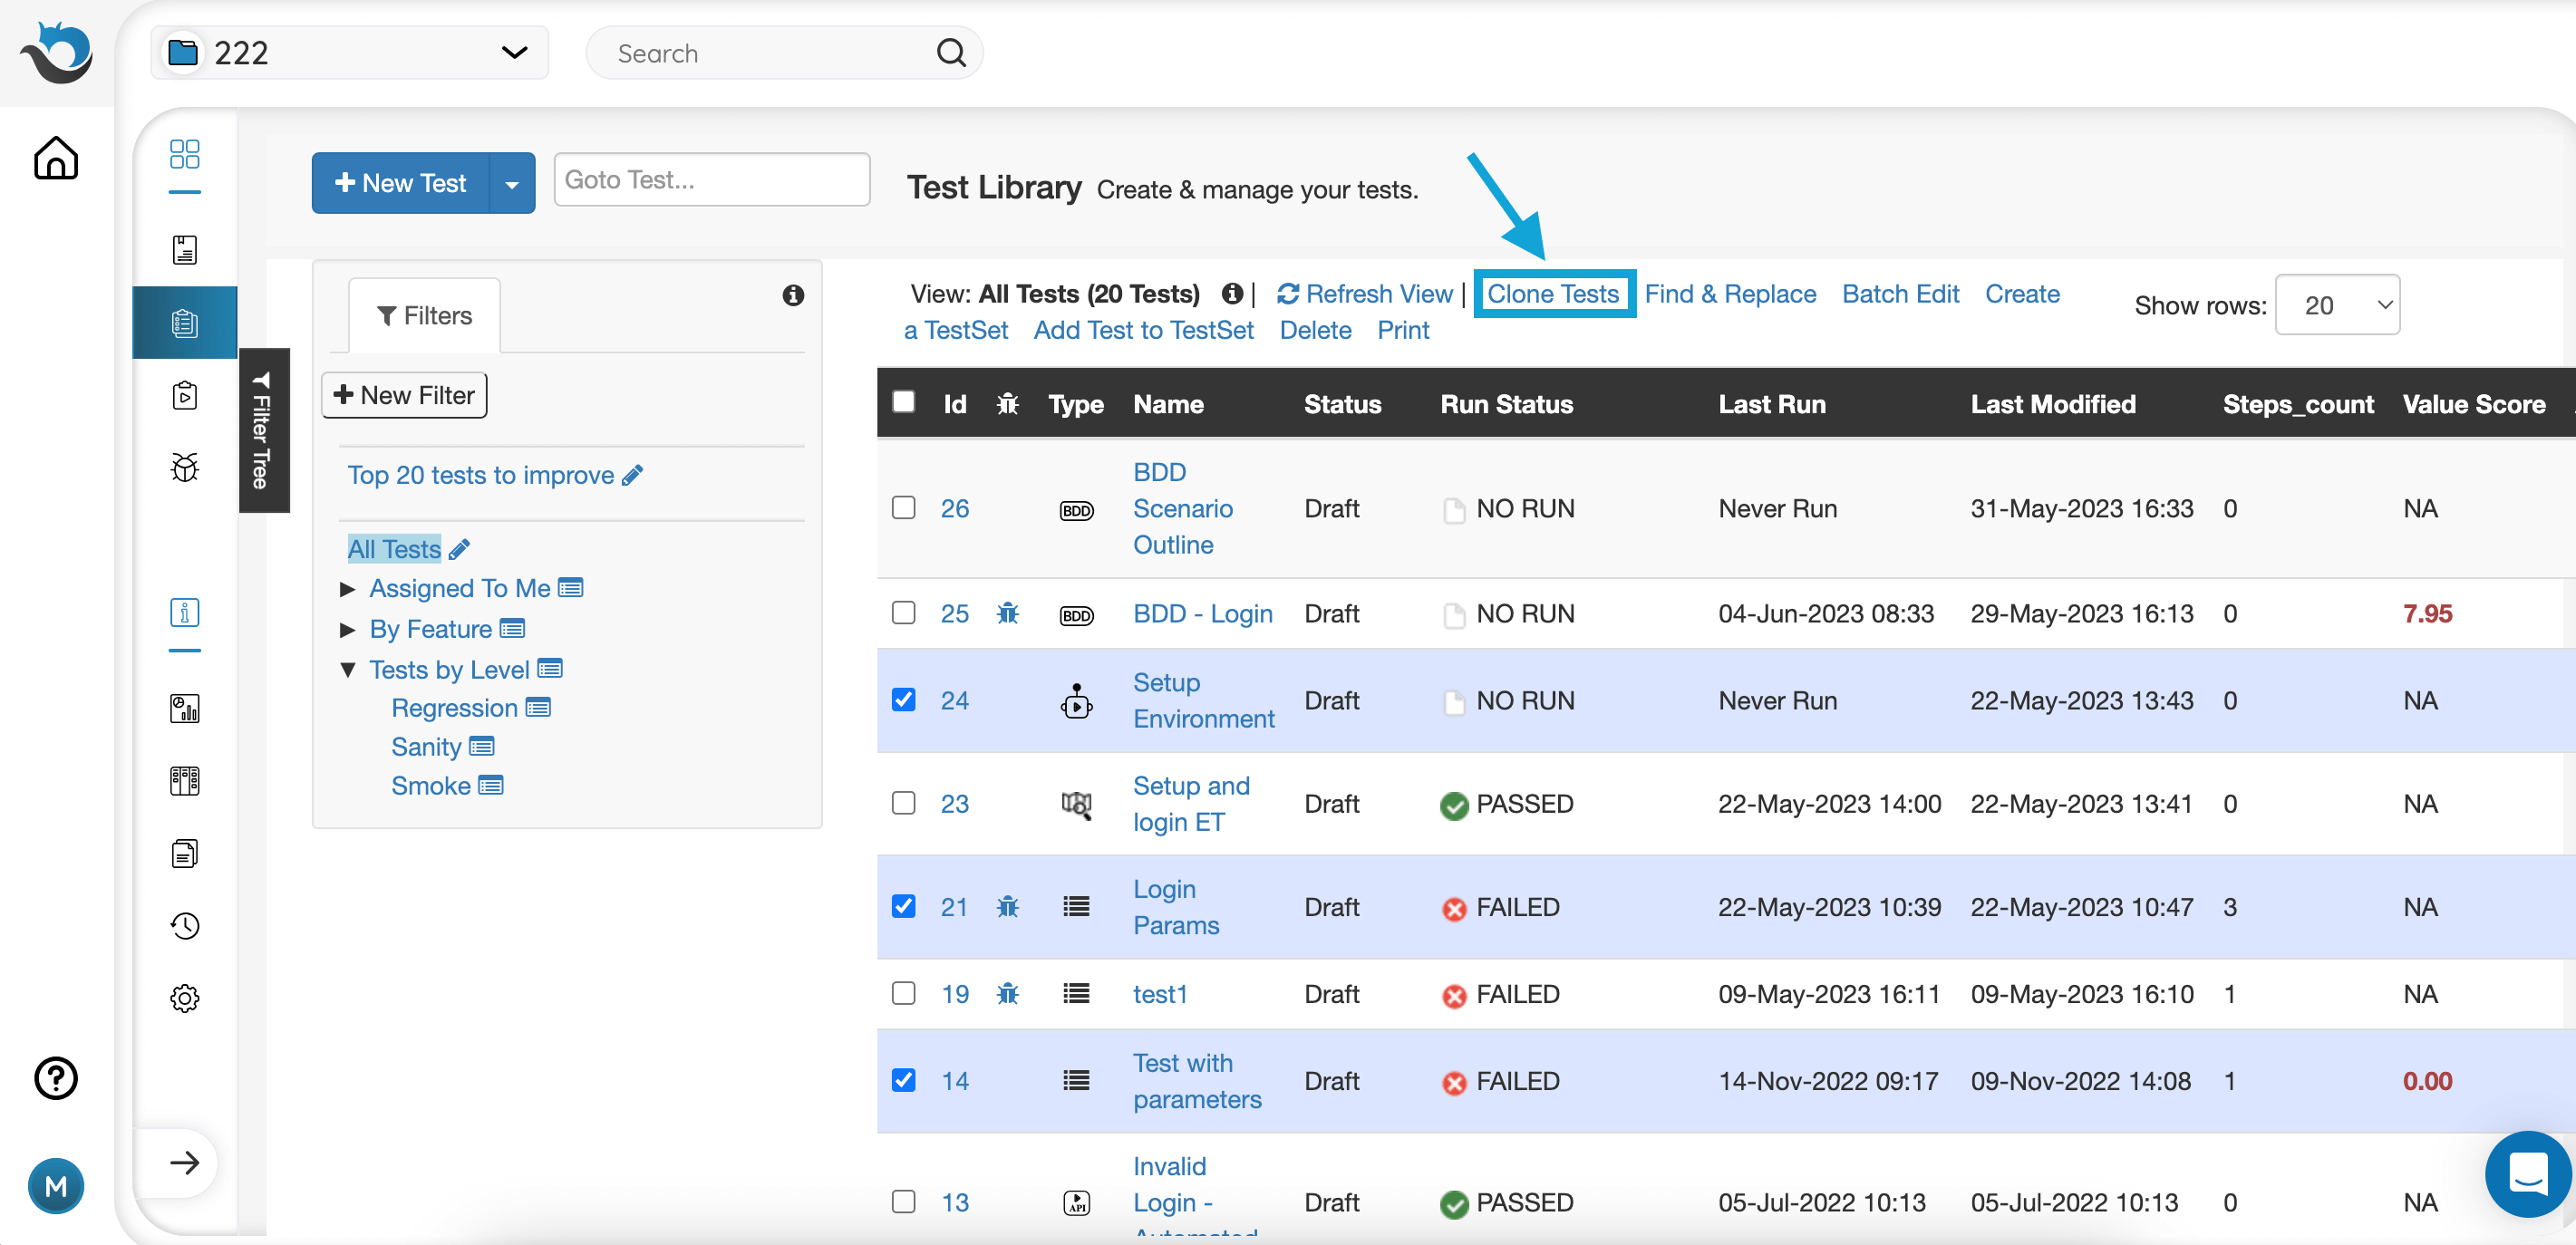
You can also perform actions from the test grid itself, such as editing, cloning,and deleting multiple tests at one time.
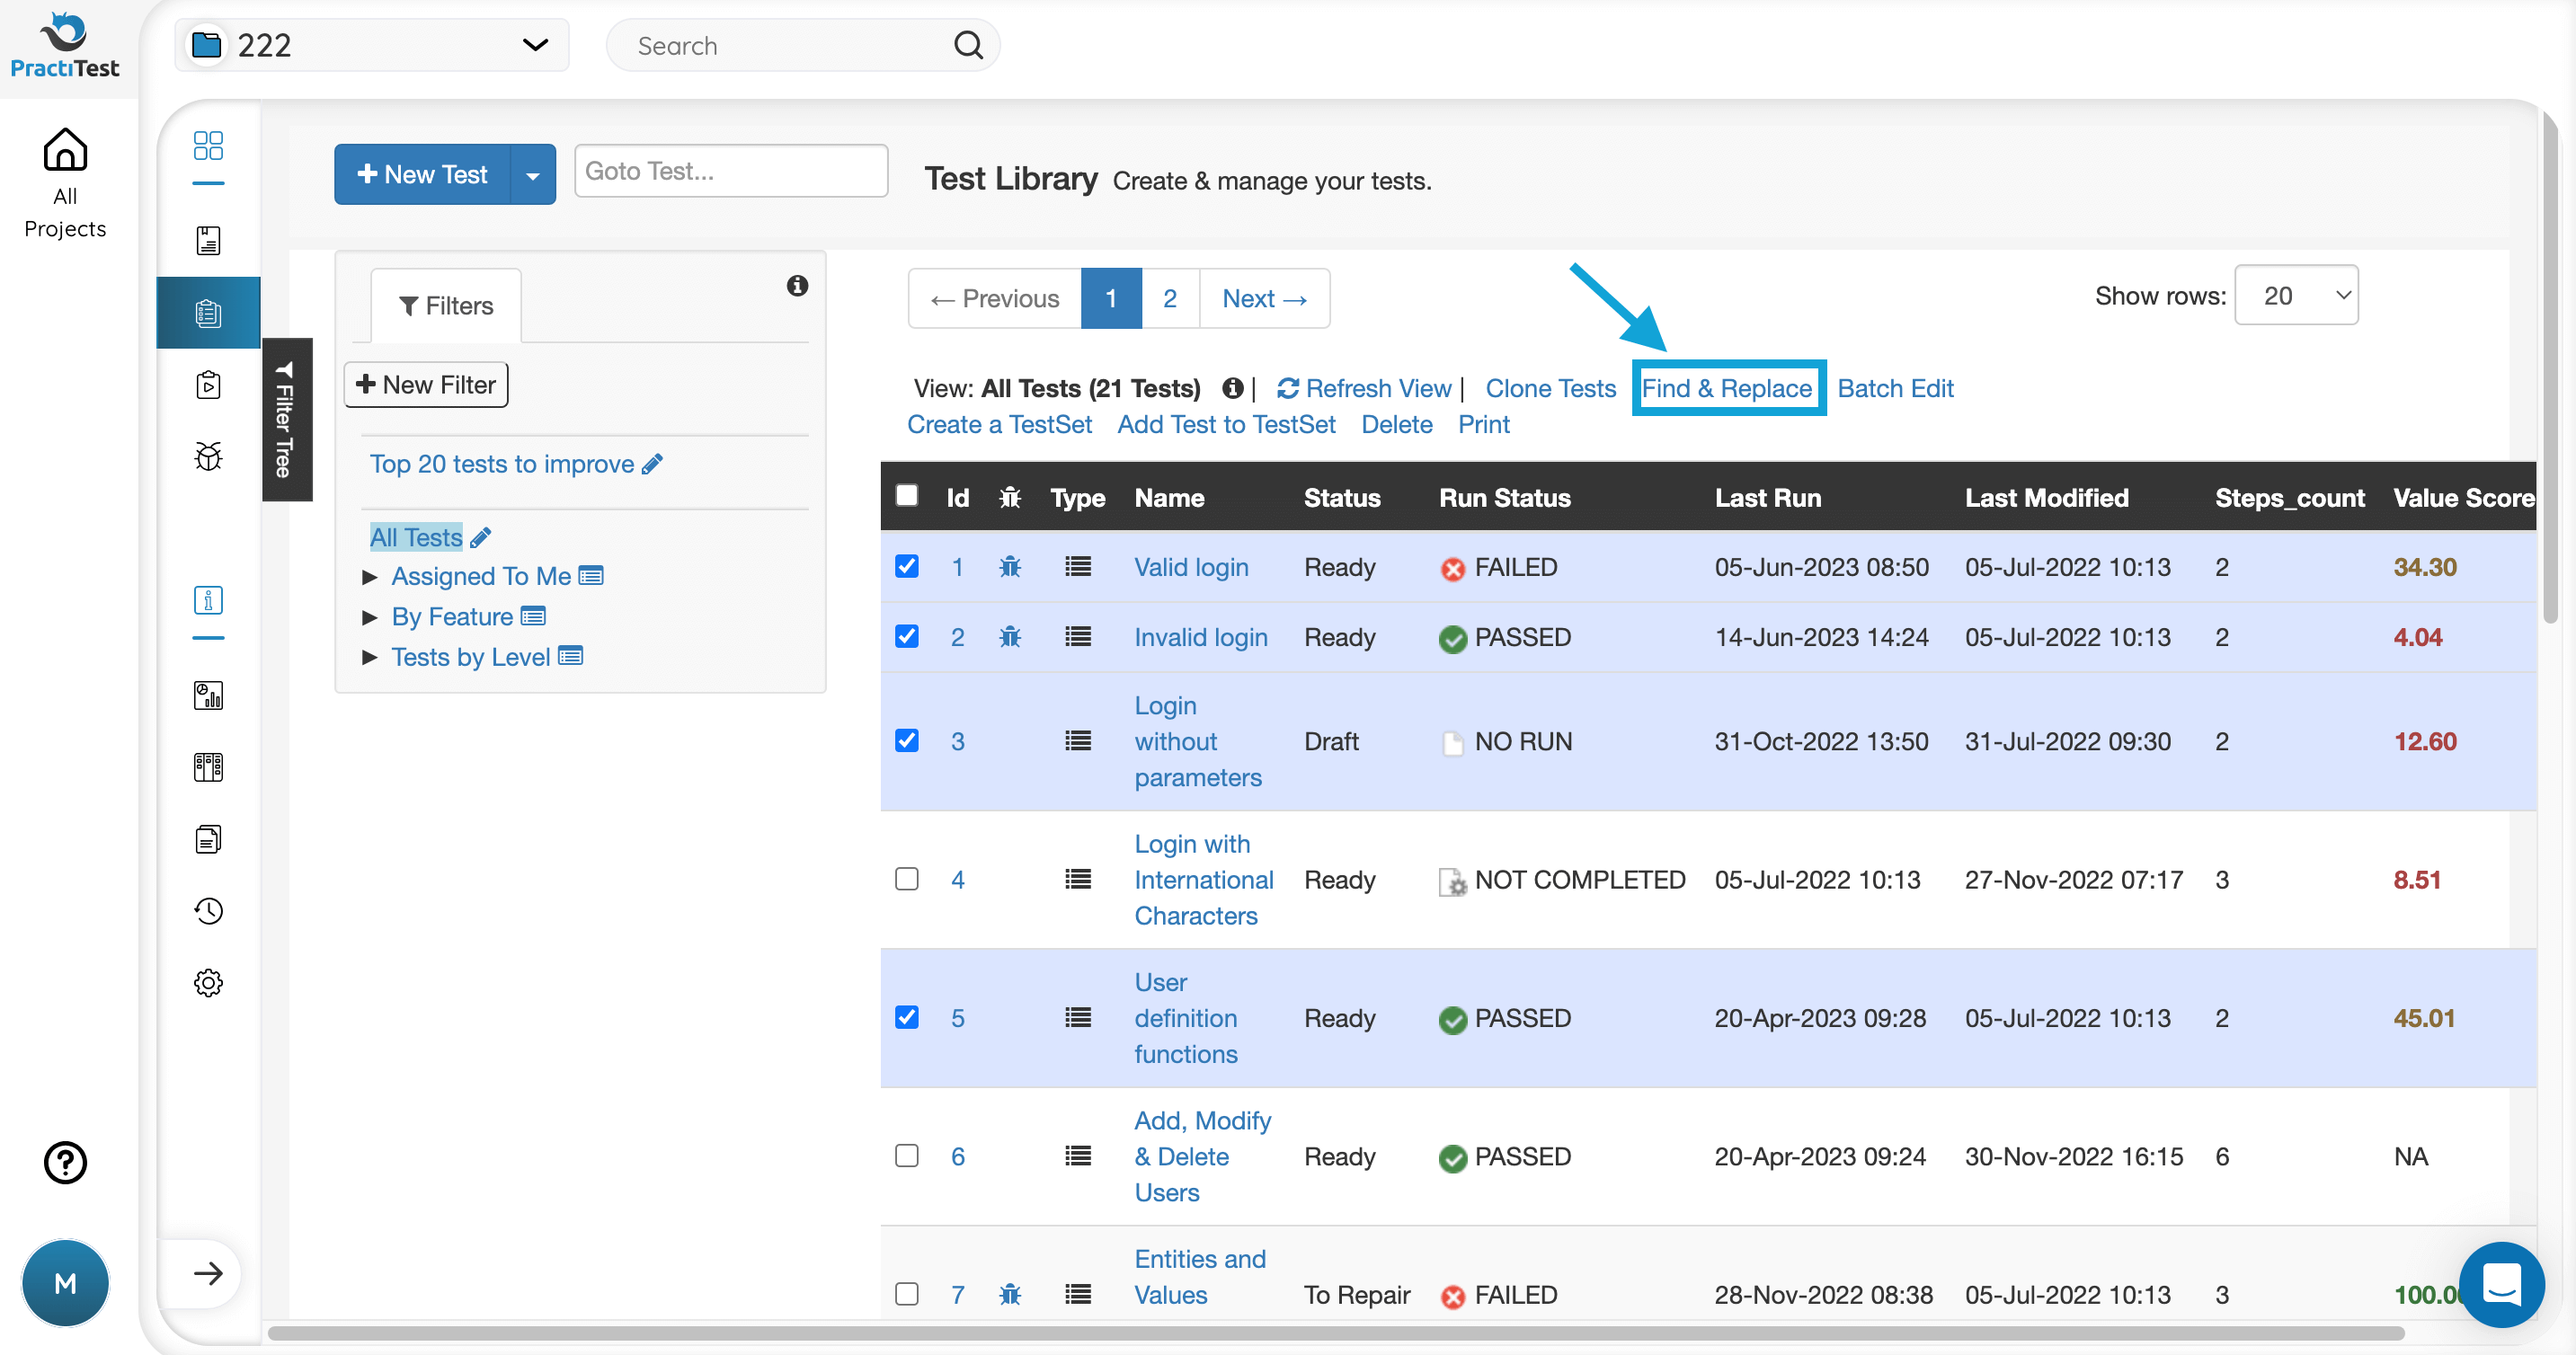
Find and Replace
To replace the same phrase in multiple entities in a single action, go to the grid, then choose the tests you want to perform the action on. Press the Find & Replace button.
Enter a phrase you want to replace in the ‘Find’ field, then enter the value you want to replace it with in the ‘Replace with’ field. Note: the ‘Find & Replace’ action is case-sensitive.
Choose the areas and fields you want to apply the search to - you can choose to replace it in all fields or select specific fields such as title fields, description fields, and so on.
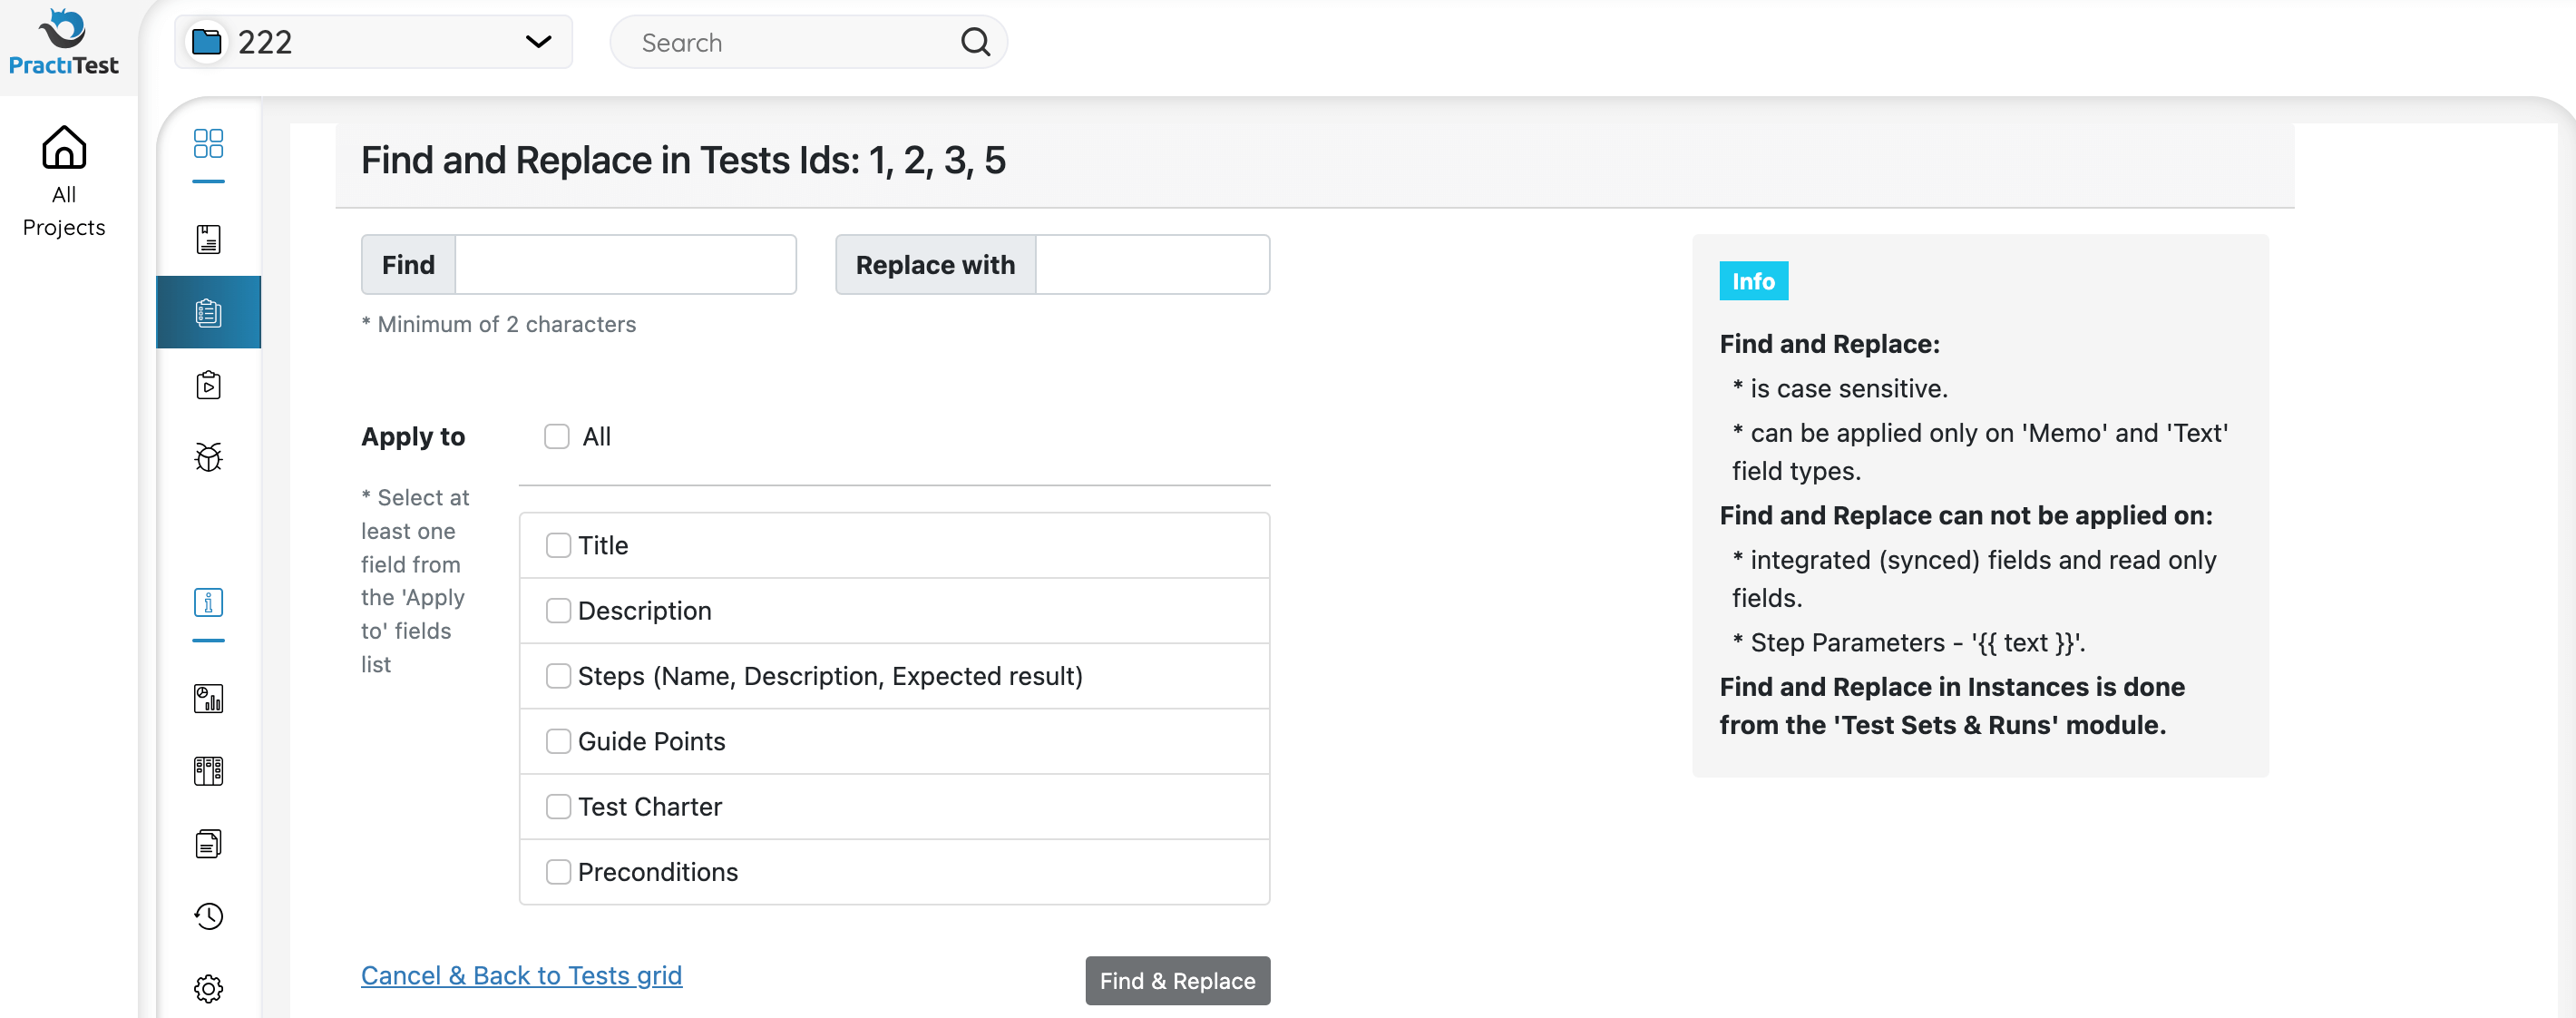
After pressing ‘Find & Replace’, you will see a message at the top of the screen confirming how many entities you are about to change. For example, if you choose 10 entities, but the word you want to replace appears only in 4, you will see 4 entities to be changed. After confirming the action, the phrase you entered will be automatically replaced.
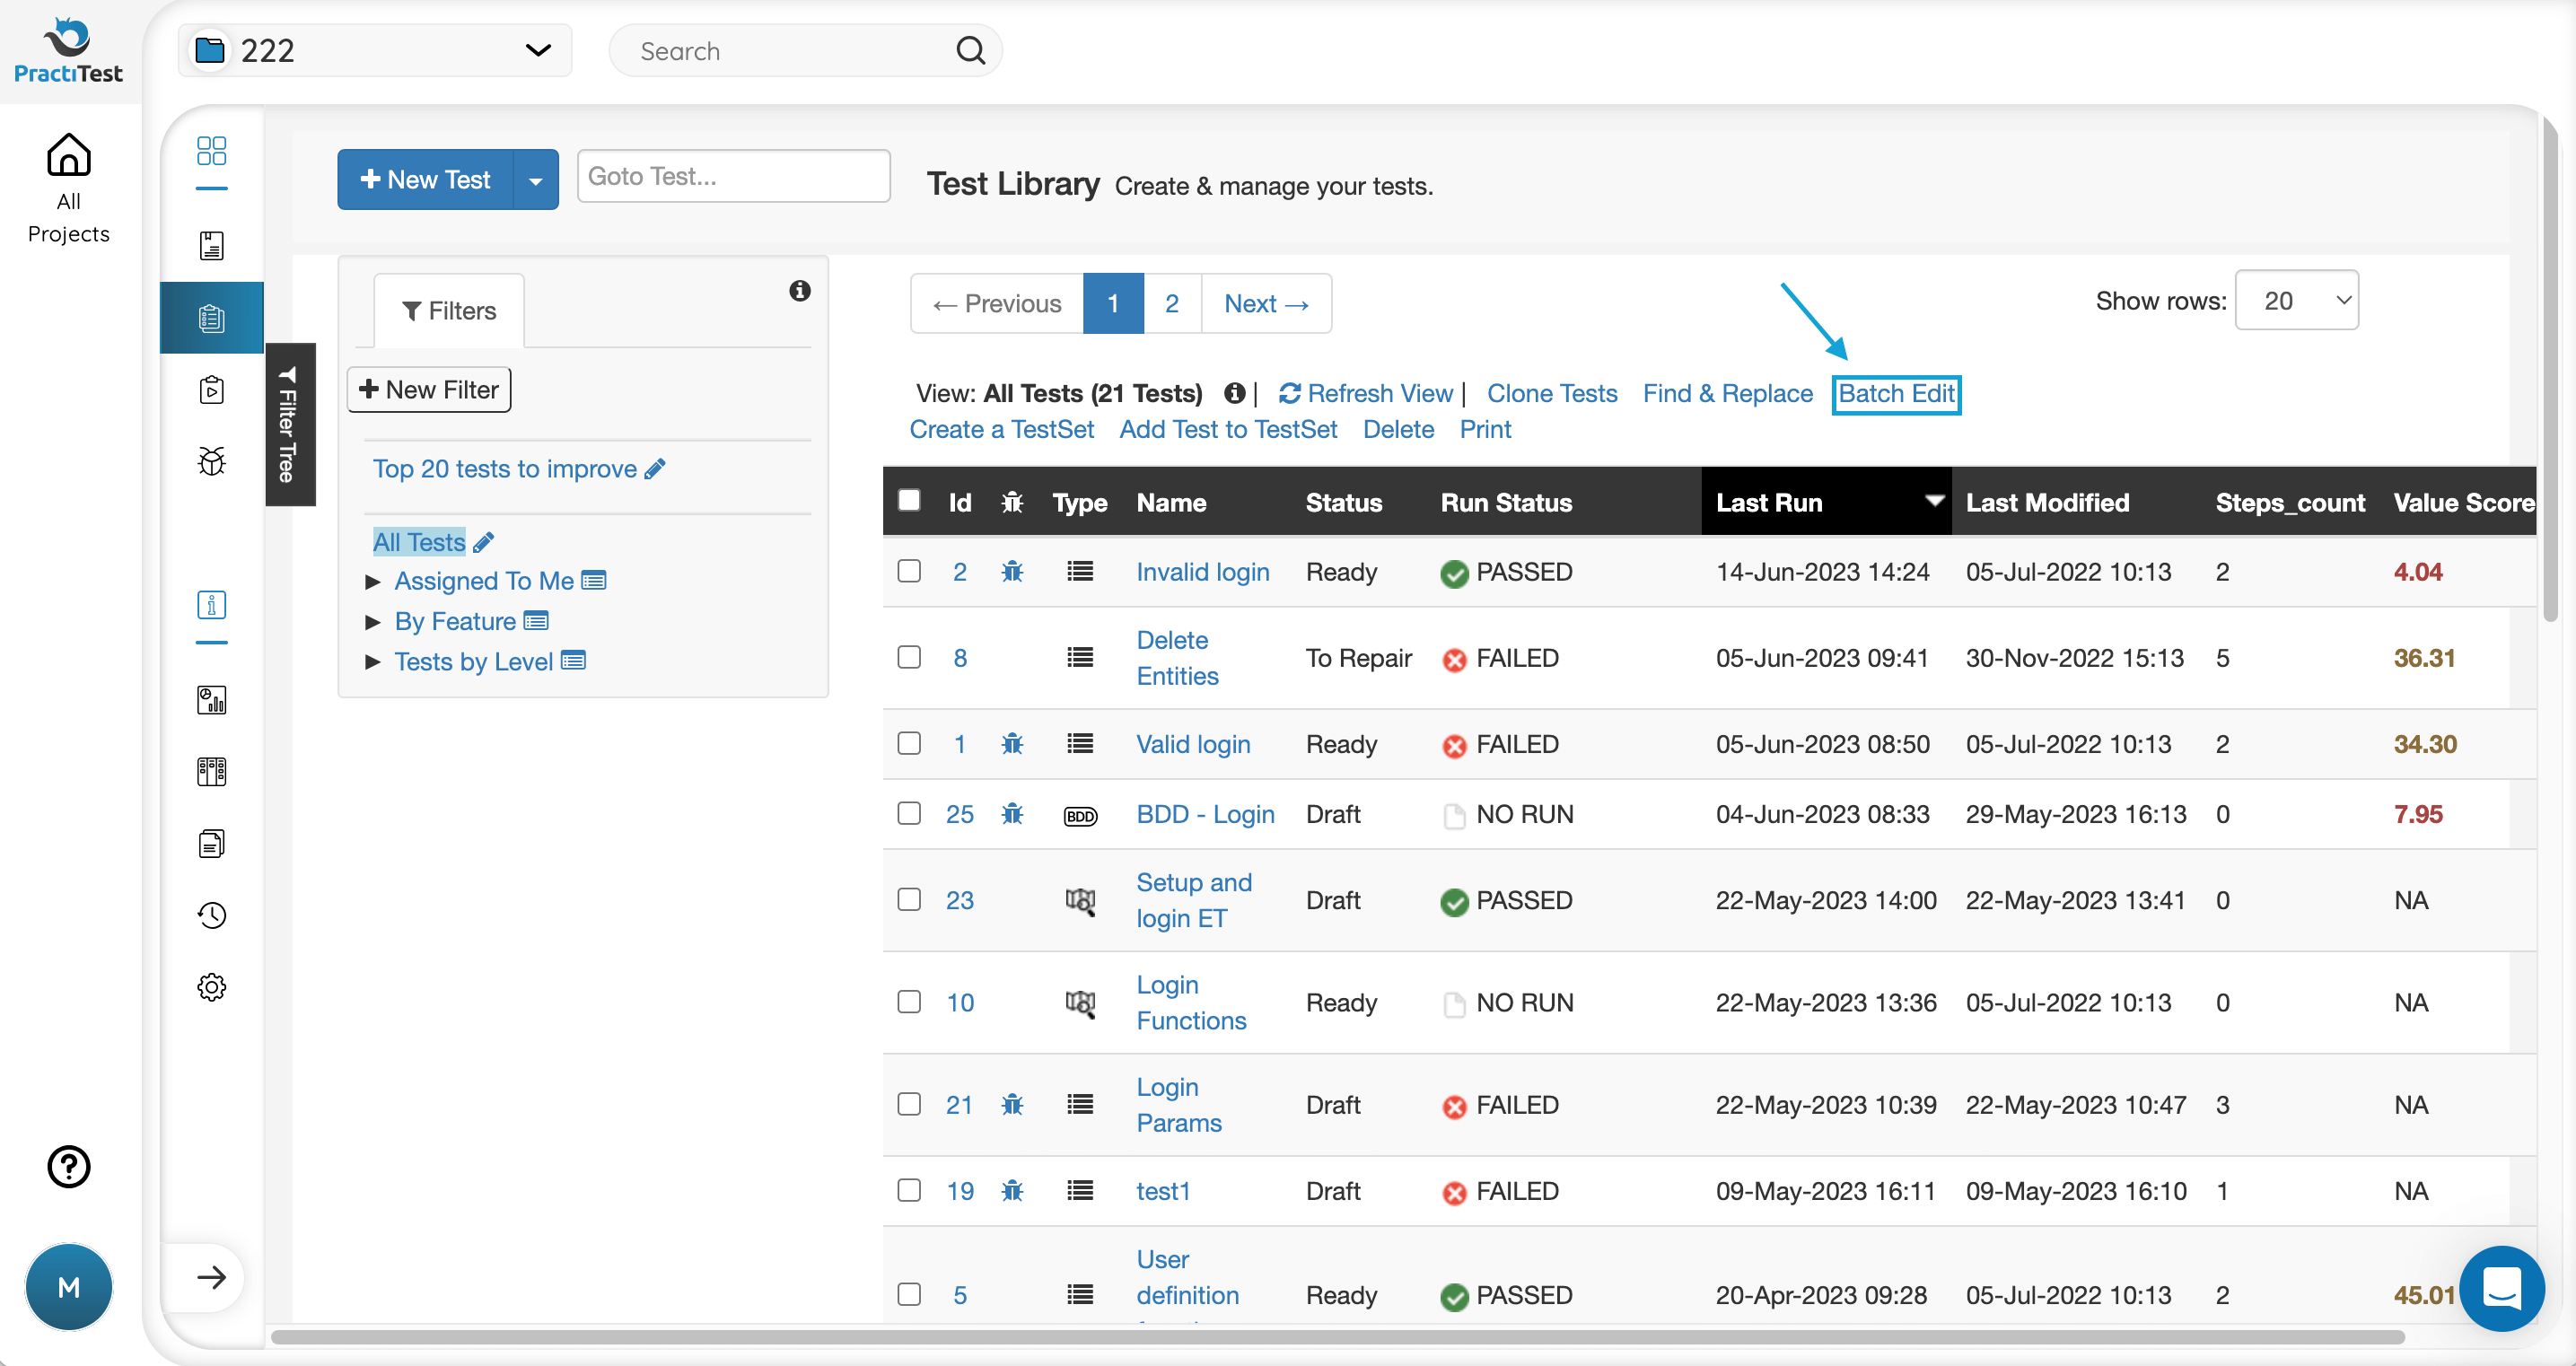
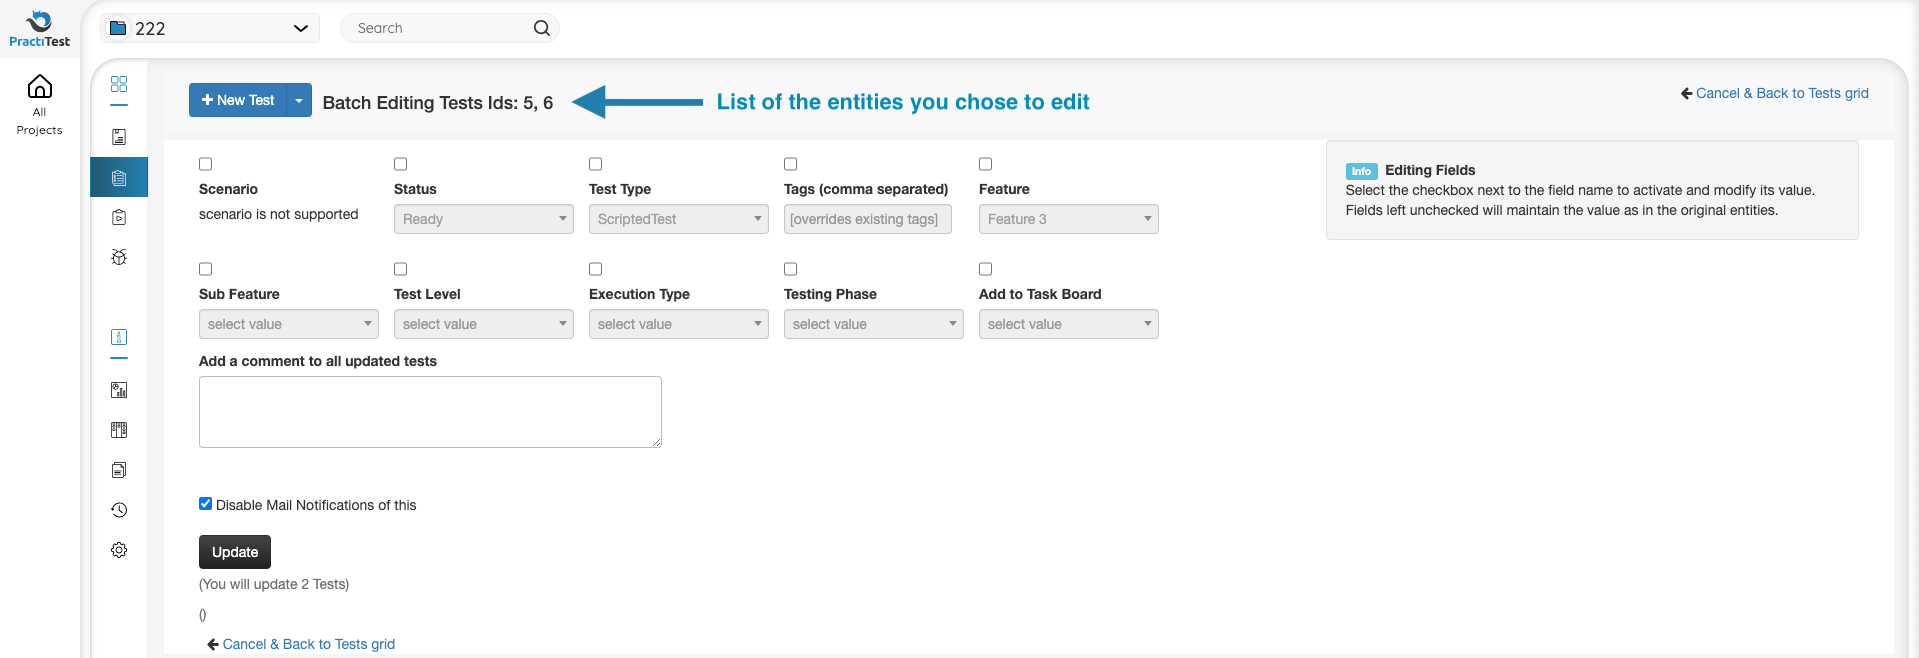
Batch Edit Fields
To edit fields of a few tests in a single action, go to the grid, then choose tests. Click the ‘Batch Edit’ button.
Choose the fields you want to edit in the selected tests, then enter the value you want them to receive. You can add a comment to the updated tests and enable / disable email notifications of this batch edit.
Batch Clone
Clone and modify one or more tests in a single action.
We recommend using the clone action only if you are changing something in the test or steps. Tests in the test library are reusable and there is no need to clone a test. To manage test runs with different parameters such as sprints or testers, we recommend adding these parameters as fields to the Test Set module. Continue using the tests in the test library without assigning them to specific executions.
In the grid, choose the tests you want to clone and click the ‘Clone’ button.
In the next window, you can modify fields, add a comment, create a new filter in the grid view, and enable / disable email notifications of this clone.
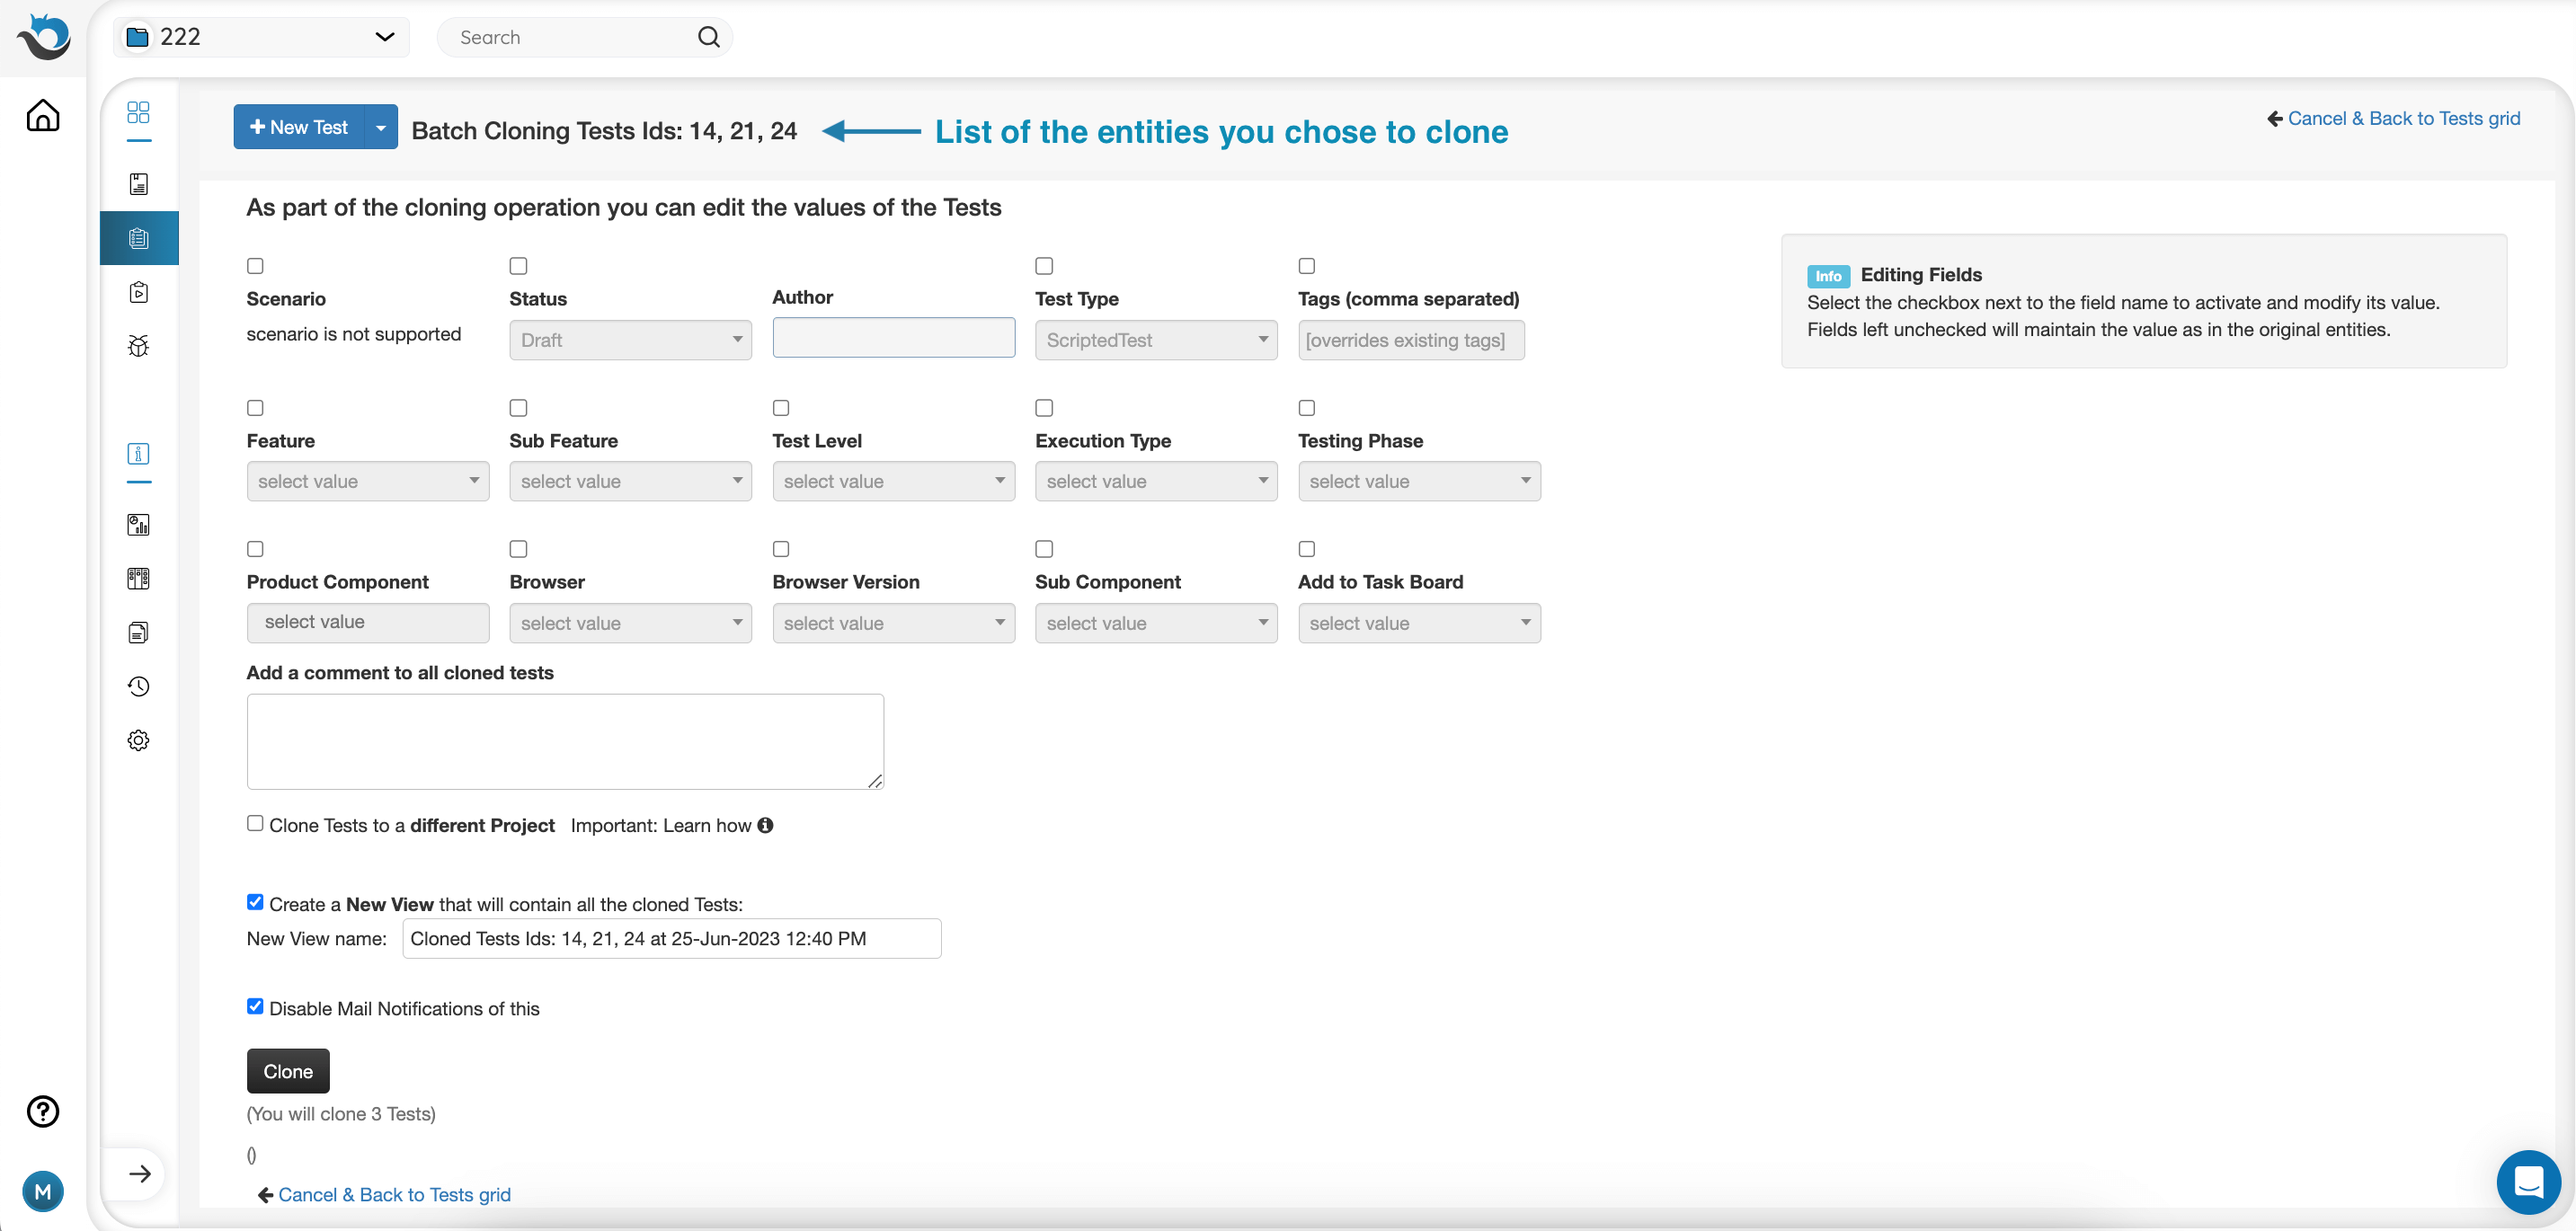
You can also clone the selected tests to a different PractiTest project. In this case, if you want to clone the values of custom fields, the target project must have the same equivalent fields with the exact names.
The Cloned Test
Under the Traceability tab in the cloned test, you will find a new section called ‘Cloning’. In this section, you will see a link to the ancestor test (the original test this test was cloned from).
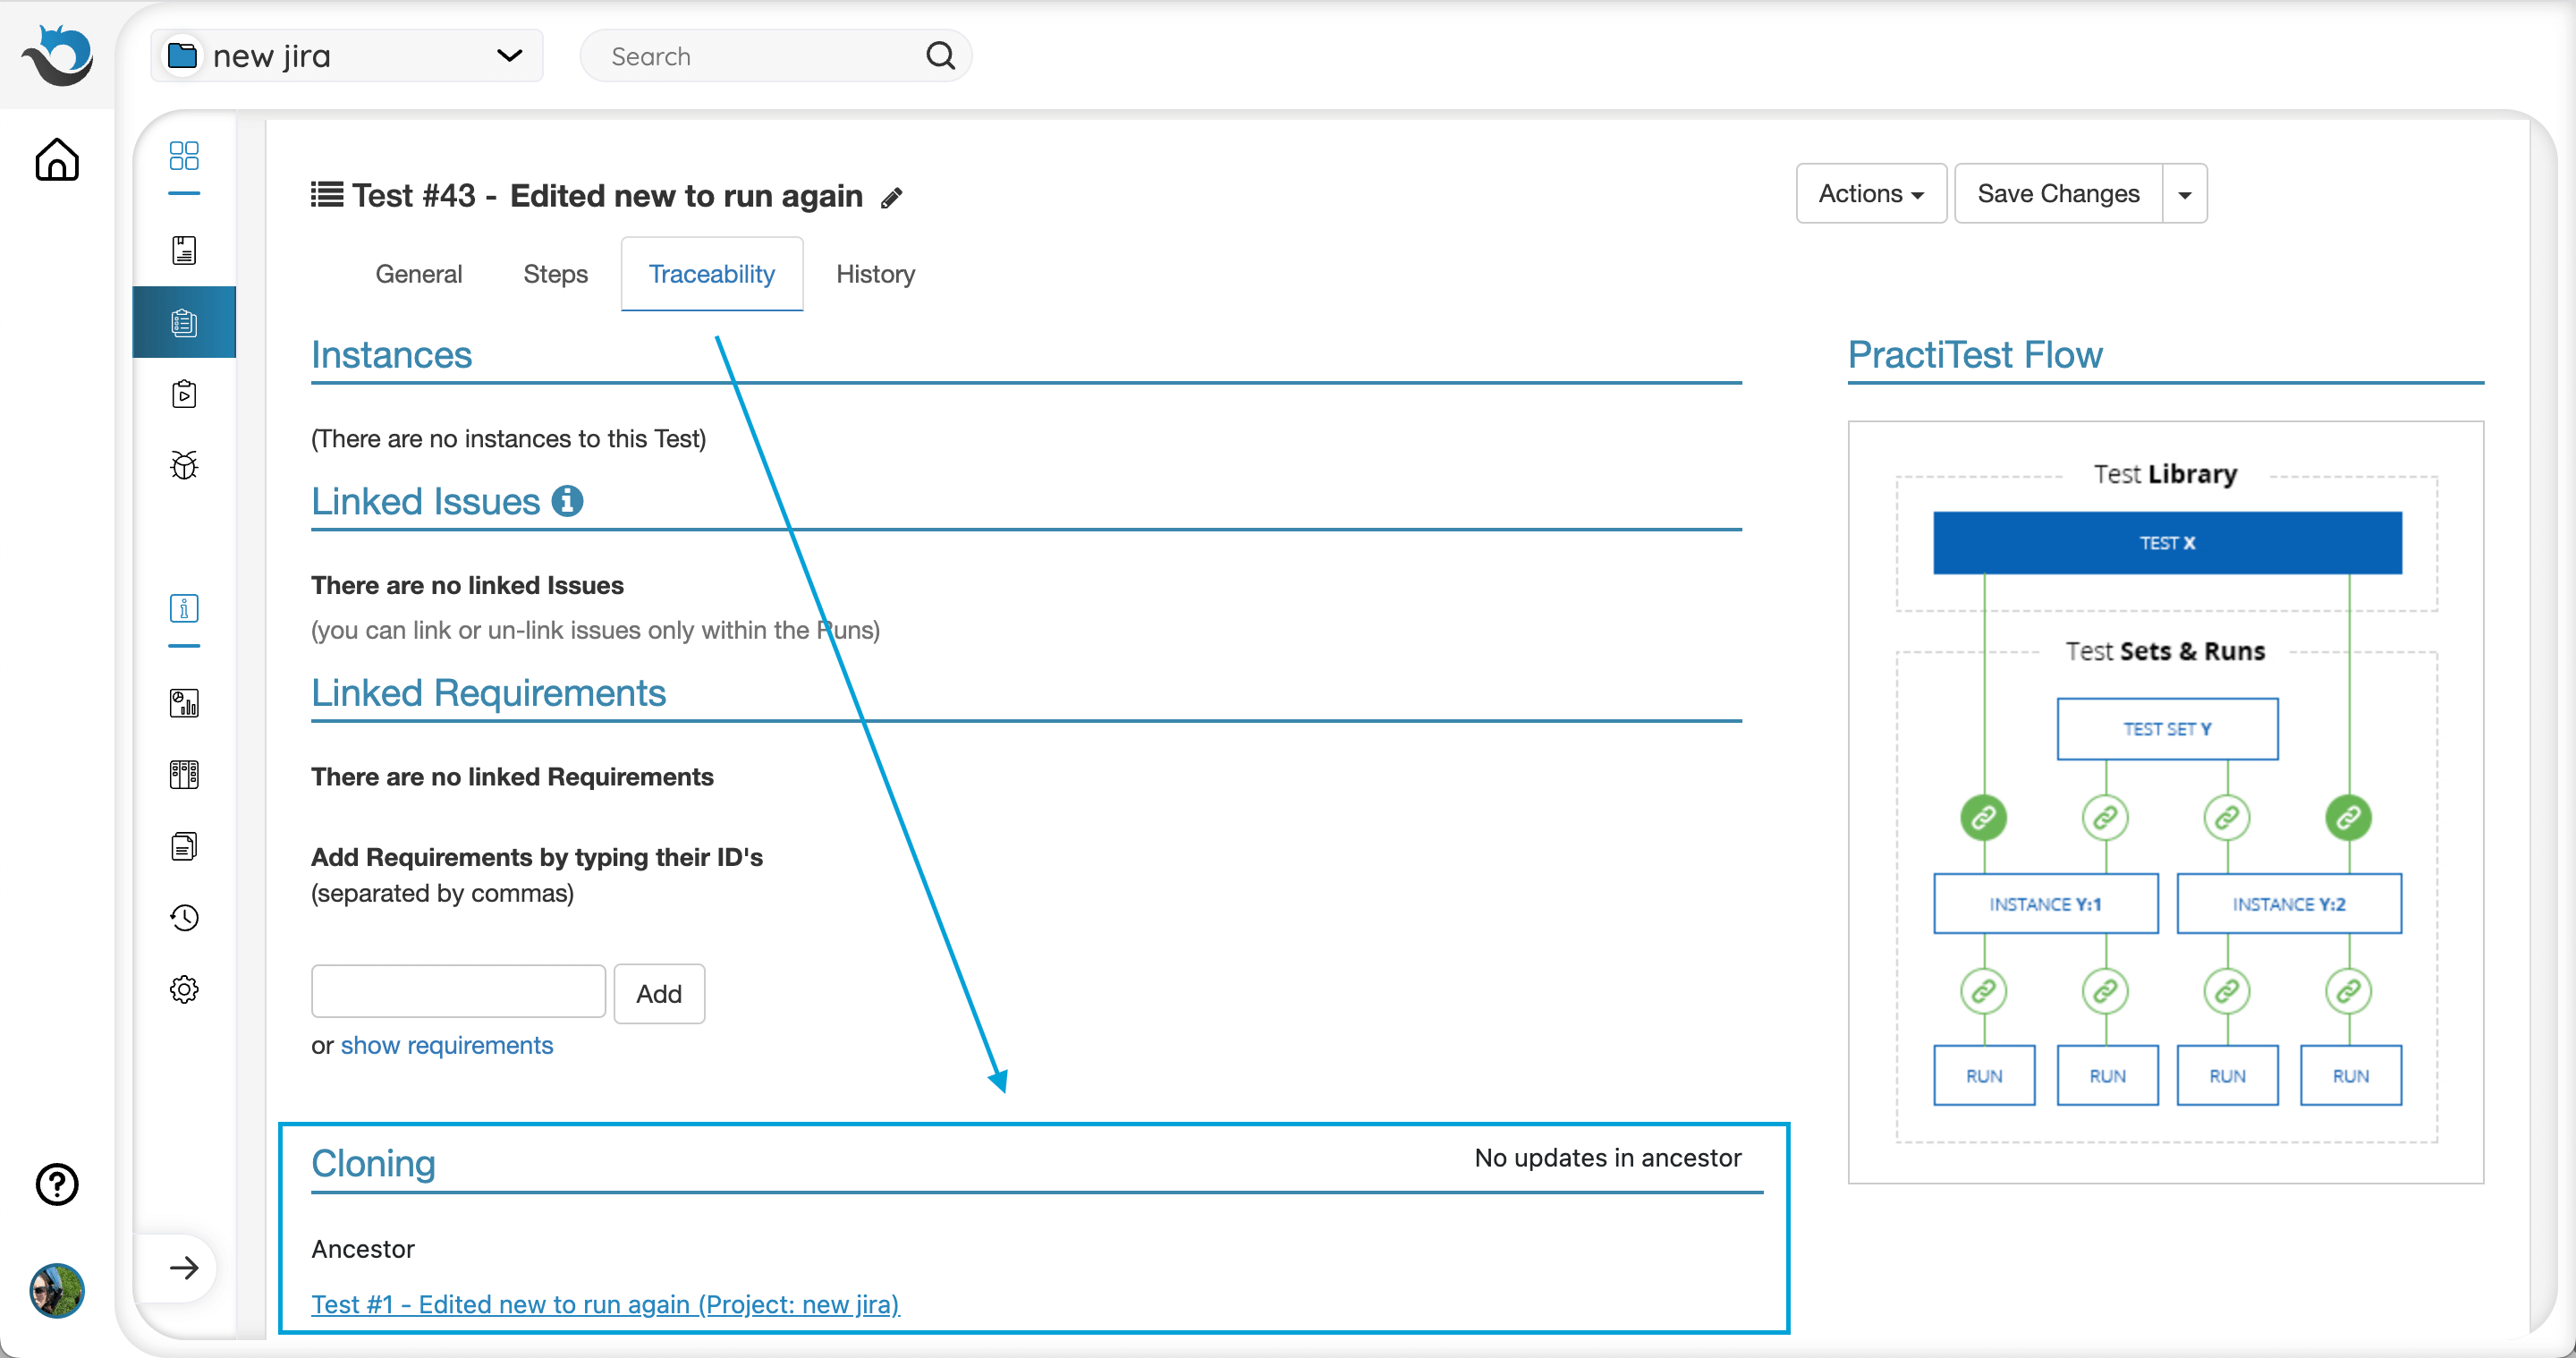
On the right side of this section, you will see a notification regarding changes made to the ancestor test. If the ancestor test hasn’t changed, you will see ‘No updates in ancestor’.

If it has changed, the text will change to ‘Updates in ancestor’ and an ‘update’ button will appear next to it. By clicking the button, the cloned test will be updated according to the changes made to the ancestor test.

The Update button is only available if you are using a Corporate/Ultimate license, and only if you have permissions to view the ancestor test and edit the cloned test.
Please note: updating the cloned test means all the data from the ancestor test, besides custom and system fields data, will overwrite the data in the cloned test. For example, if I have updated a field and the description in the cloned test, and someone updated the same field and description in the ancestor test, when I click ‘Update’ in the cloned test, the field value will remain the same, but the description will change according to the ancestor test description.
When cloning a test to a different project, the behavior will stay the same, considering the permissions of the user.
Clone Tests From One Project to Another
- In the test library, select the checkboxes for the tests you would like to clone.
- Once selected, click on the “Clone Tests” link above the grid (see example in Batch Clone section above).
- Edit the test fields by selecting the checkbox next to the field you would like to change, and then selecting the desired value. Keep in mind that this value will change for each cloned test.
- At the bottom of the page, select the “Clone tests to a different project” checkbox. This will open a dropdown menu. Choose the project where you would like the cloned tests to be saved.
- Click the “Clone” button.
Important Notes
- In order to be copied correctly, custom fields must have identical names and values in both projects. These values are also case sensitive, so please pay close attention to both uppercase and lowercase letters.
- When you create a new project based on an existing project, you can choose to clone the fields and their values. This will ensure that cloning tests between projects will transfer all the details correctly.
- When cloning a test to a different project, the cloned test will have the ‘Cloning’ section in the Traceability tab like the regular cloned tests, considering the permissions of the user.
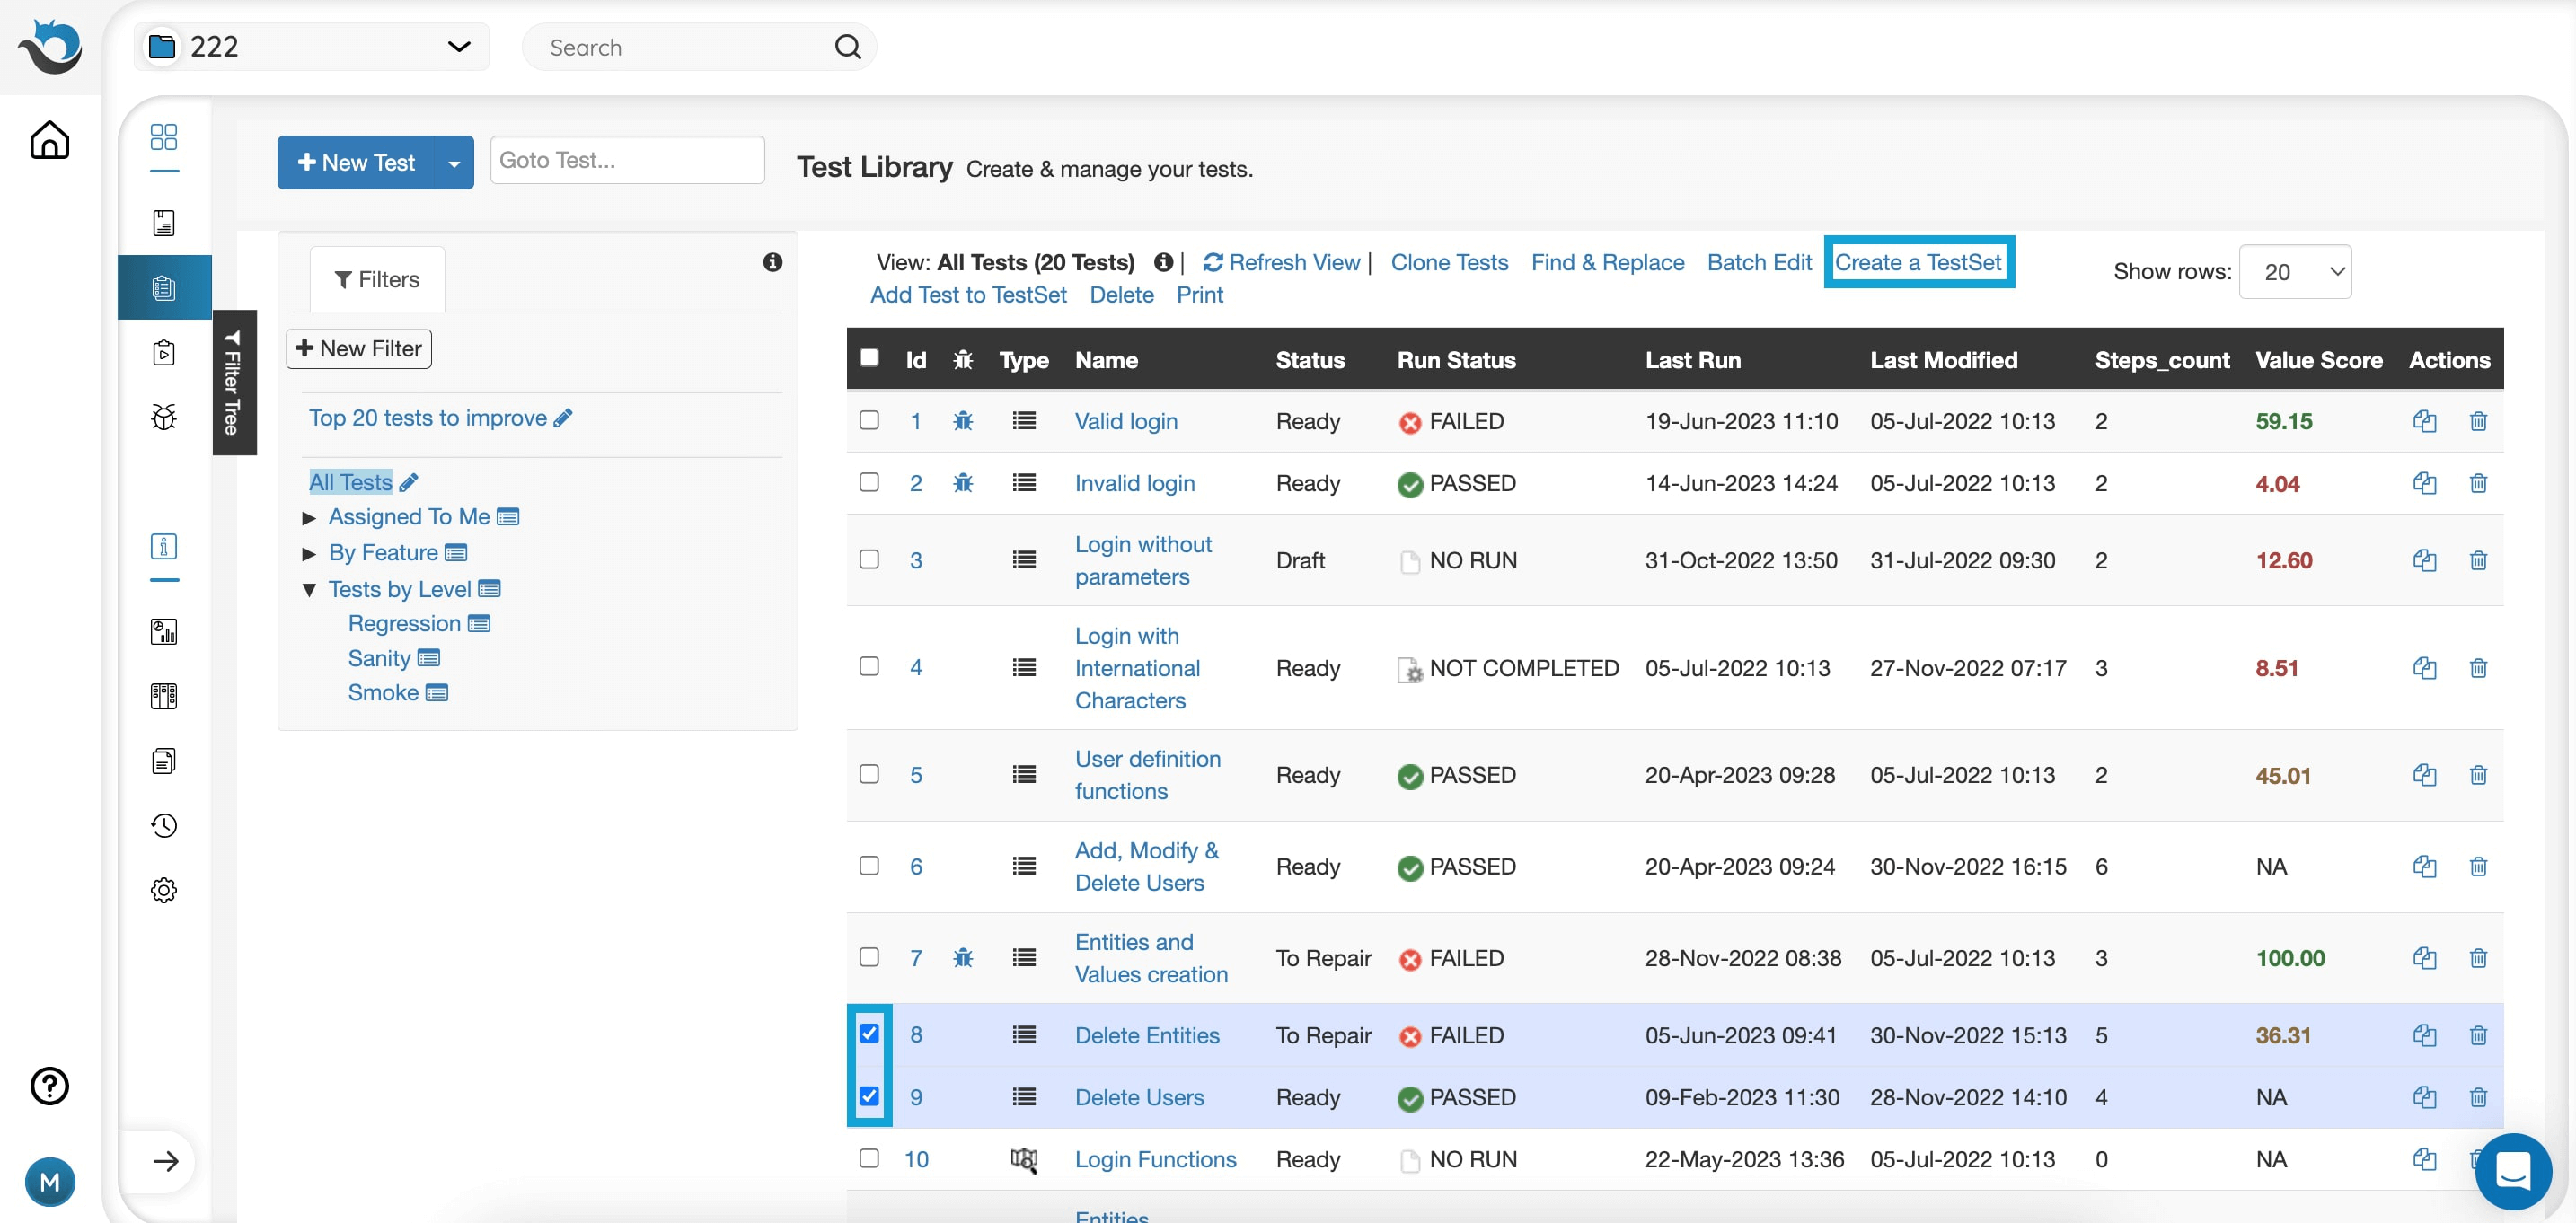
Create Test Sets Directly From the Test Library
Test Sets can be created directly from the test library. Simply select the tests you want to group together in a Test Set, then click on ‘Create a Test Set’.
Add Tests to Existing Test Sets
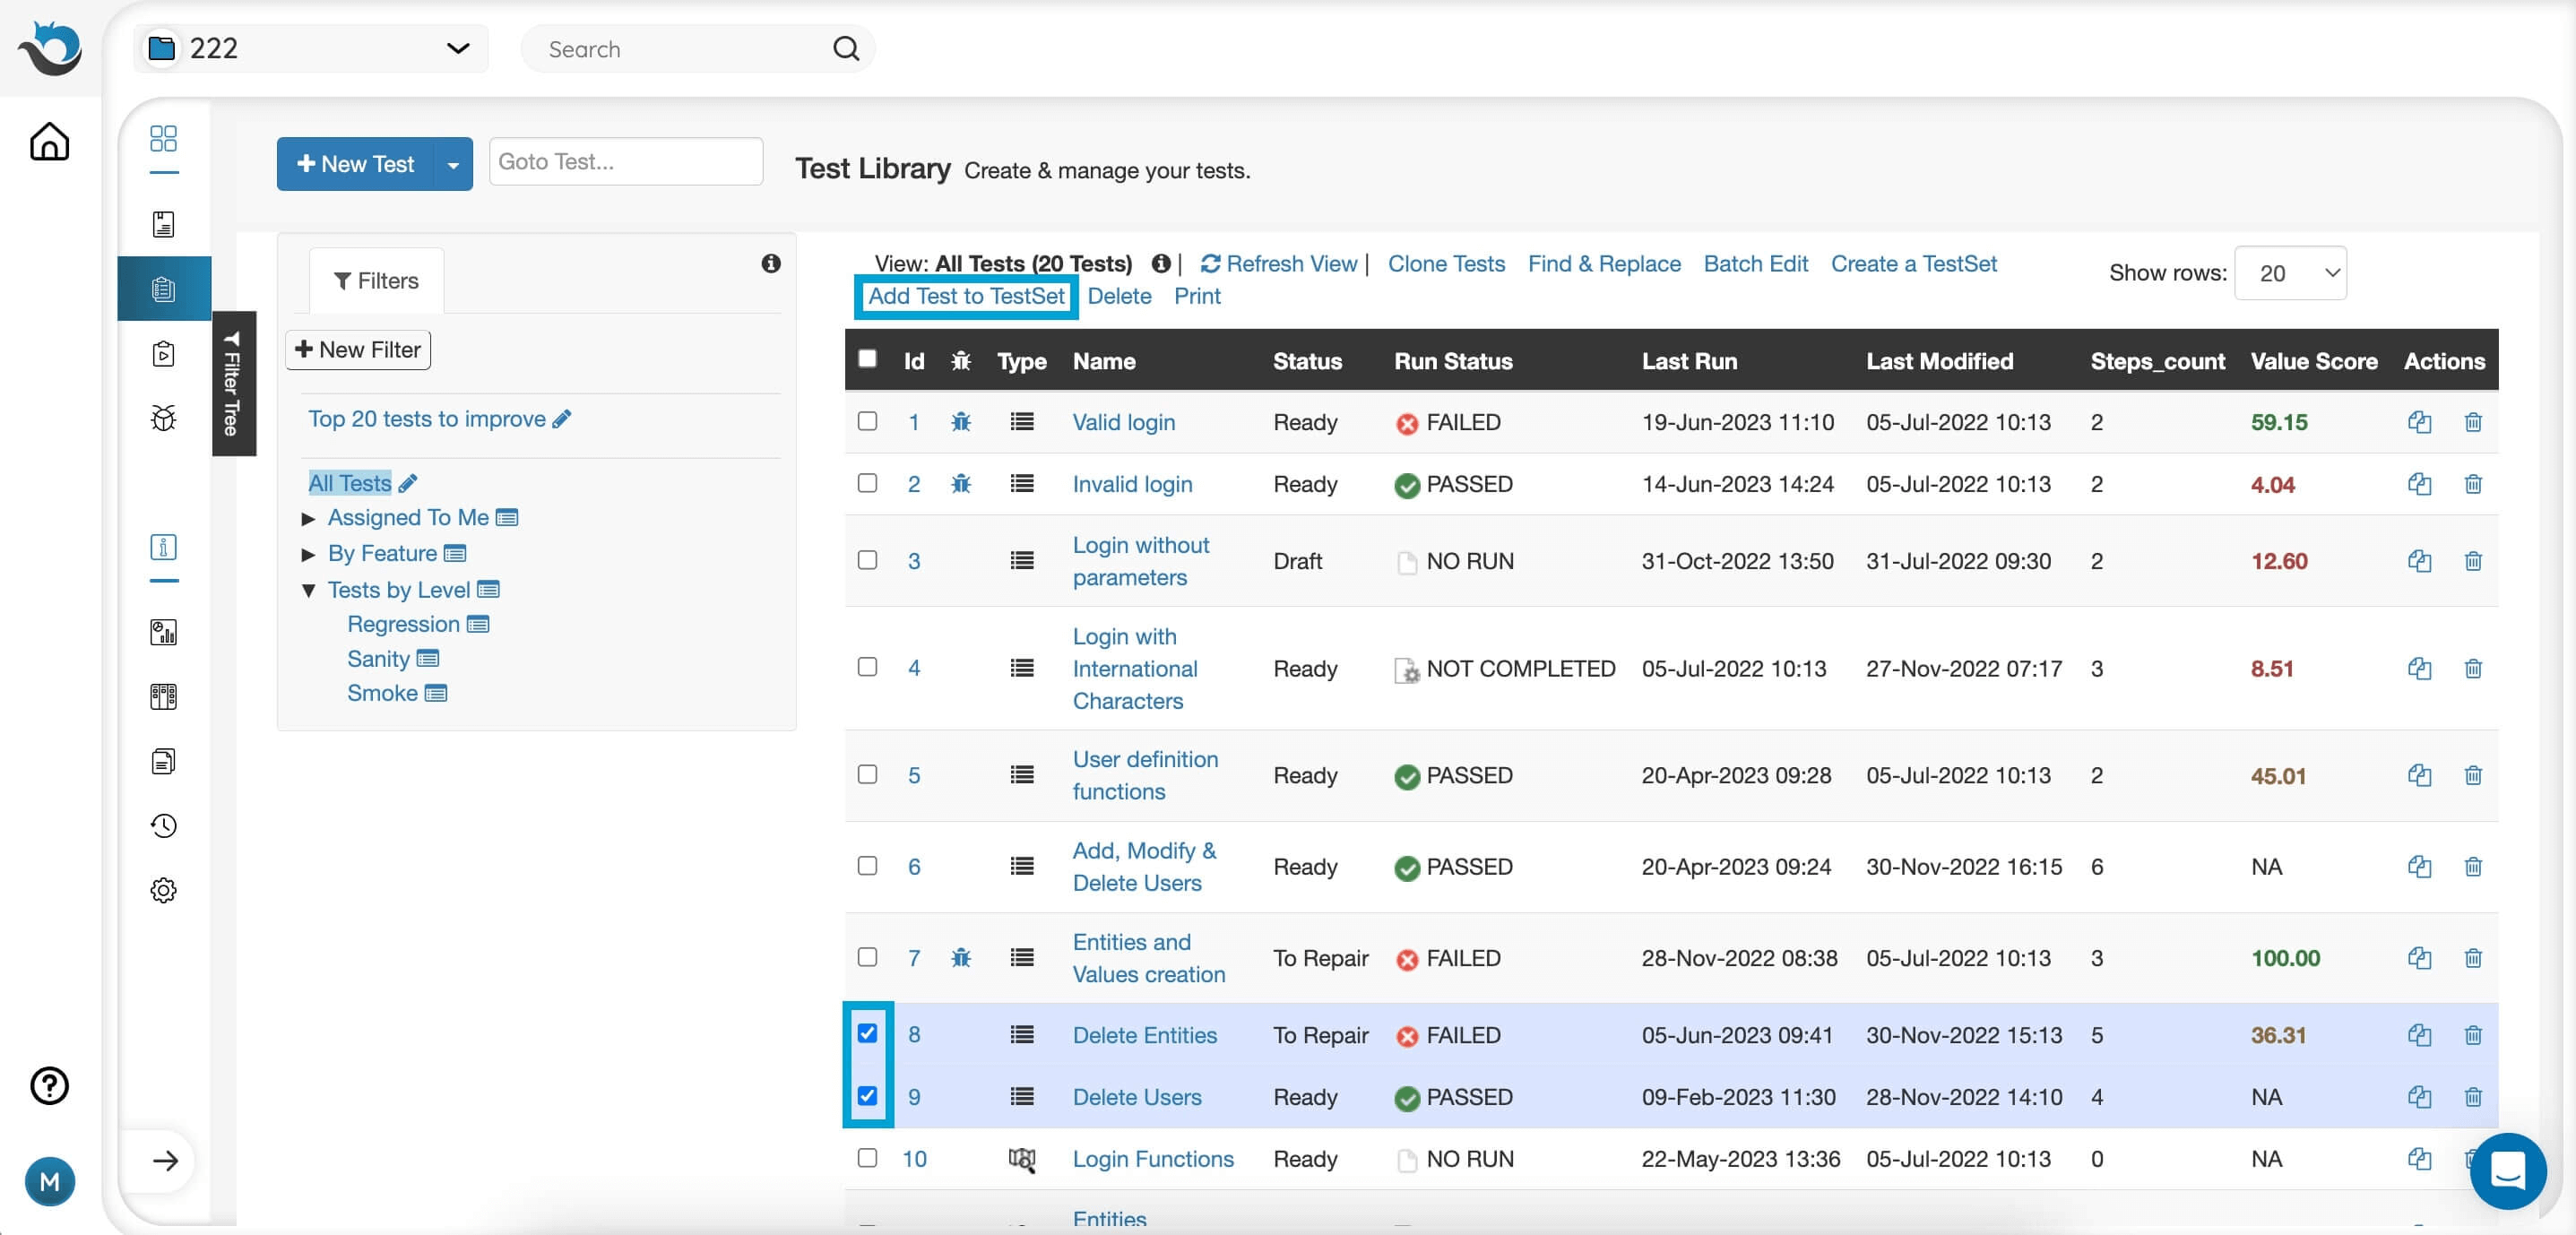
Adding tests to existing Test Sets can be done both from the test library and the Test Sets & Runs module.
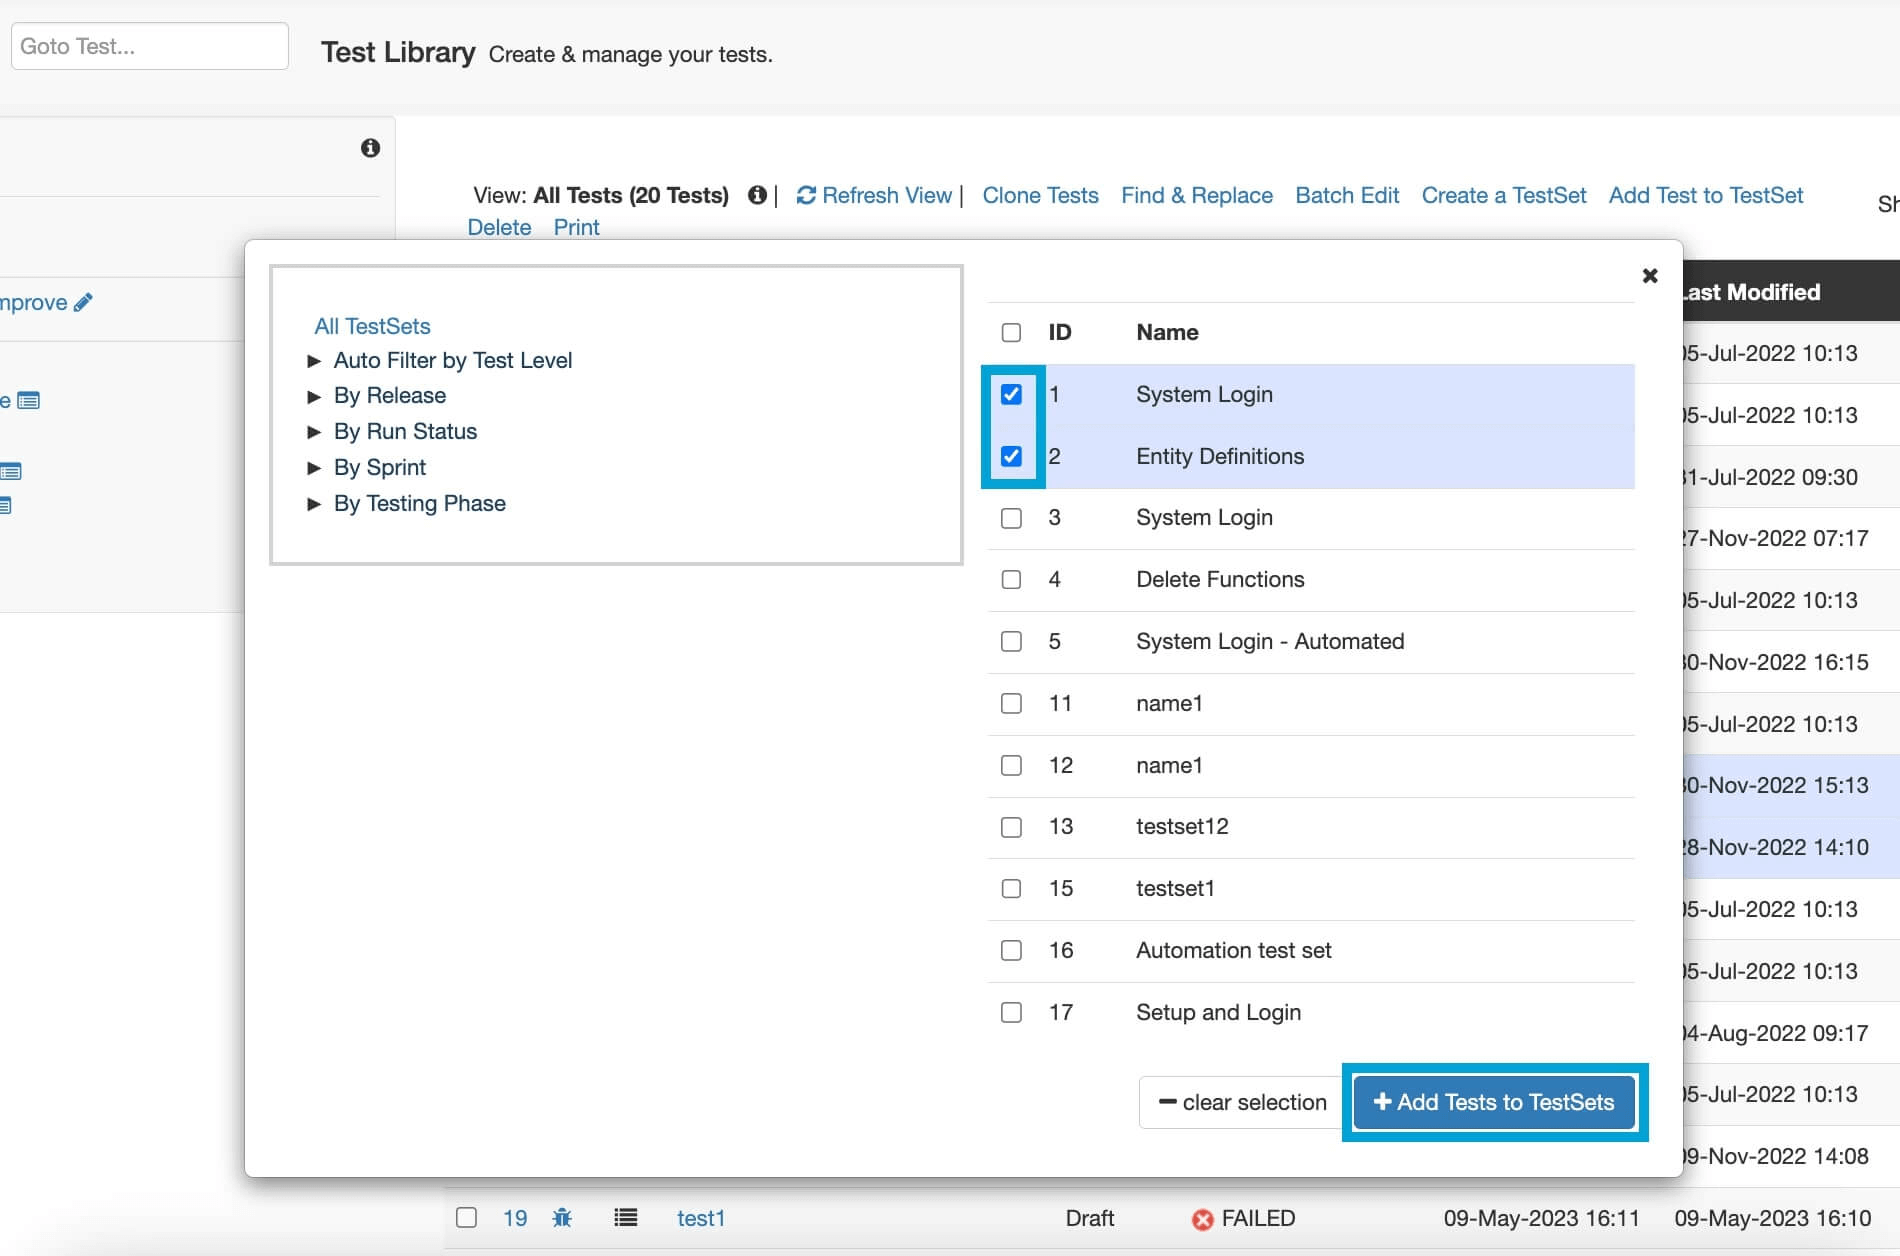
To add tests to existing Test Sets from the test library, select the tests, then click ‘Add Test to Test Set’.
A new screen will appear, containing the different filters from the Test Sets & Runs module. Select the Test Sets you want to add the tests to, then click ‘Add Tests to Test Sets’.